Introduction
Thank you very much for choosing our theme. We truly appreciate and really hope that you'll enjoy our theme!If you like this theme, Please support us by rating us 5 stars (How to rate?)
Claue - The best WooCommerce theme for online fashion store, personal blog.... It comes with a lot of great features that would take you months to develop. It is fully responsive, it looks stunning on all types of screens and devices. Including easy to set up for MailChimp, Contact Form 7, Instagram, Lookbook, WooCommerce Email Transaction and Product Colour Swatch, Product Colours Swatch Gallery Images, Product Video Thumbnail, Instagram Shop, Product Bundle,...
Theme features
- Responsive Design
- Retina Ready
- Sticky Header
- Header Layout Options
- Footer Layout Option
- WooCommerce Ready
- WooCommerce Product Color Swatch
- WooCommerce Product Color Swatch Gallery Images
- WooCommerce Product Images Swatch
- WooCommerce Product Video Thumbnail
- Product List Color Attribute Filter
- Product List Brand Filter
- Product List Isotope Categories Filter
- Product List Masonry Layout with Lazy Load or Infinite Scroll
- Quick View Product
- WooCommerce Product Custom Tab
- LookBook Plugin
- WooCommerce email transaction preview
- Ajax Add to Cart
- Product's Badge (New, Sale, Sold Out)
- WooCommerce Newsletter Popup integrate with MailChimp
- Social Icons for WooCommerce email transaction.
- WooCommerce Product Cloud Zoom.
- Blog Page Layout Option
- Portfolio Page Layout Option
- Menu's Badge
- Product Ajax Search Suggestion
- Product Bundle
- Frequently Bought Together
- Instagram Shop
- FontAwesome Icons
- WPML Support
- One click to import demo.
- Visual Composer Page Builder(save $34)
- MailChimp For WordPress
- YITH WooCommerce Newsletter Popup
- Contact Form 7
- Meta Slider
- YITH WooCommerce Wishlist
- YITH WooCommerce Ajax Product Filter
- YIKES Custom Product Tabs for WooCommerce
Credits
- Icons used in the theme: http://fortawesome.github.io/Font-Awesome/
- Mockup iPhone & iPad free include PSD: http://pixeden.com
Image Sources
- https://stocksnap.io
- https://stockphotos.io
- http://free-photos.gatag.net
- https://pixabay.com/
- Product's images: http://www.asos.com/
- google.com
Note: All images are just used for Preview Purpose Only. They are not part of the theme and NOT included in the final purchase files.
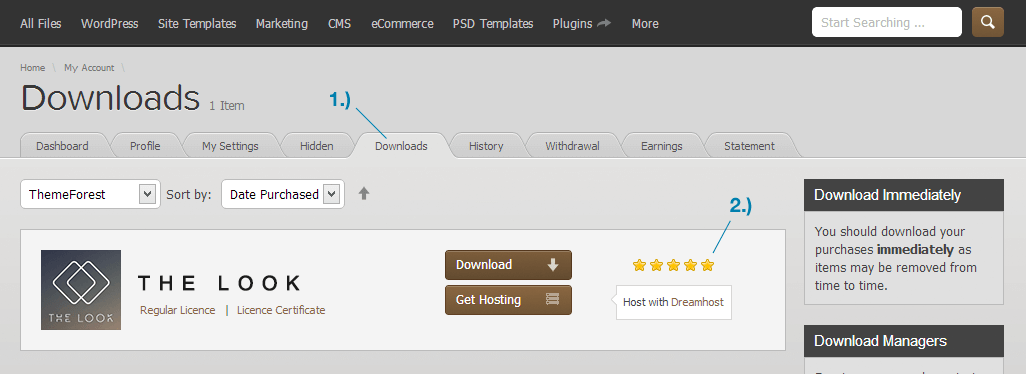
Need Support?
If you have any questions regarding to theme issues, please submit a ticket at http://support.janstudio.netTheme Installation
Once you purchase the theme from themeforest, you'll be able to load 2 file type.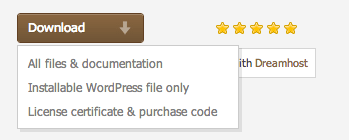
- All Files and documentation
- Installable Wordpress Theme File
Install theme via Wordpress Dashboard
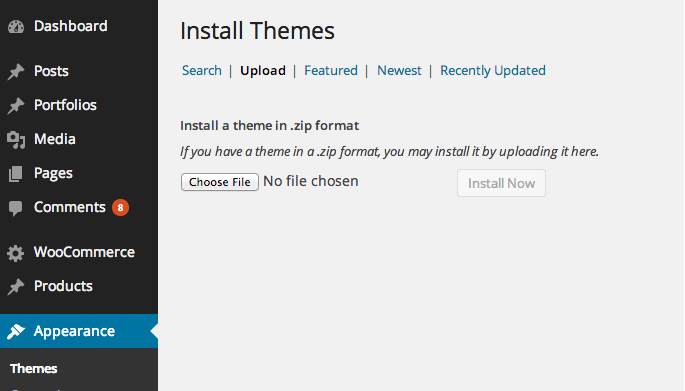
- Go to 'Appearance > Theme' section
- Click 'Add New' and select the 'Upload' option
- Upload the zip file
- All Done :)
Install theme via FTP
- Access to the file on your server using ftp editor program
- Go to 'wp-content/themes' folder
- Extract the zip file and put the themename-vxx_xx folder there
- Go to 'Wordpress Dashboard > Appearance > Theme' section to activate the theme
- All Done :)
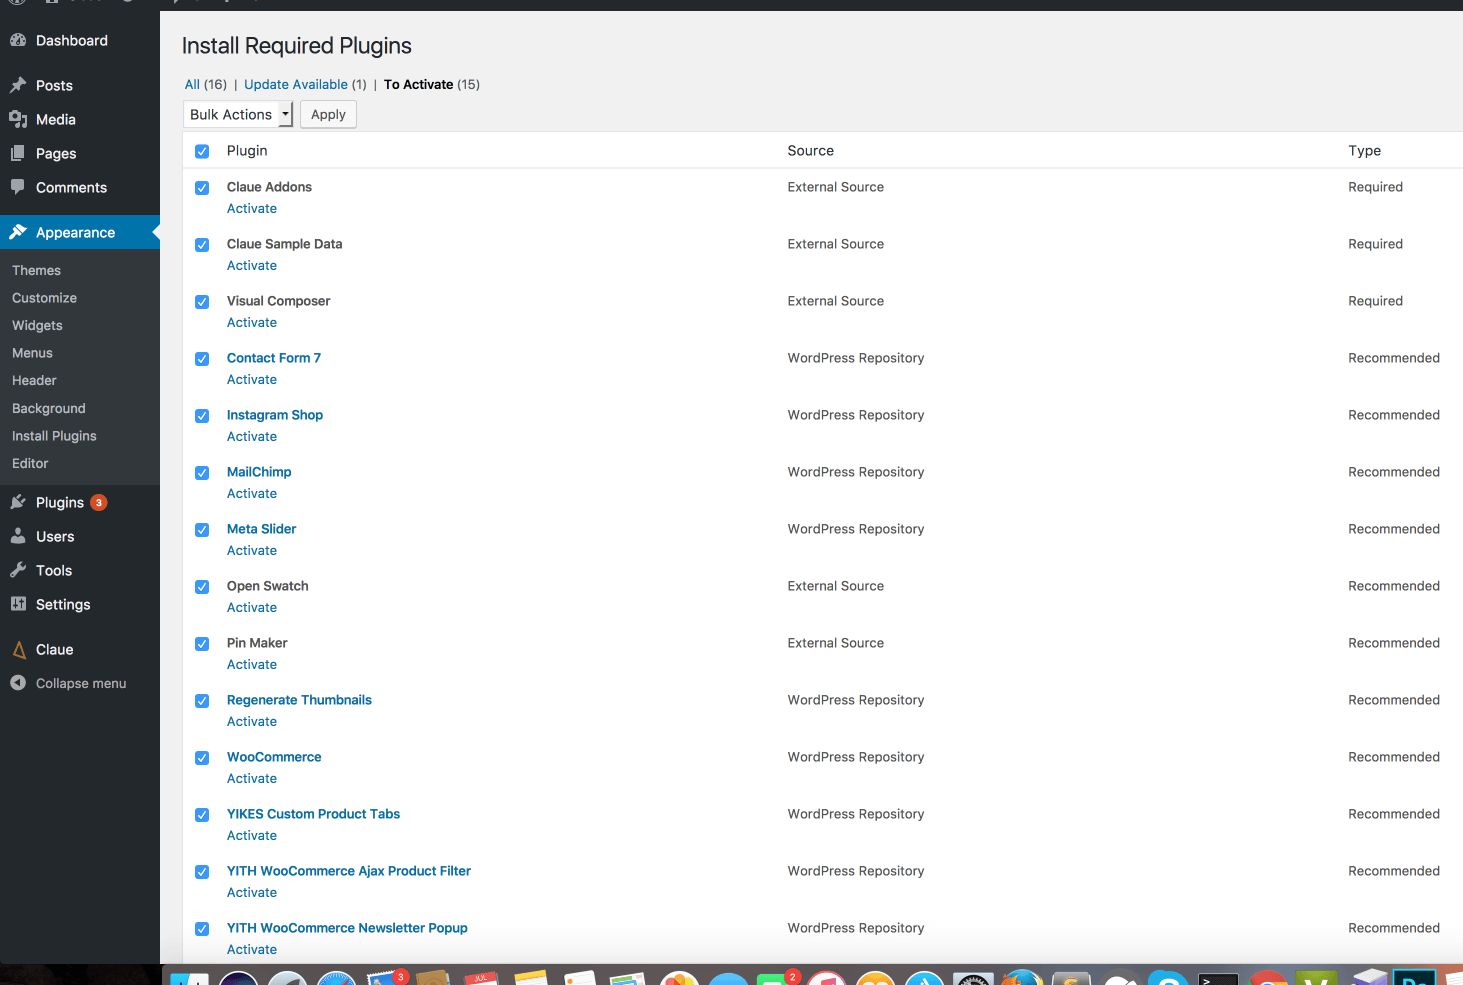
Install Plugins
After you install the theme, there'll be a list of suggested and recommended plugins at the top of the wordpress dashboard.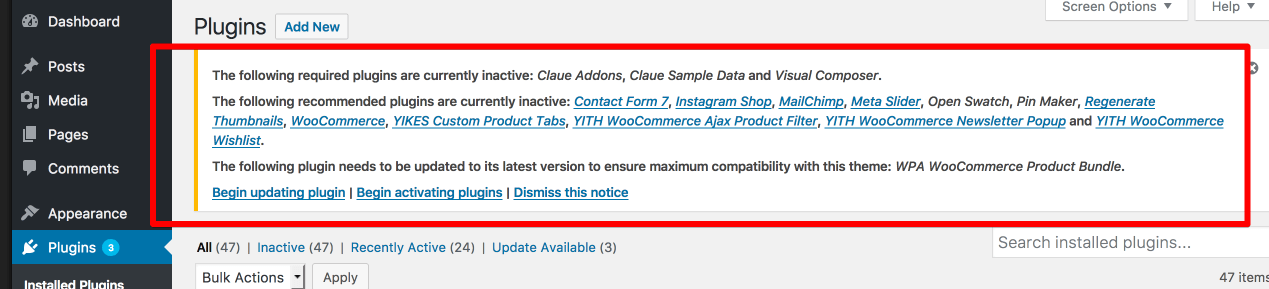
If you already hide it out, you can go to 'Appearance > Install Plugins' section instead too.
Importing Demo Content
After activating the theme, there'll be suggested plugin listed at the top (if there aren't, you can go to 'Appearance > Install Plugins' section as well ). Try installing and activating these following plugins ( as it effects the importing process ). You can also install all suggested plugins at this step as well.Note:All of your old data will be remove if you use this function.
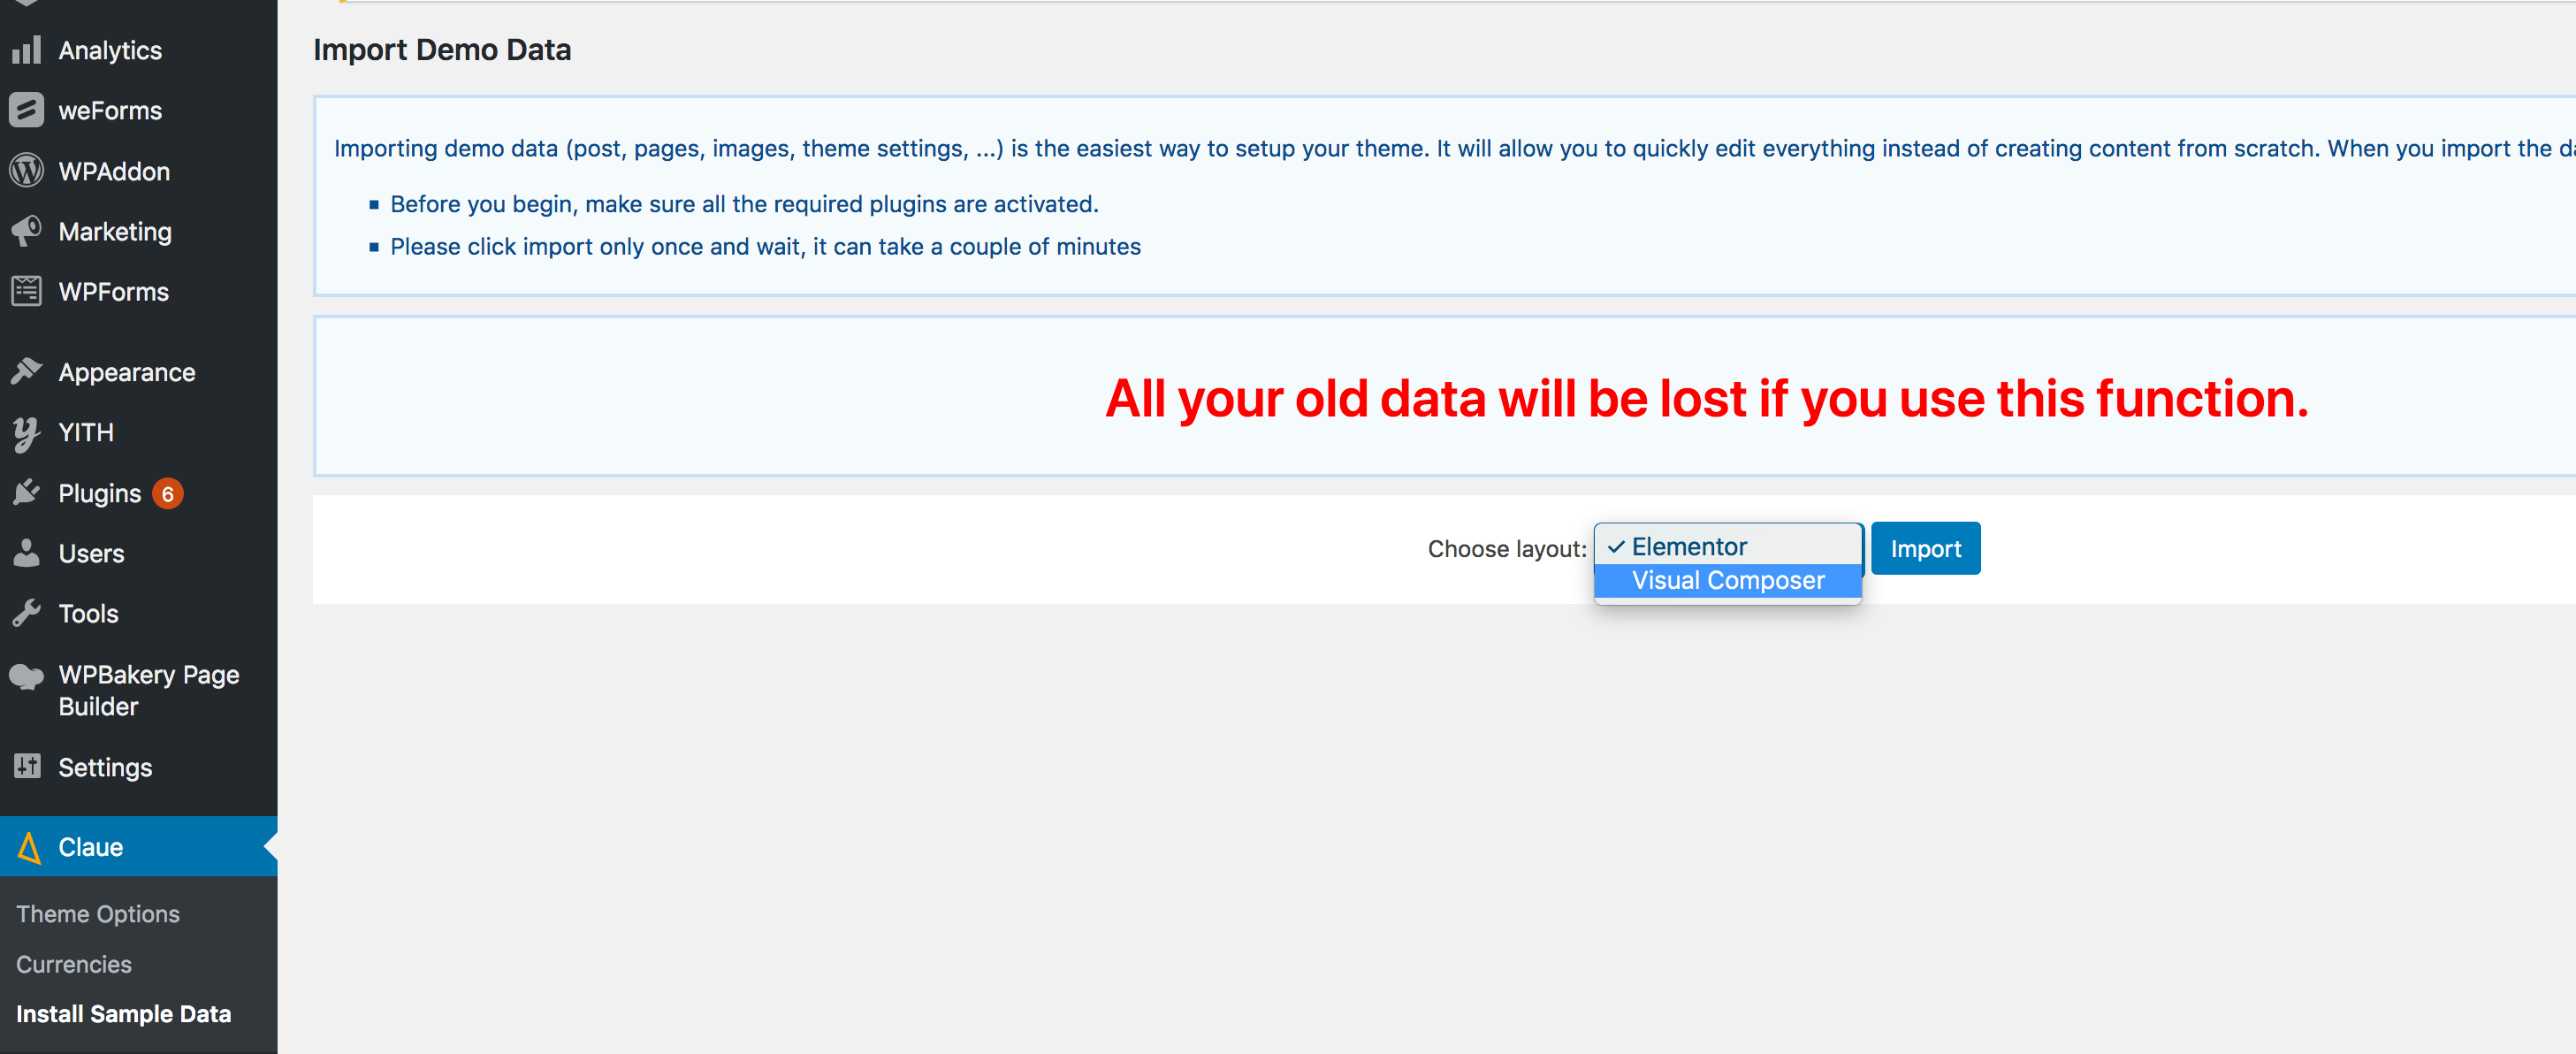
Then, go to 'JanStudio > Install Sample Data > Choose Elementor or Visual Composer > Import'
Follow the steps mentioned on the screen, then, you'll get the site like the demo :)Theme Translation
Try installing the 'Loco Translate' plugin. ( Can be found in 'Plugin > Add New' section ) or You can download plugin at here
- After installed plugin go to 'Loco Translate' section. And Click to "Theme > New Language"Select your language to translate
Translate texts
You can learn more about how to localize / translate the wordpress string from here as well
Updating the theme
1. Auto Update
You can download plugin and follow step at https://envato.com/market-plugin/2. Manual Update
Try following this steps for this.- Download the zip file from themeforest again
- Install it to different folder ( or just simply uploading via wordpress dashboard without removing the old one)
- Activating new theme version
- Set the menu to themes location at the 'Appearance > Menu' section.
- Save the theme option once
- Make sure everything is working properly and you can remove the old theme files out
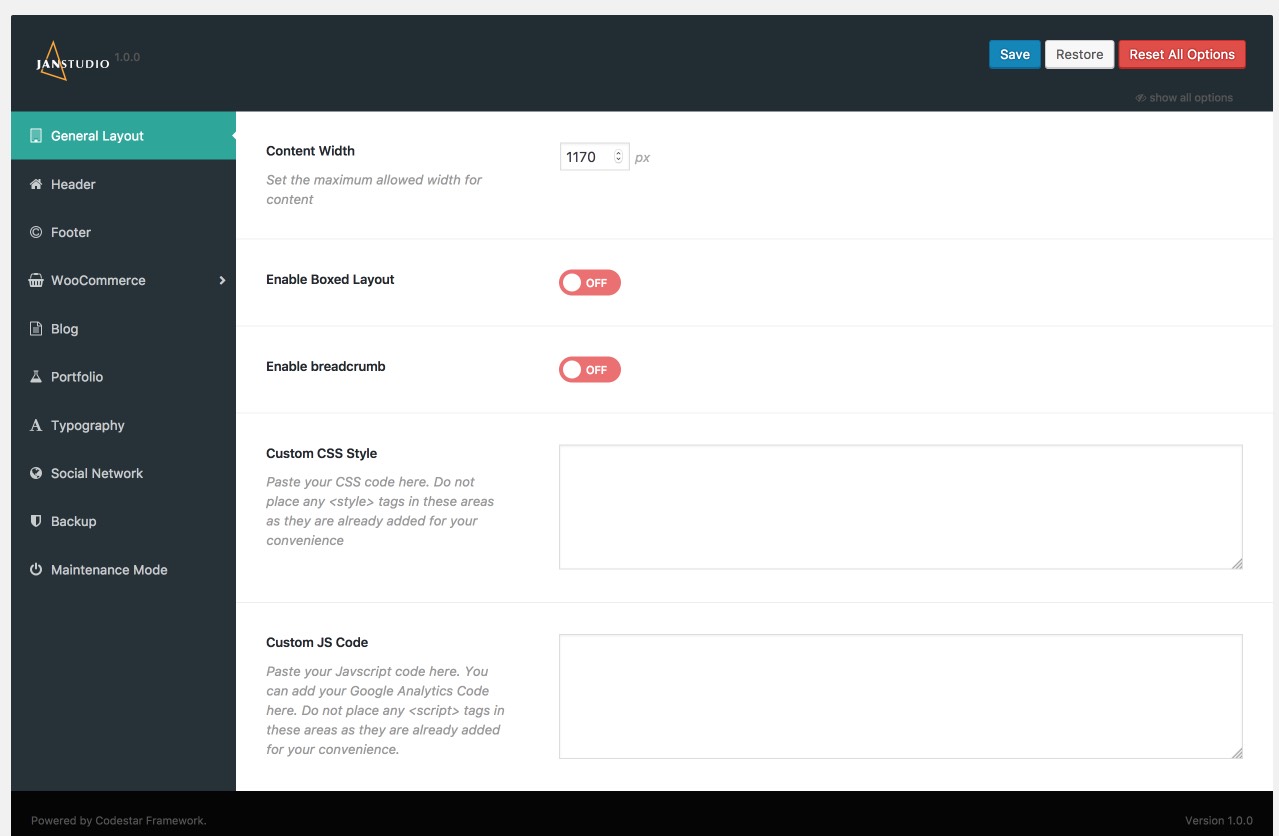
General Layout
- Content Width
- Boxed Layout
- You can use Custom CSS style if you want overwrite style of theme and your customize code keep in database so you can update theme in future without change
- You can add Google Analytics code to manager, track your website
Header Settings
1. Header Layout Options
- You can choose 1 in 5 header layout options to display on your website.
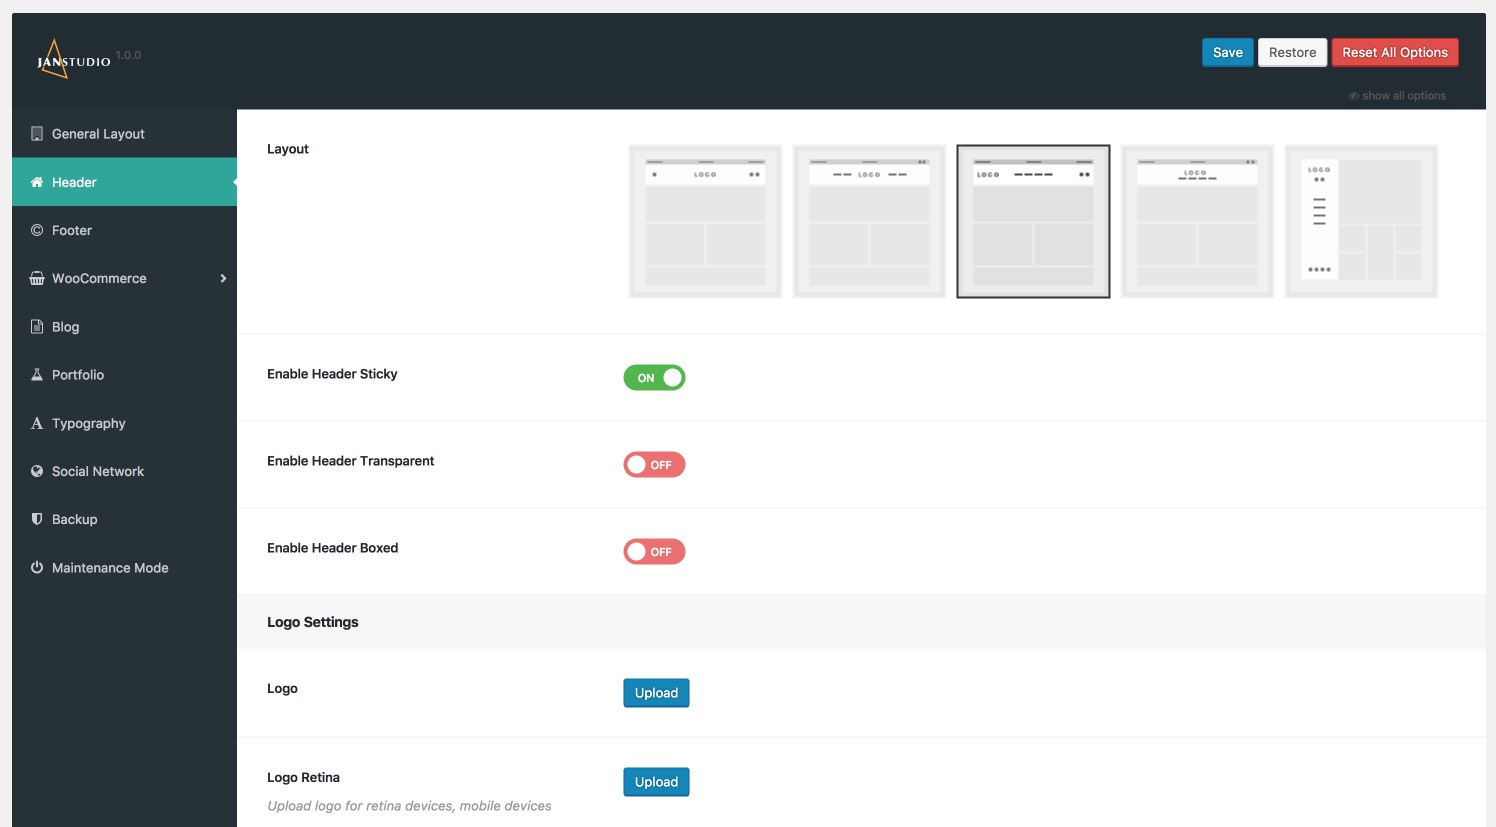
2. Logo Settings
- You should upload both regular logo for normal device and retina logo (2x) for high resolution as macbook retina, mobile devices
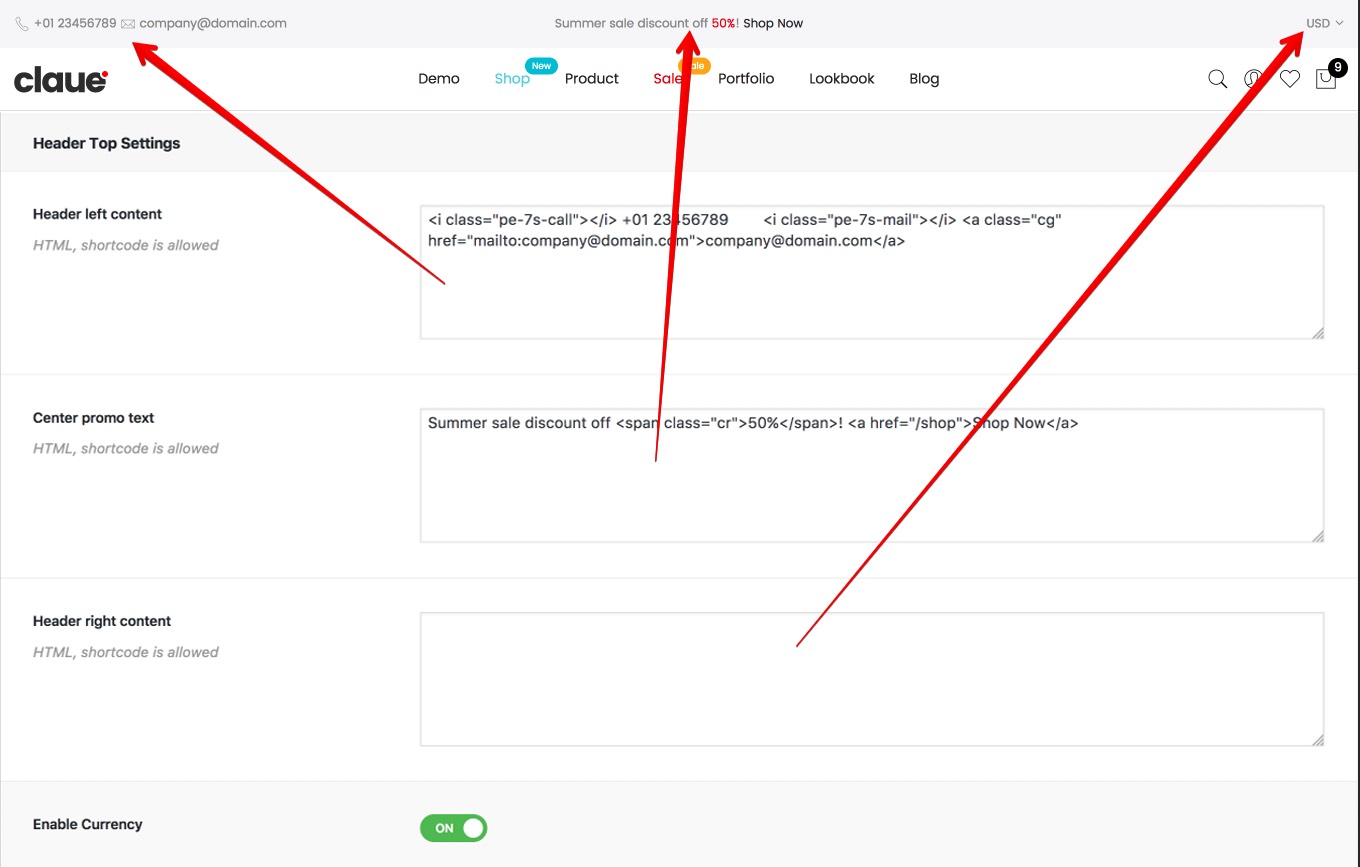
3. Header Top Settings
- Have options for you can customize text display on header top "Content Left" (phone number, email, socials that's help your customer easy contact with you) or you can display promotion message for your customer with header top "Content Center" html, add short code to display language switch on "Content Right"
- You can config to header display currencies
Footer Settings
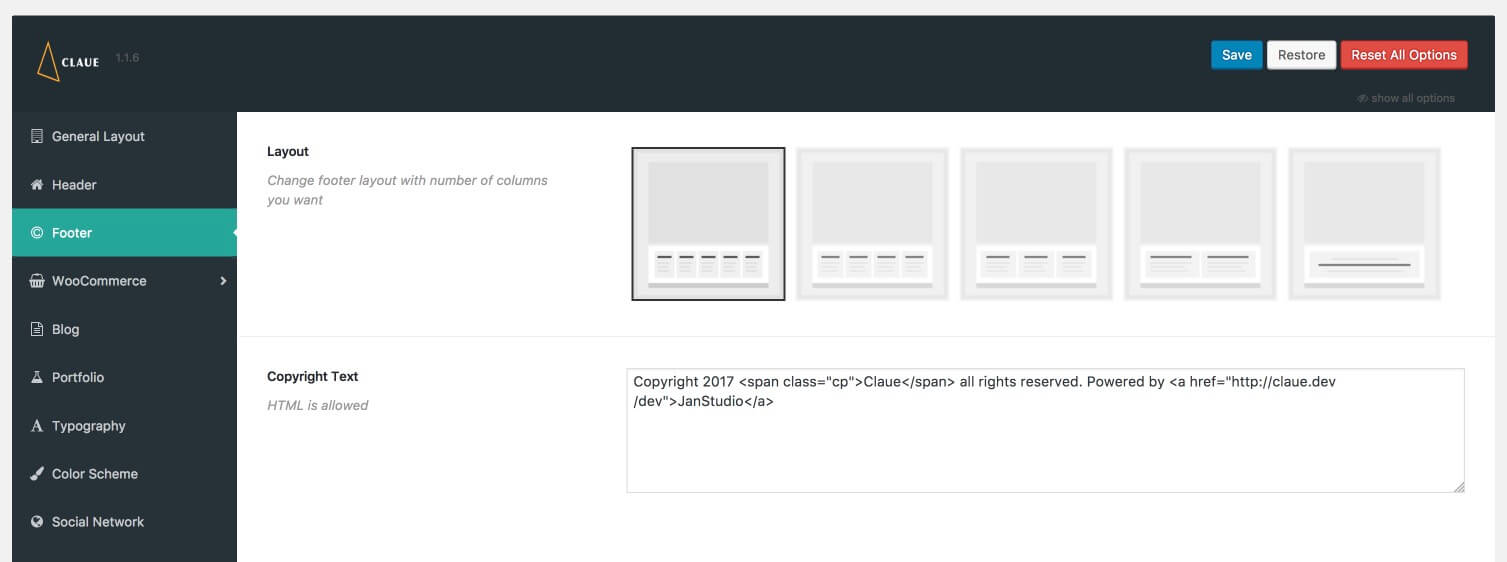
- You can choose 1 in 3 footer layout options to display on your website.
- You can change copyright...
Woocommerce Settings
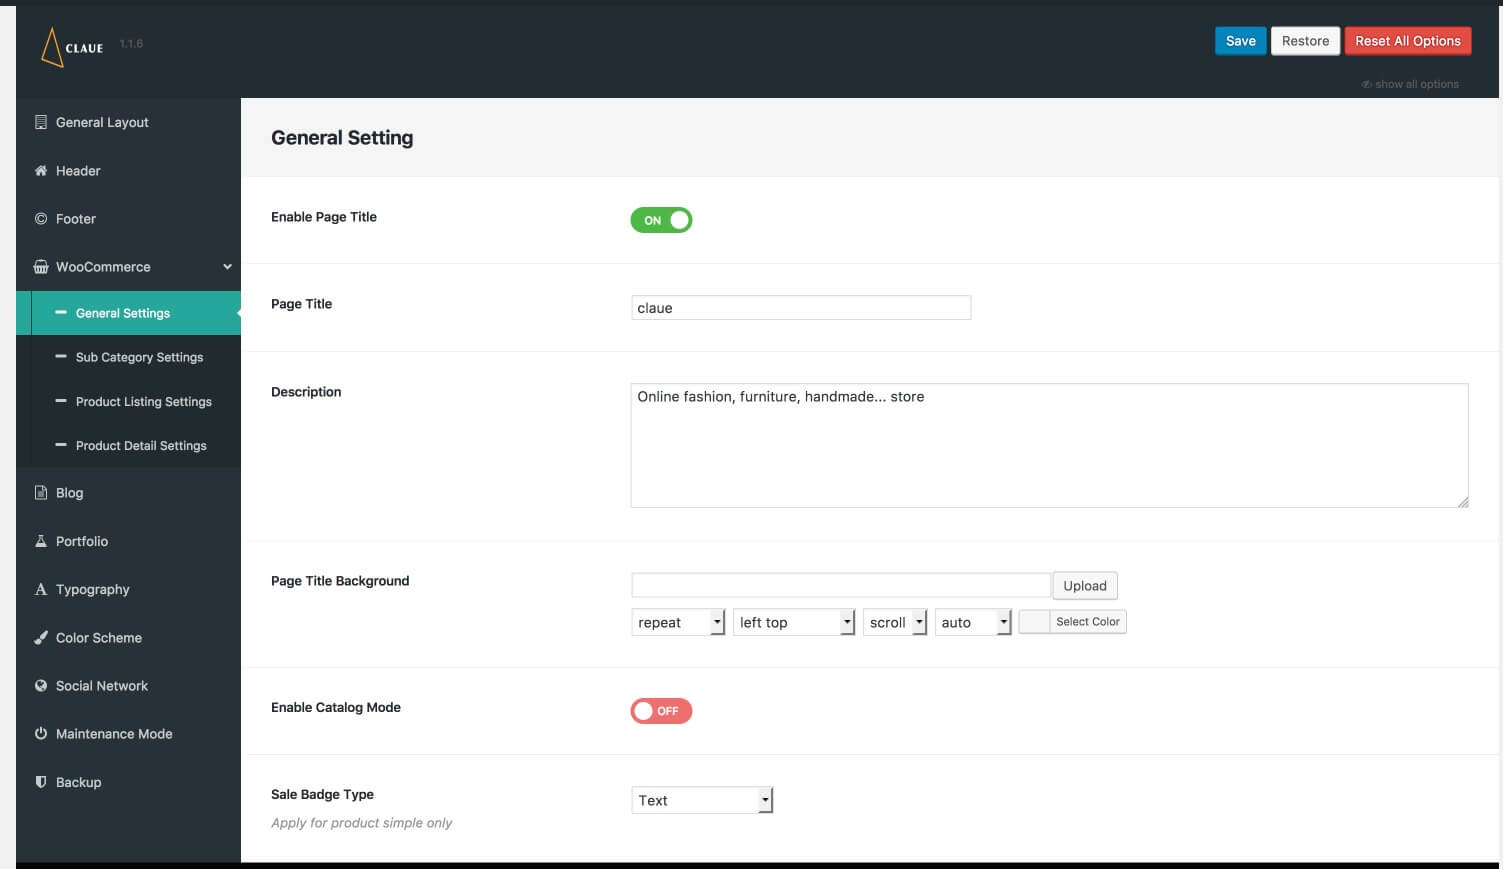
1. General Setting.
You can setup page title and sub-title display on shop (all categories) page
You can enable catalog mode by enable param
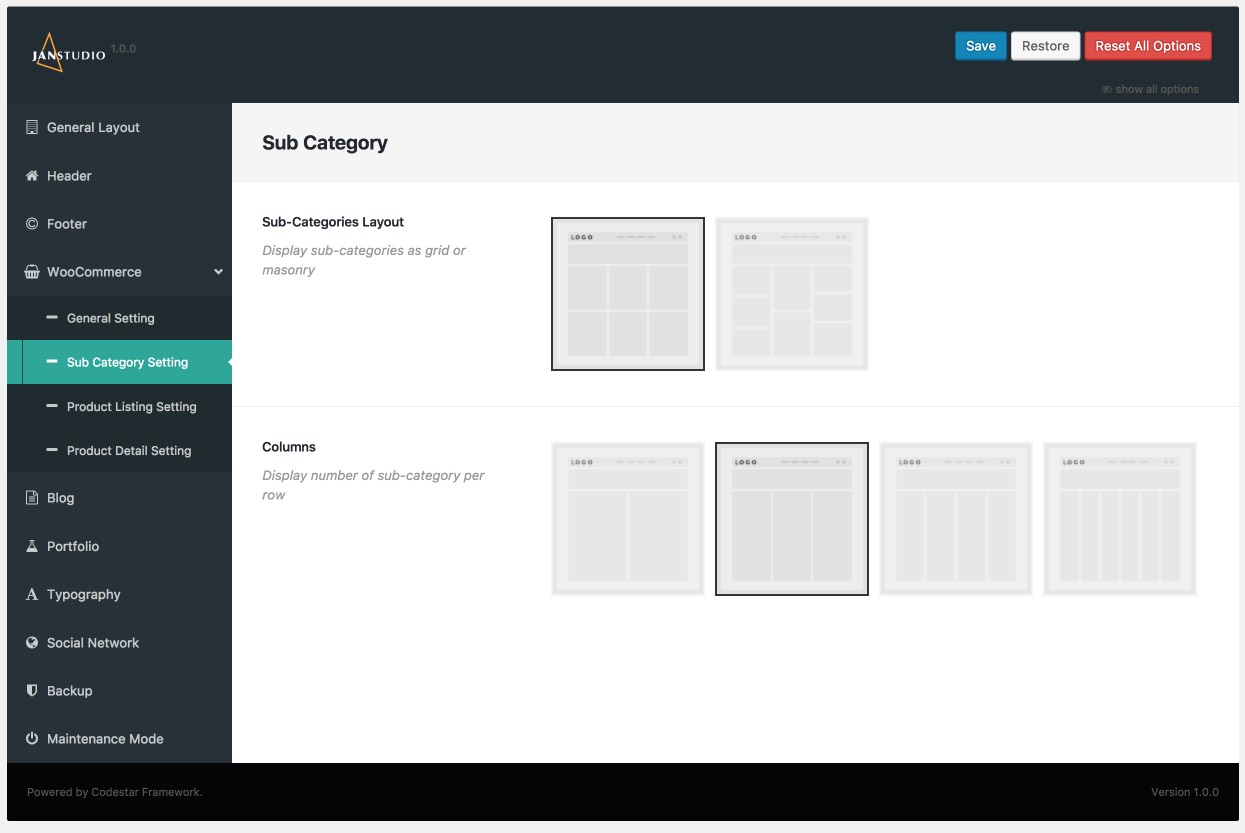
2. Sub Category Setting.
With sub-category setting you can setup layout dislay as grid or mansory and number of columns
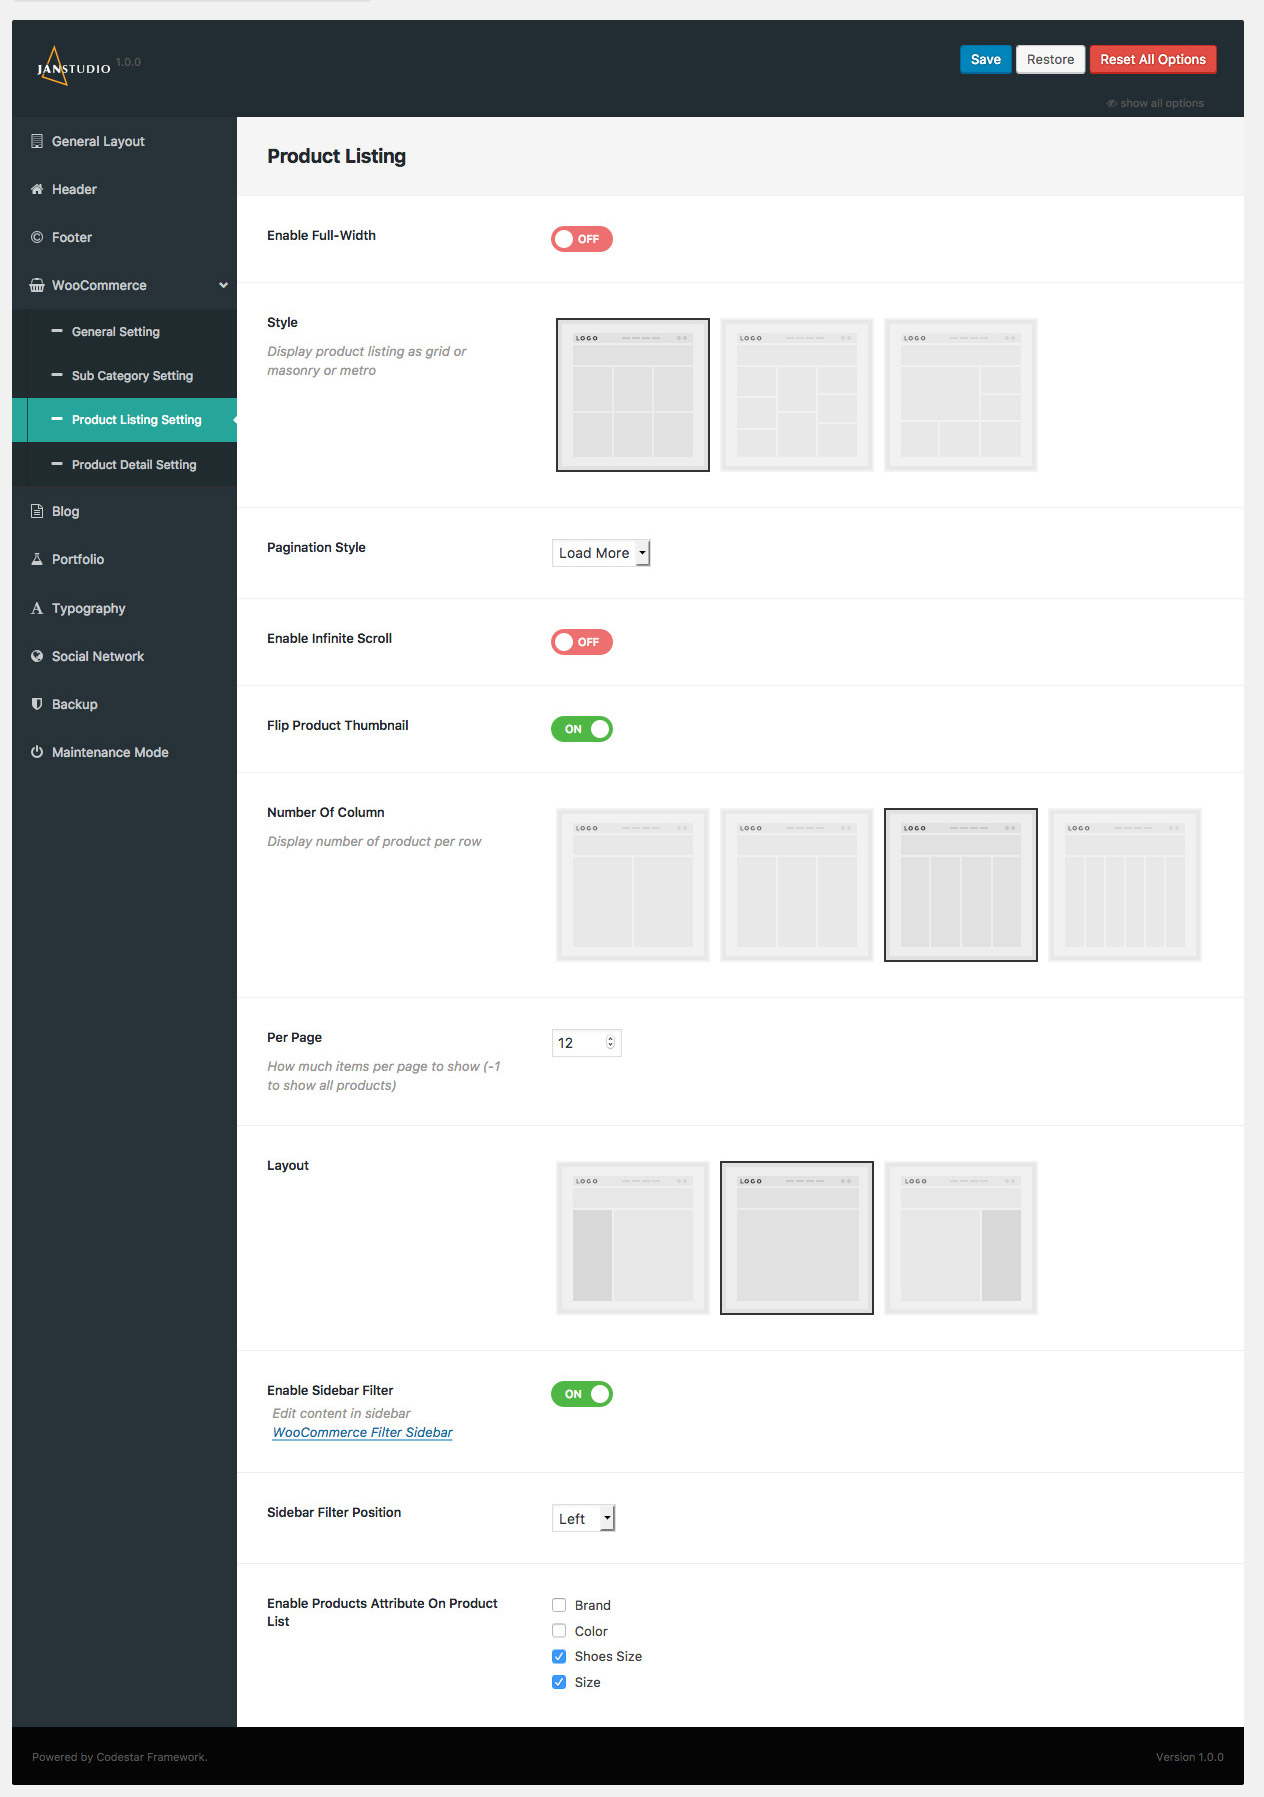
3. Product Listing Setting.
- Full-Width: Display product listing layout full width of screen or use boxed layout
- Style: You can setup list of product display as grid, masonry or metro
- Flip Product Thumbnail:You can enable this param to enable flip product thumbnail when hover
- Number of Column: With this option you can setup layout with 2,3,4,6 products per row
- Per Page: Default of Woocommerce you only can display 12 products on page with this option you can increase or decrease number of product per page
- Layout: You can setup category page with left sidebar, right sidebar or no-sidebar
- Filter Sidebar:Display Filter Sidebar on Left or Right on product listing layout
- Enable Products Attribute On Product List: You can choose available attribute of product when hover on images
4. Product Detail Setting.
- Enable Full Width: Display or product detail page as full screen when this param enabled
- Product Detail Style: We define 3 styles layout (fixed, images thumbs slider and full with big images)
- Thumbnail Postion: You can setup thumbnail at left, right or bottom on product detail layout 1
- Extra Information: You can display summary as tabs or accordion and select position to display summary
- Miscellaneous: You can change size guide image for all product, shipping & return text content, enable/disable social share
- Other products: You can set number of related products, up-sell products display on product detail and number of columns

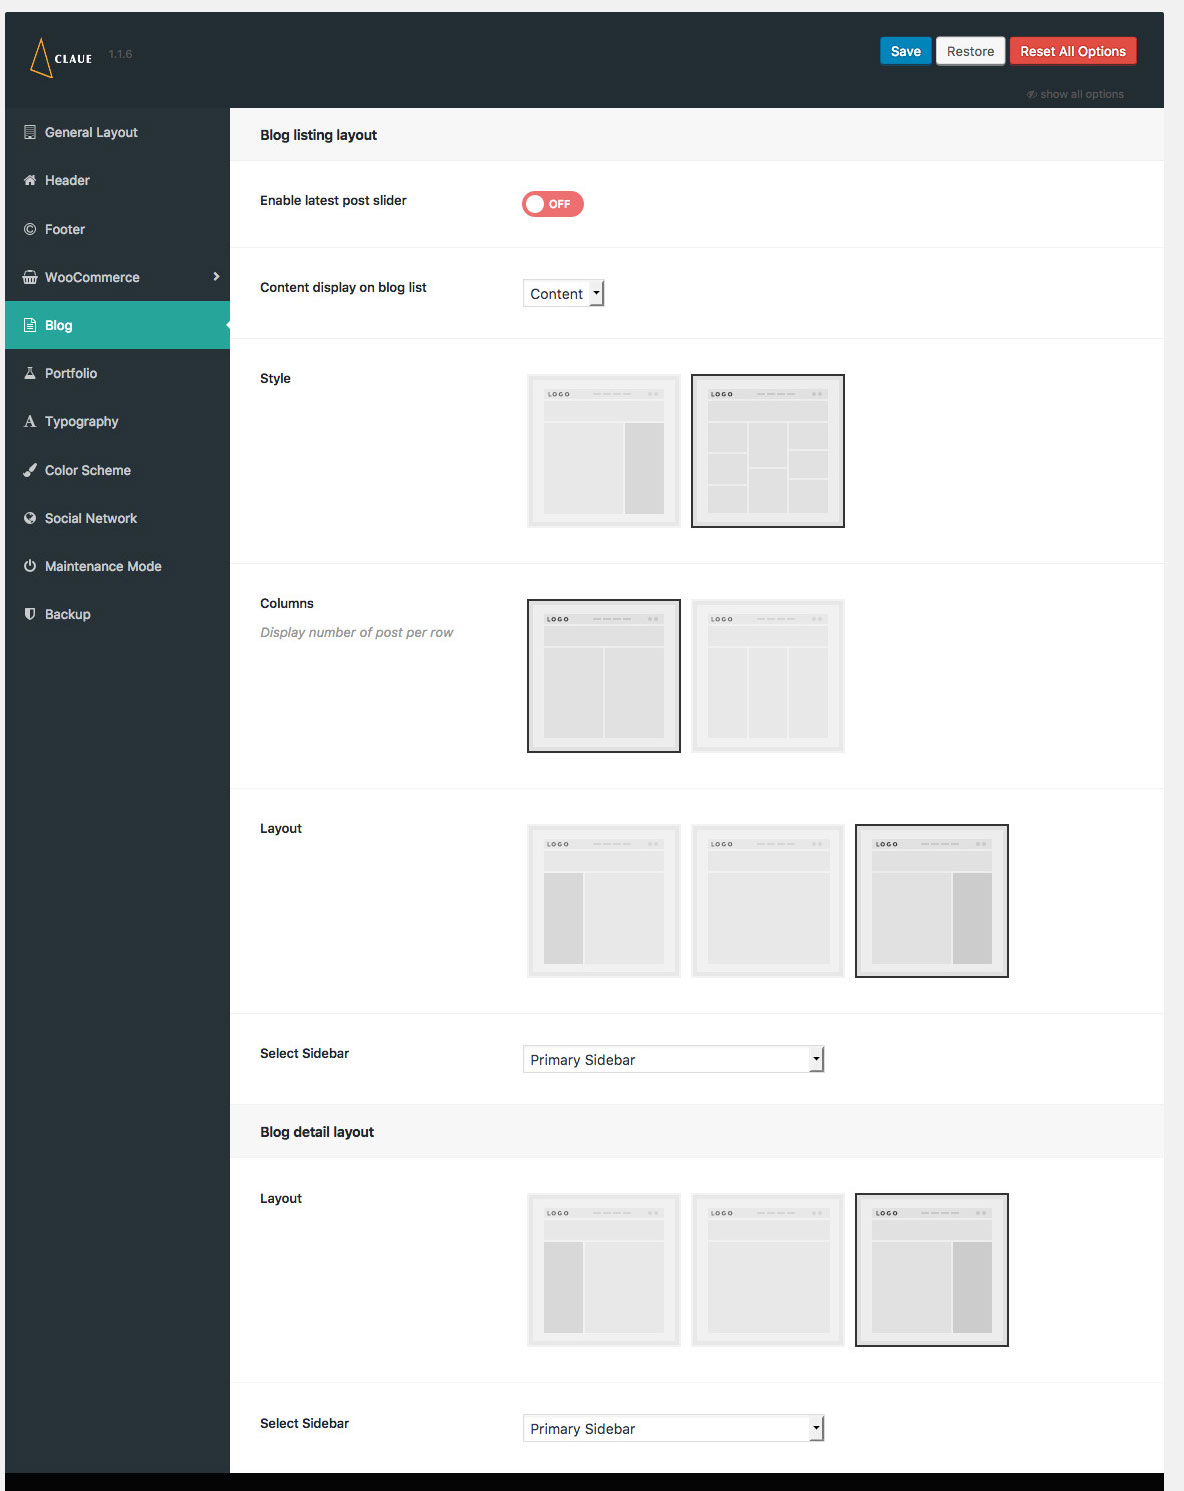
Blog Settings
You can setup blog page display as grid or masonry layout with left sidebar,right sidebar or no sidebar
You can edit blog sidebar by navigate to Appearance > Widgets > Primary
Portfolio Settings
- You can setup page title, sub-title, background for page title
- You can setup portfolio page display as 2, 3, 4 columns and number of project display per page

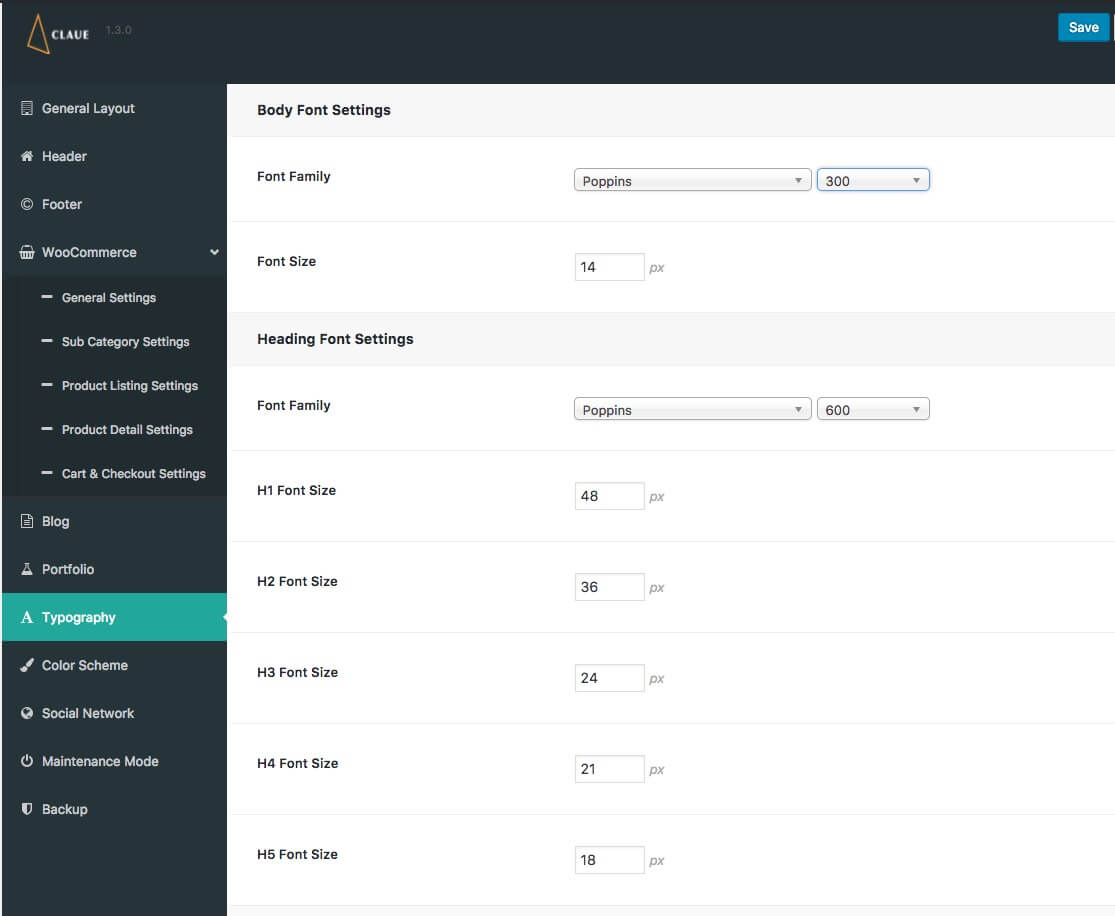
Typography Settings
You can change font family use default fonts, google fonts, change font size, font color, heading font size
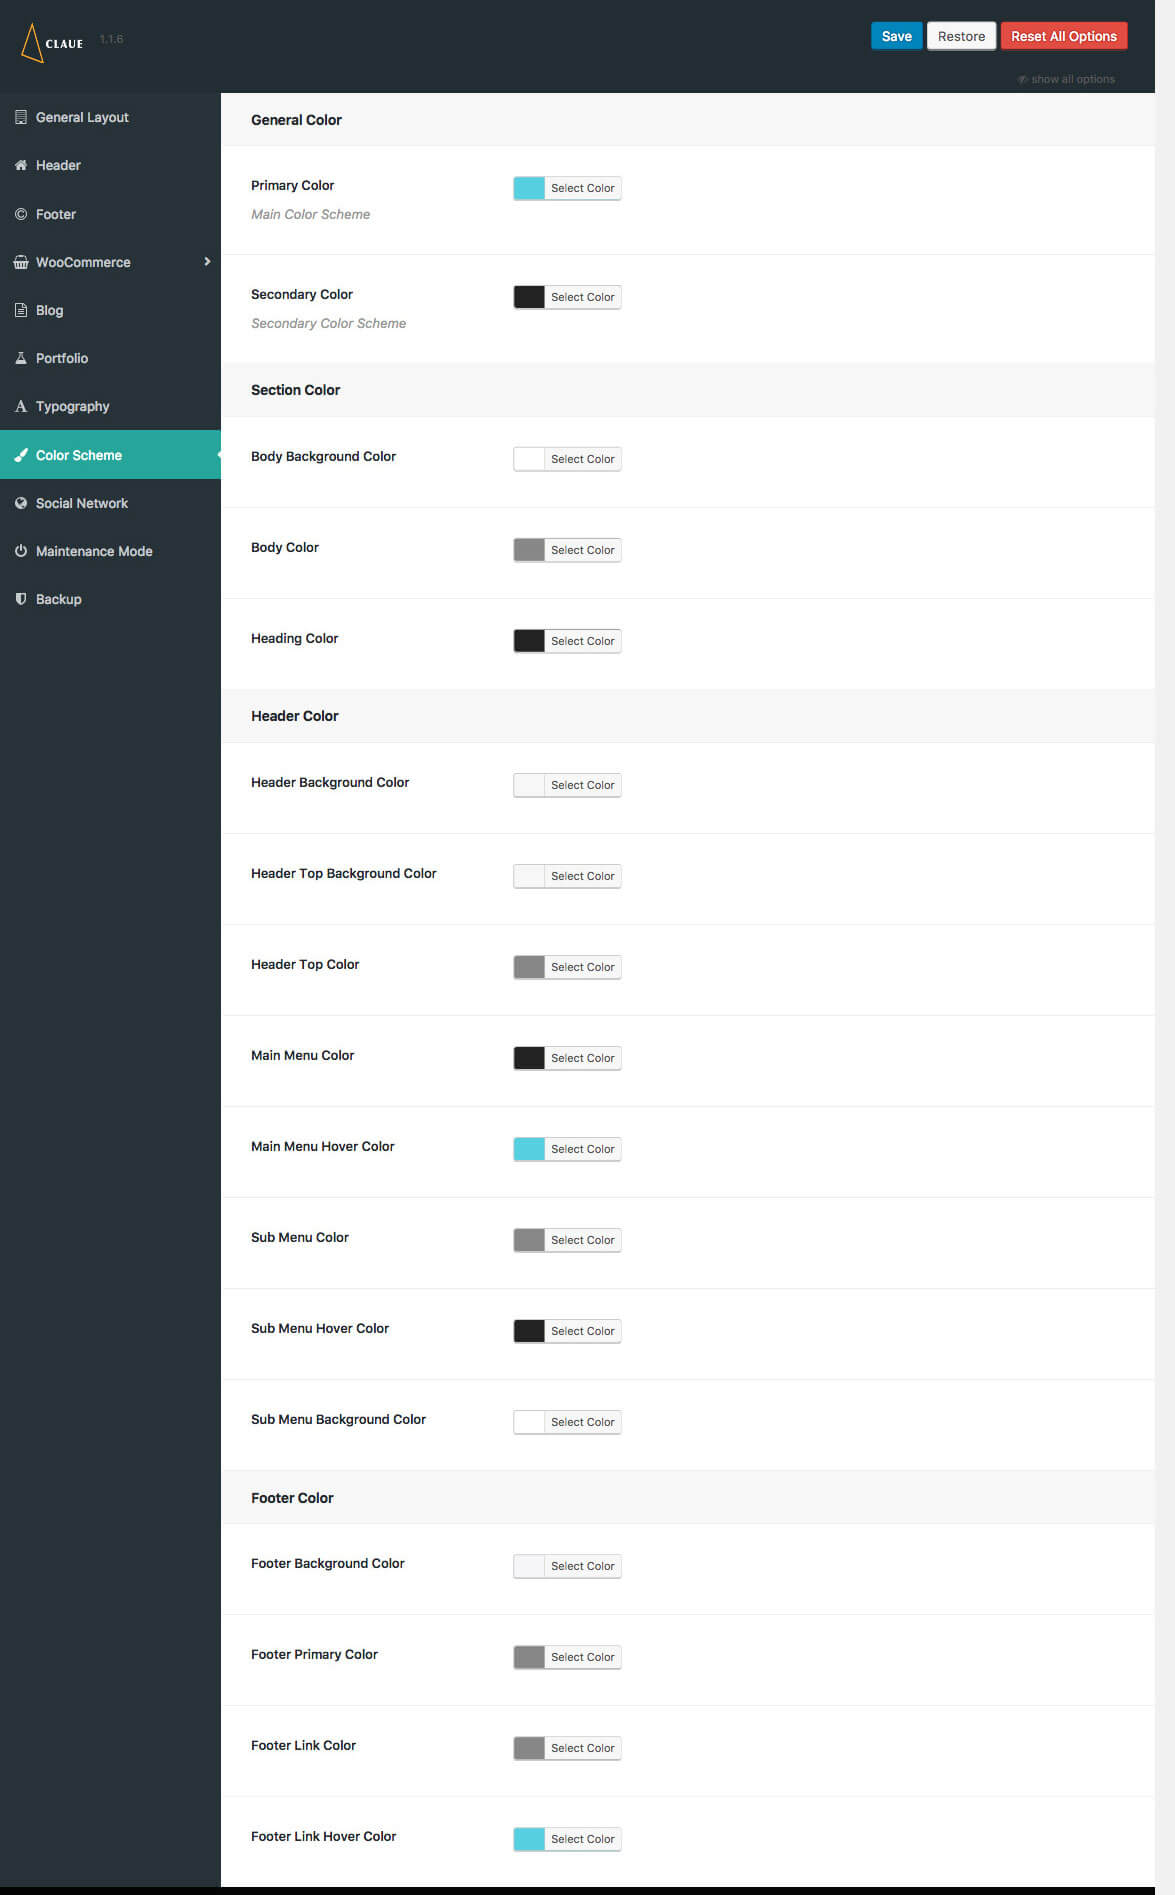
Color Scheme
You can change color for overal site, header, footer.
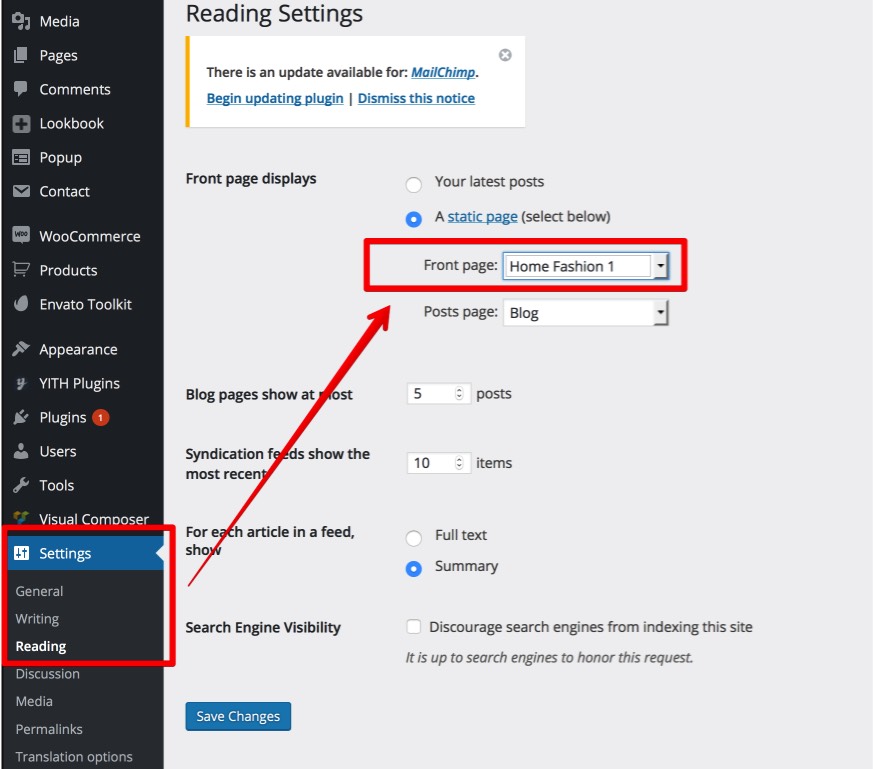
Homepage
- You can assign another page to homepage by go to Dashboard > Settings > Reading > Change Frontpage to any page you want
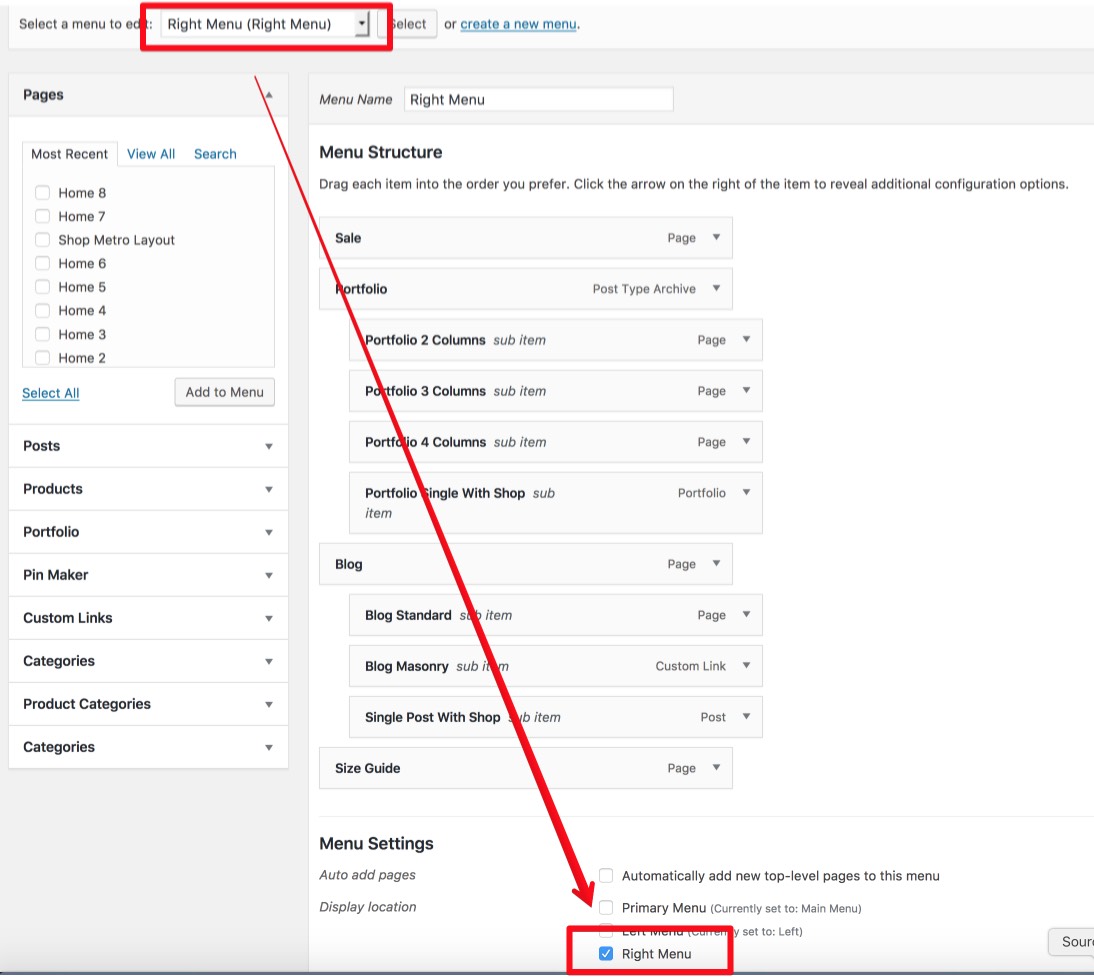
Menu Layout
Normally you create a menu and assign this menu to Primary Menu
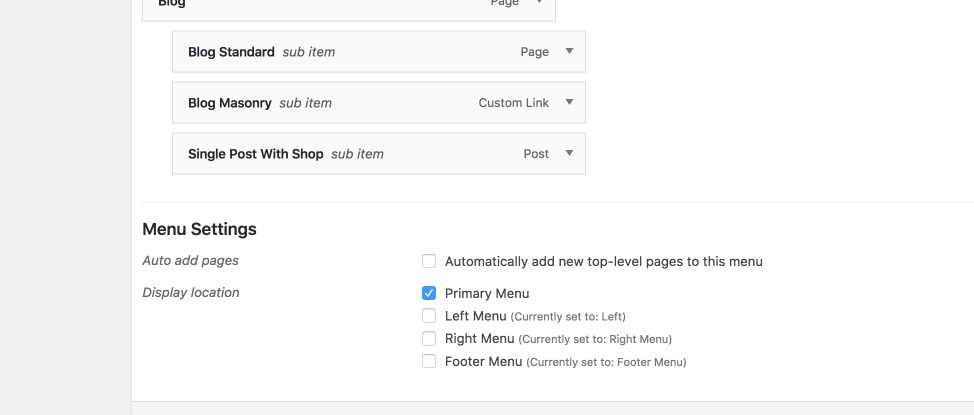
If you use Header Layout 2 you need create separate menu left, menu right and assign for Left Menu and Right Menu
Menu Badge
Our theme support for menu badge with "New", "Sale", "Hot" with class "new", "sale", "hot". You can remove badge by remove class
![]()
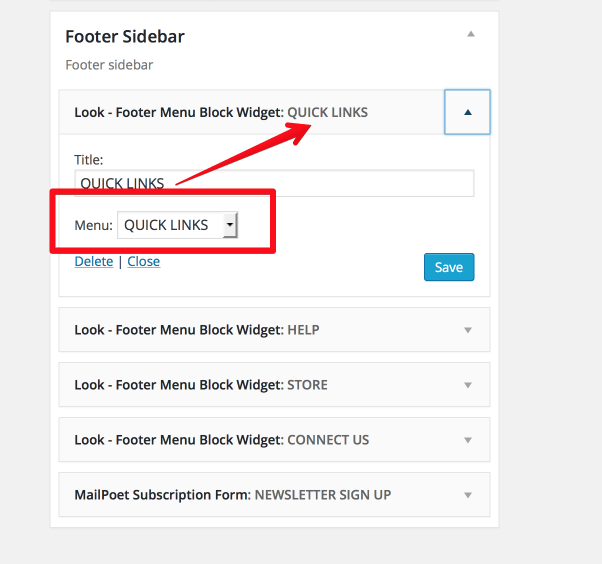
Footer Link Widget (Footer 2 Layout)
1. Go "Appearance > Menu" create invidiual menu: "QUICK LINKS", "HELP", "STORE", "CONNECT US"

2. Go "Appearance > Widget" and create footer block widget containe menu "QUICK LINKS", "HELP", "STORE", "CONNECT US"
Footer Menu
You need create menu and assign to Footer Menu

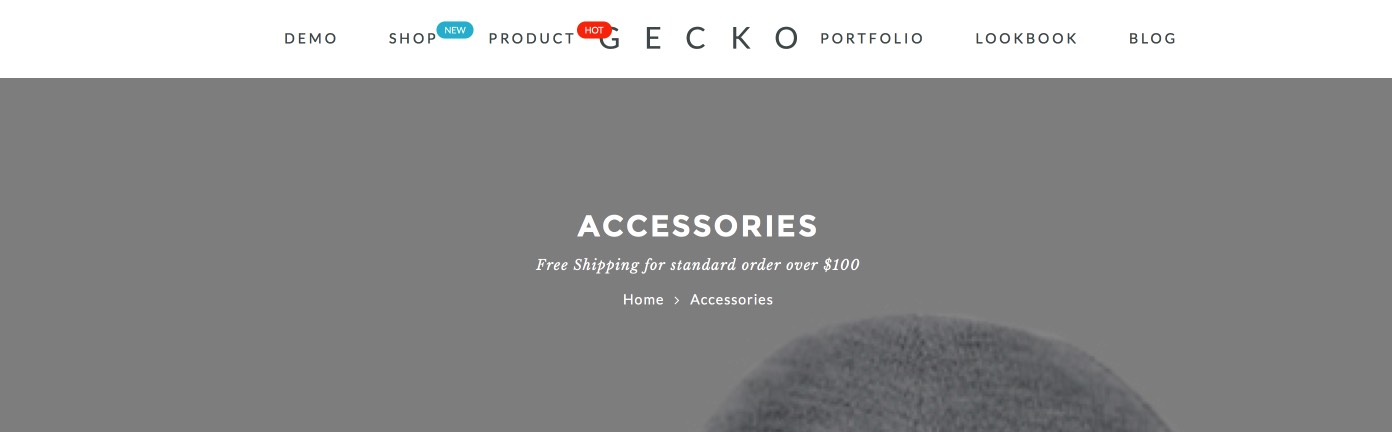
Page Title Options
1. Page Title Display

2. To display page title you have turn it on, add sub title and upload background image
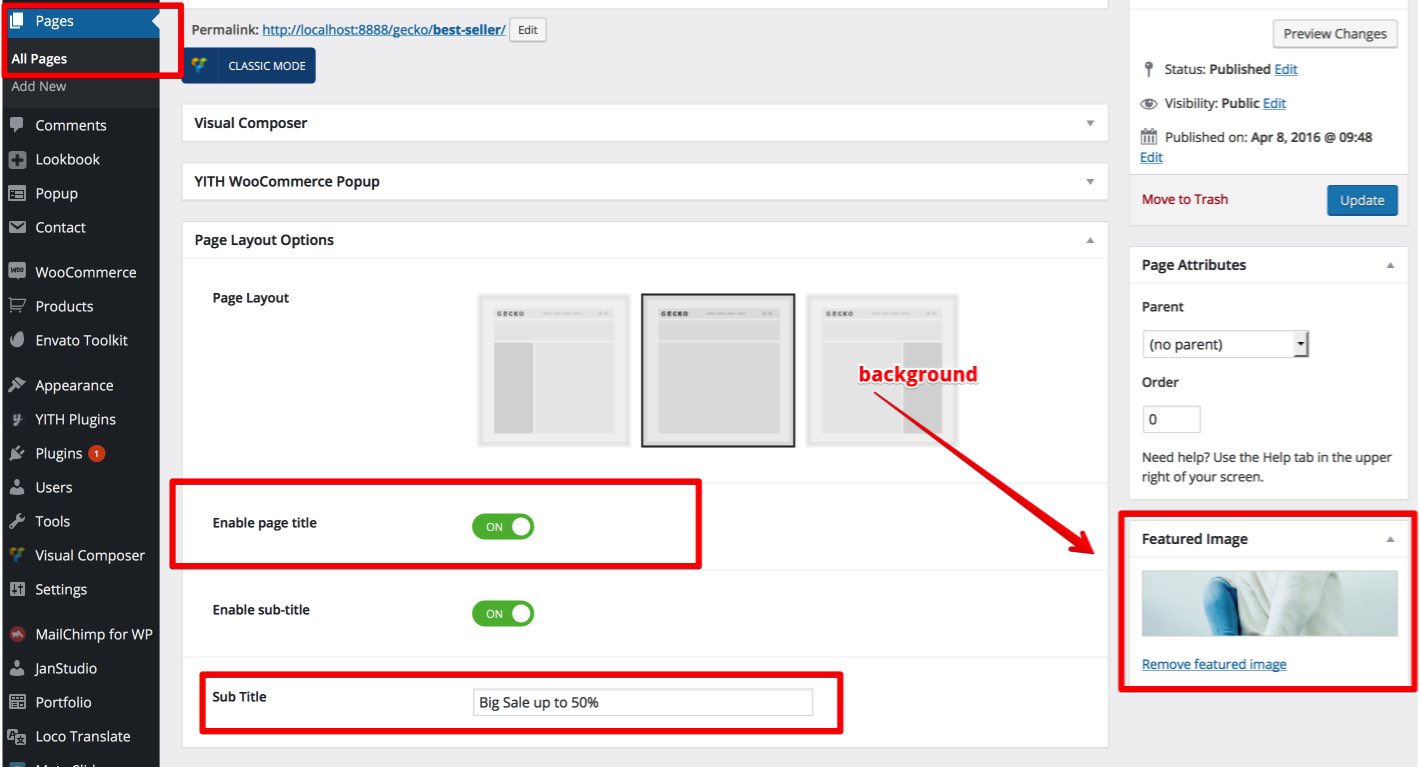
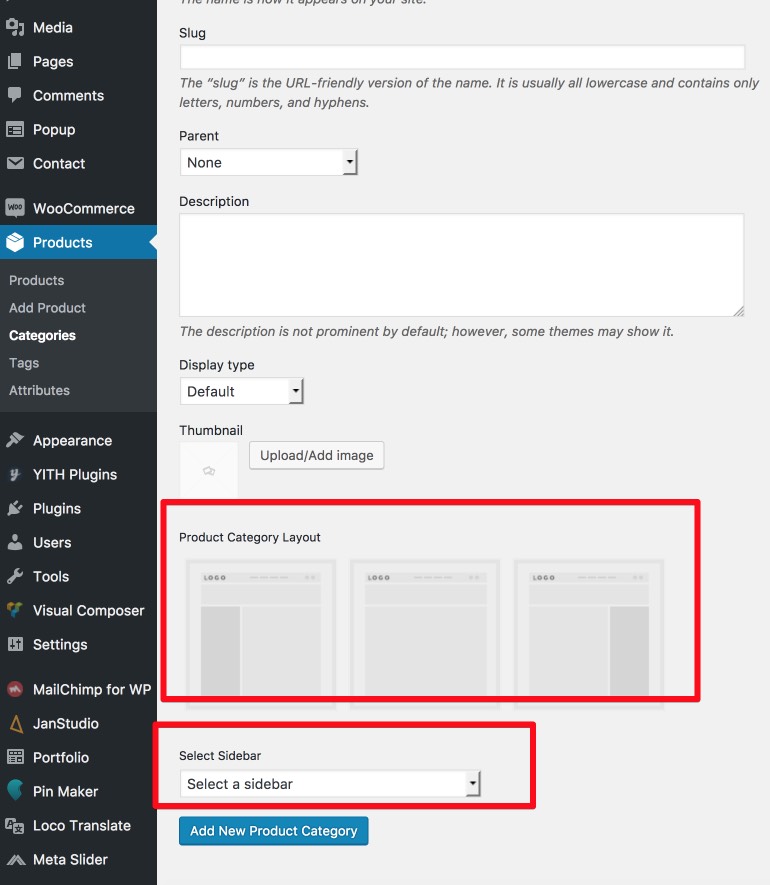
Category Header Background
Go to "Products > Categories to create new Product Category and upload image as background

Category Sidebar
You can setup individual layout for category and select separate sidebar for individual category
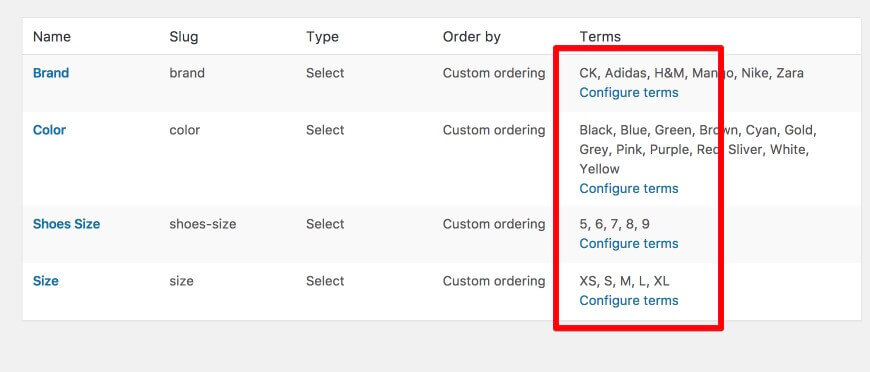
Product Attributes
To display product attributes (colours, size) you have to create product attributes first.
1. Go "Products > Attributes" to create attribute
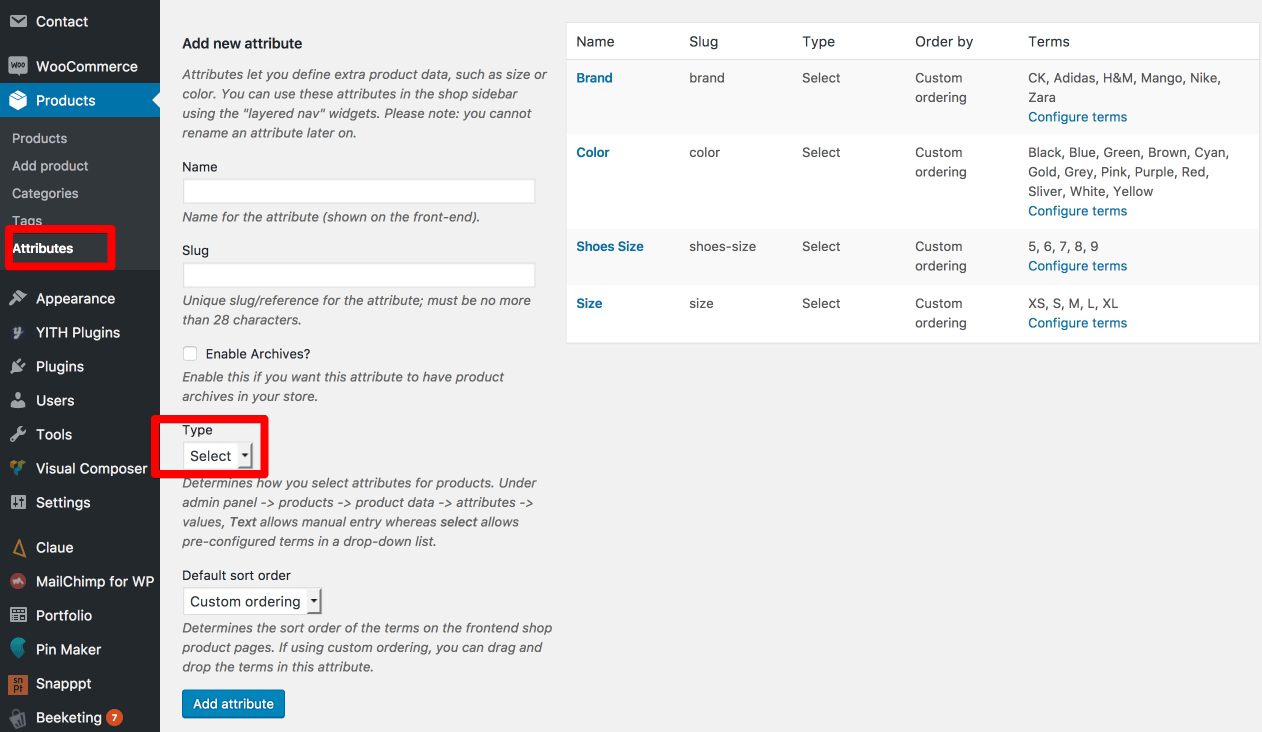
2. After create attribute you have to click on "Configure Terms" to add attribute (example 'Size: XS | S | M | L | XL')
Category Product Ajax Attributes Filter
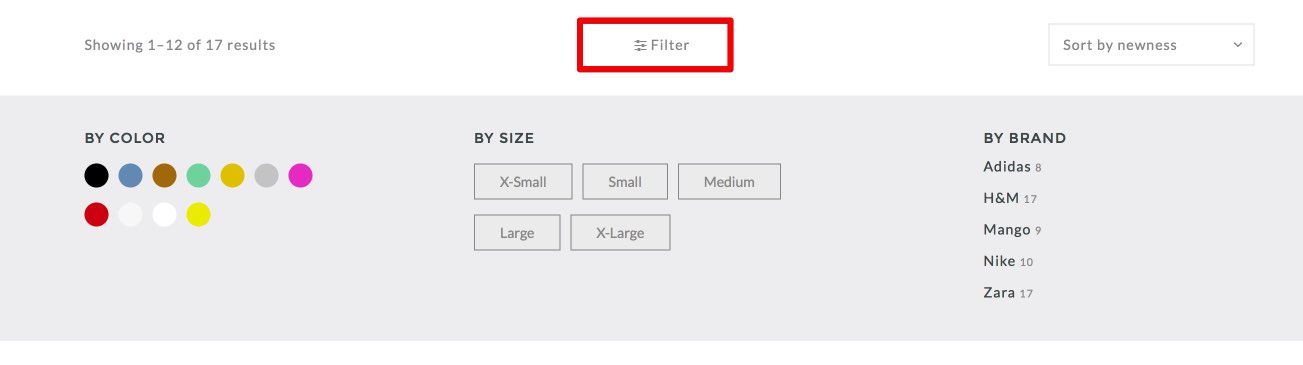
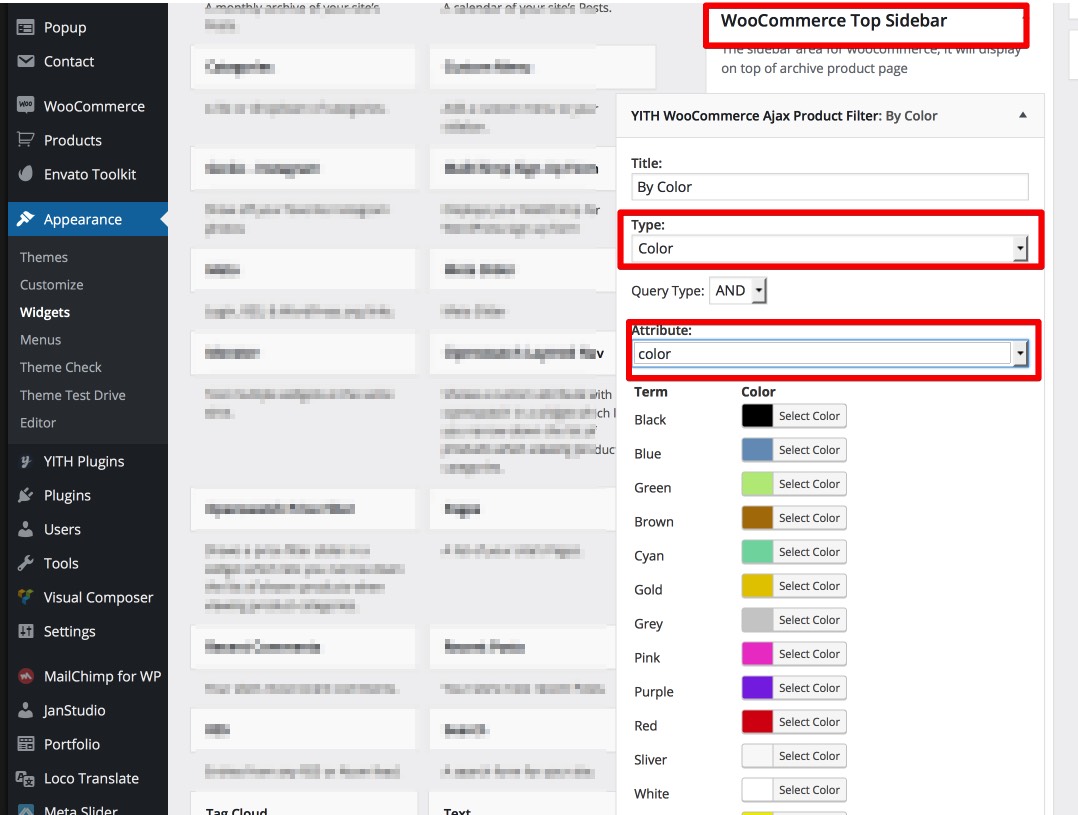
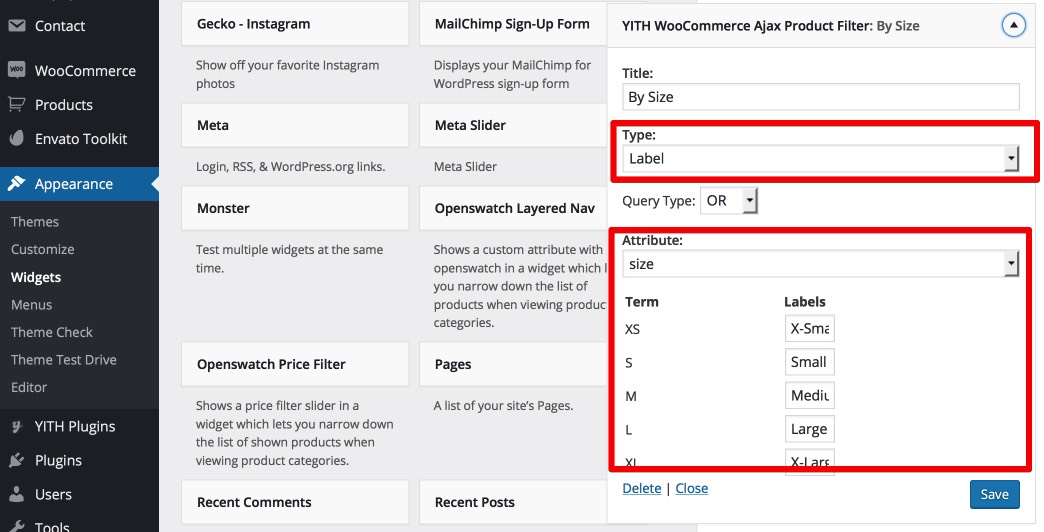
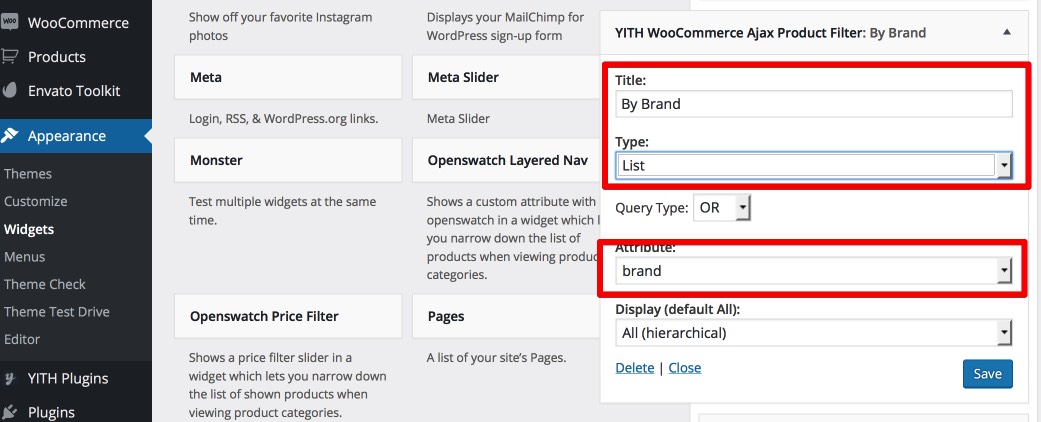
- We created WooCommerce Filter Sidebar Widget Area to contain YITH WooCommerce Ajax Product Filter.
- YITH WooCommerce Ajax Product Filter work with product attributes you created at prev step (color, size, brand)
- To add YITH to WooCommerce Filter Sidebar you go to Appearance > Widgets > YITH WooCommerce Ajax Product Filter > WooCommerce Filter Sidebar
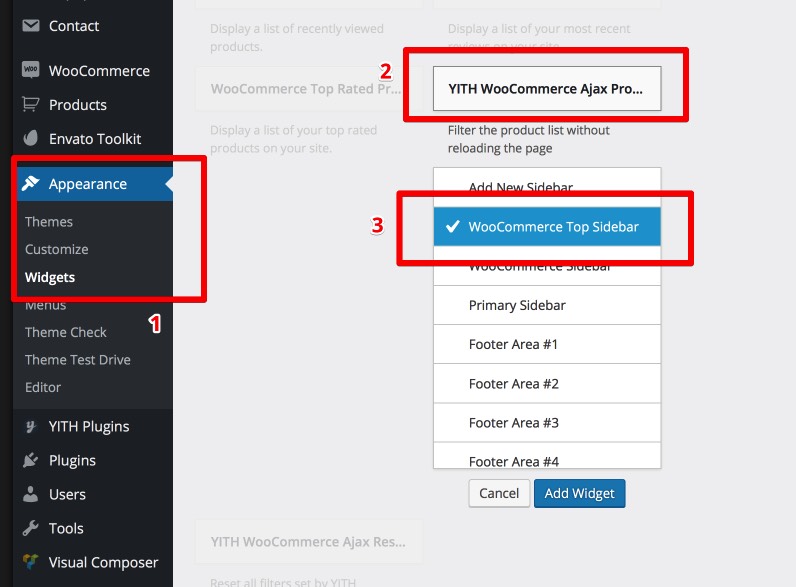
- To config color filter you go WooCommerce Filter Sidebar and do like screen shot
- To config size filter you go WooCommerce Filter Sidebar and do like screen shot
- To config Brand filter you go WooCommerce Filter Sidebar and do like screen shot
Product's images size
There're several predefined thumbnail product's images size, catalogue product's images size and single product's image size. Which you have to set in "Appearance > Customize > WooCommerce > Product Images"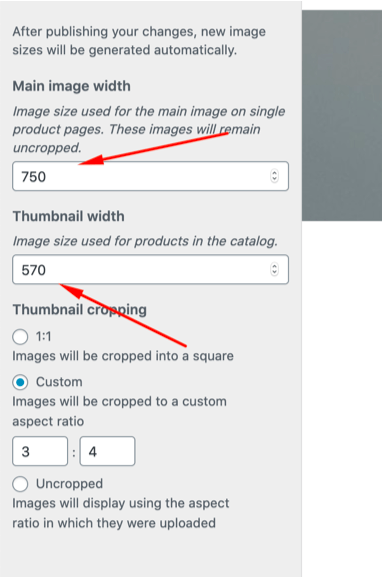
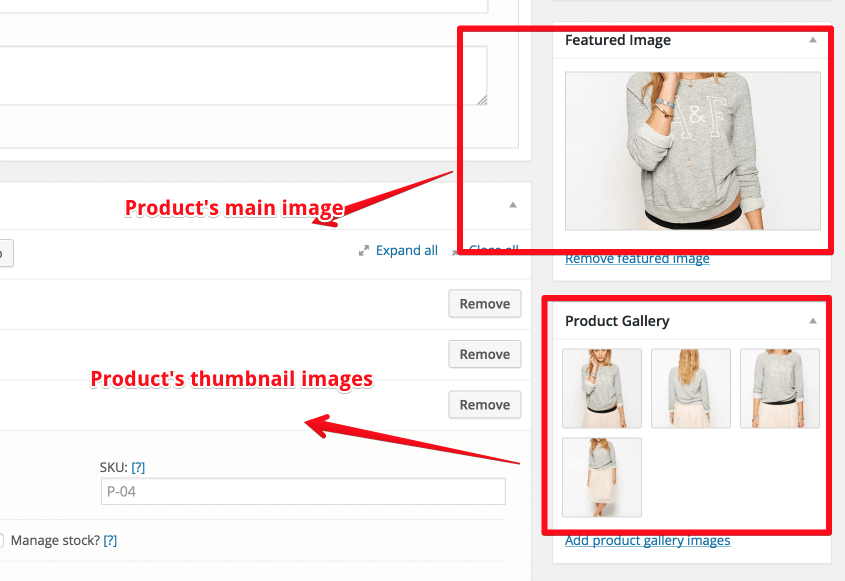
Product Images
Upload images to display on product detail. Upload featured image as main image and gallery as thumbnail images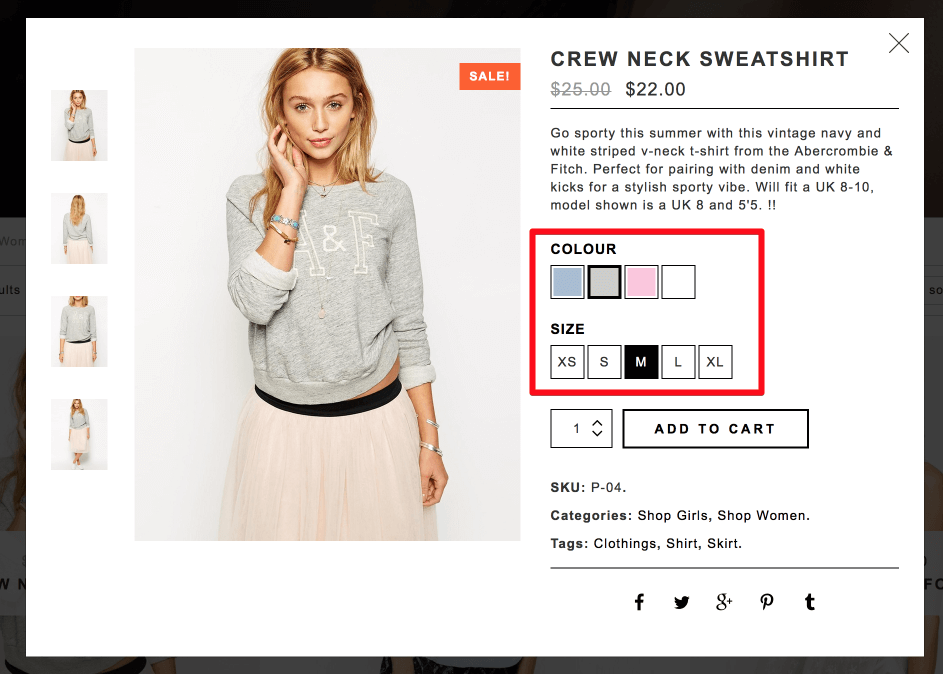
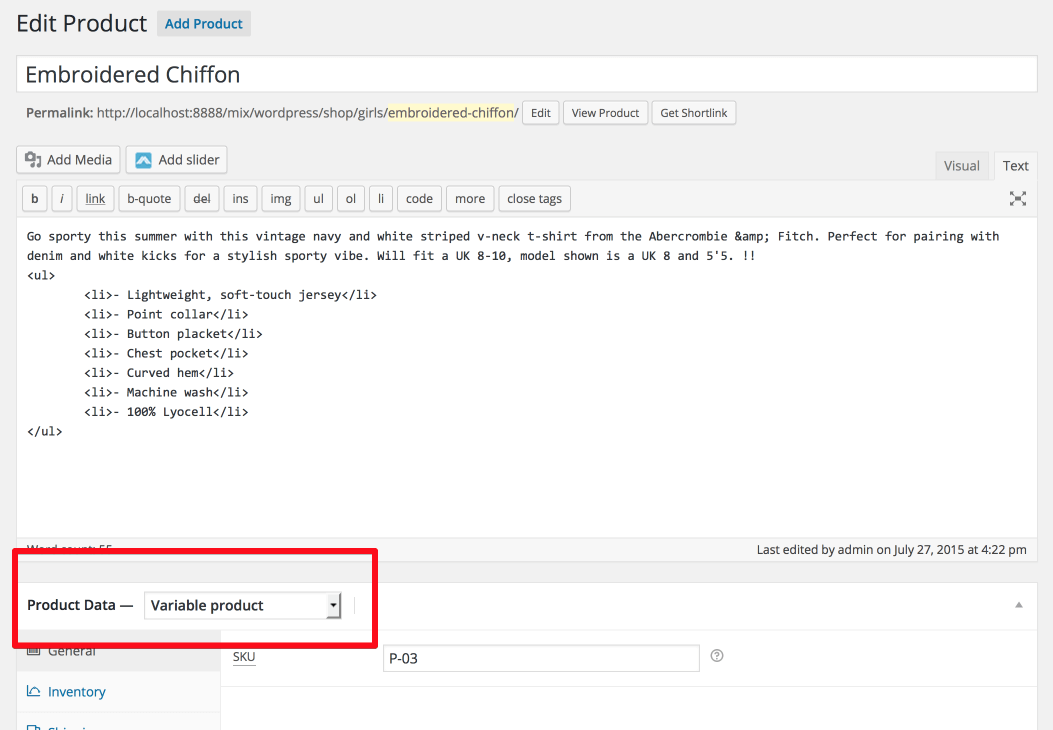
Product colour and size swatch
After create attributes you can display atrribute on product "Quick View" and Product detail page
1. Create new product and set Product Data "Variable Product".
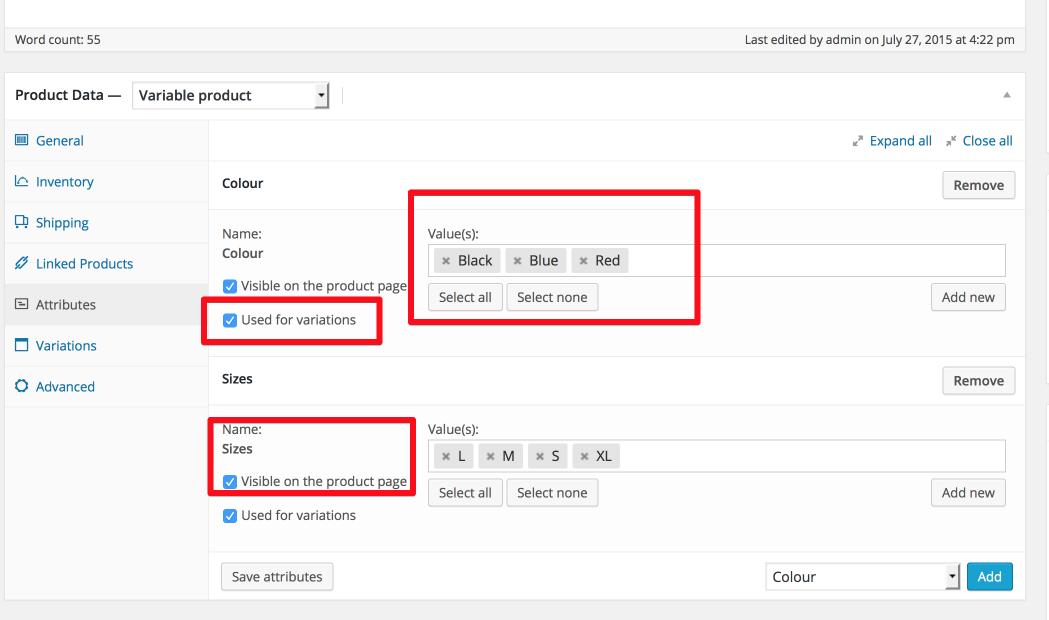
2. Add attribute for this product.
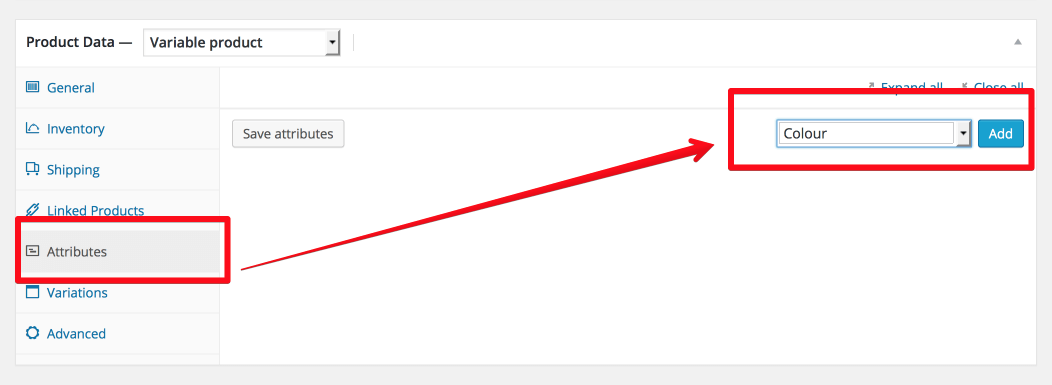
Remember tick on Used for variations
3. Set image and assign with atttribute color.
Choose color and any size and upload thumb as color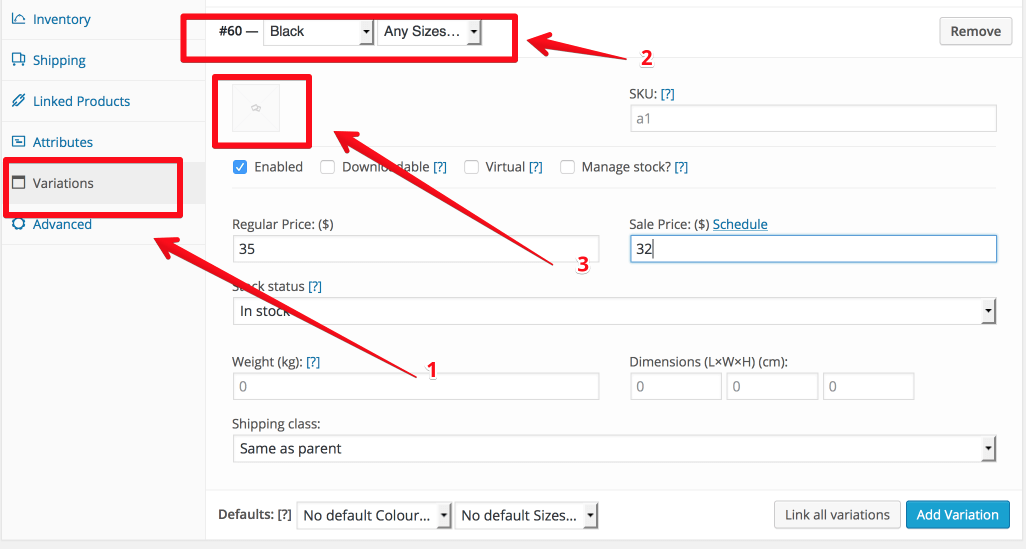
4. Set default colour and size for product.
After set image thumbnail as color and size for product you should set default colour and size to display for product.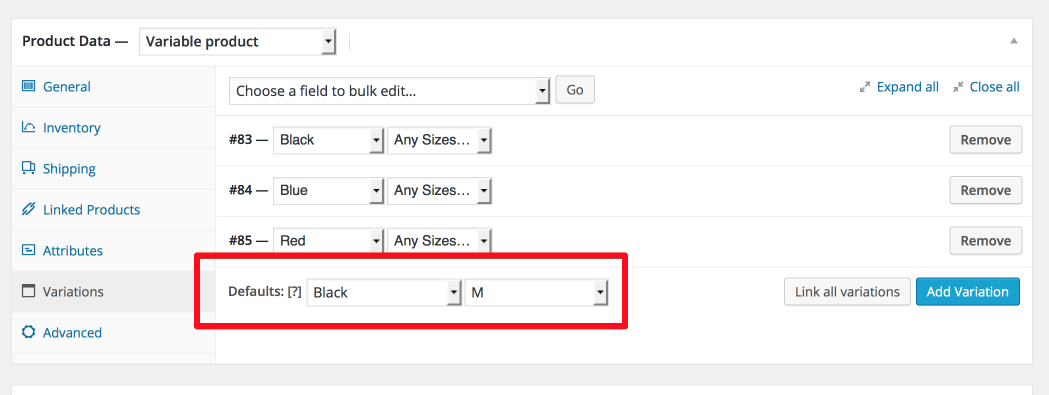
5. Enable Color Swatch.

6. Display colors swatch gallery for images
If you want display more than one images as color you should upload images for gallery colors as screen shot

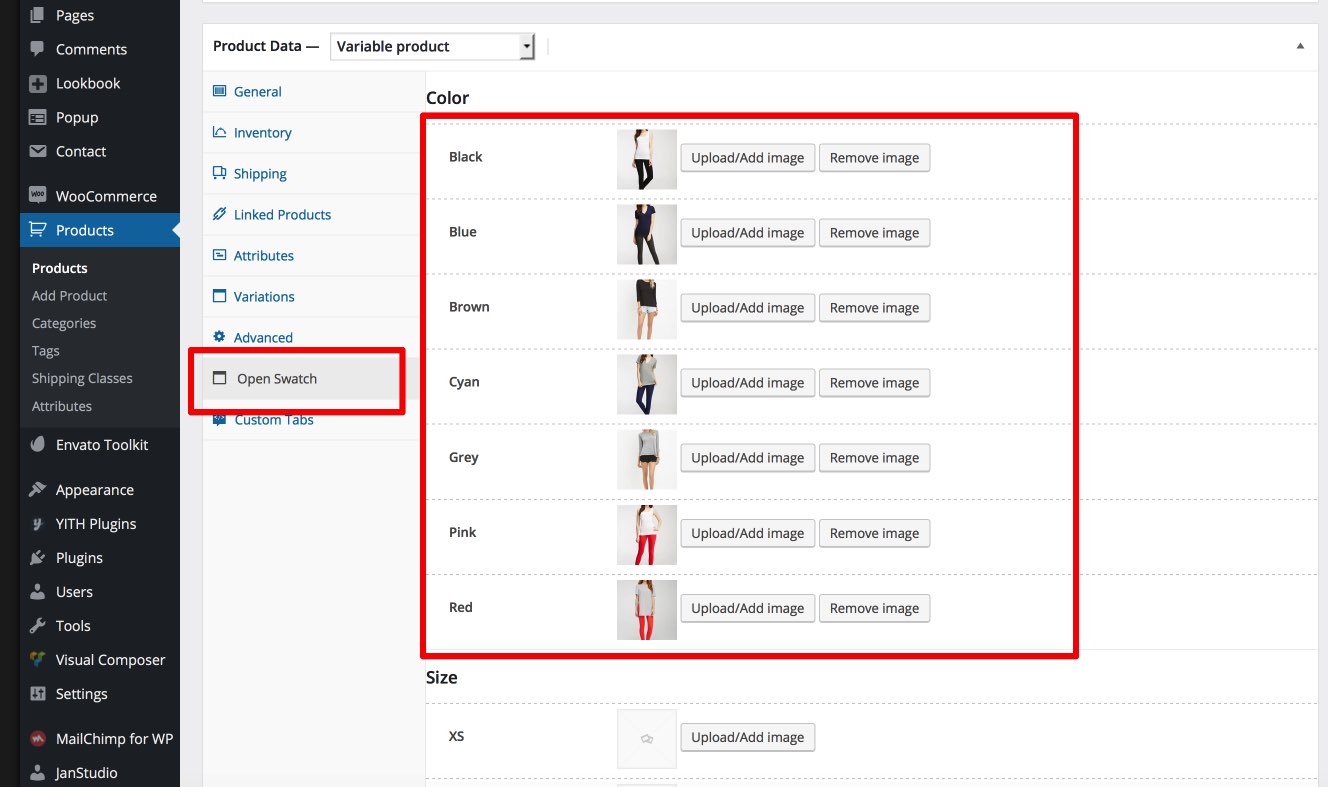
7. Display images swatch
If you want display images swatch Choose "Open Swatch" tab and upload images as color like screen shot
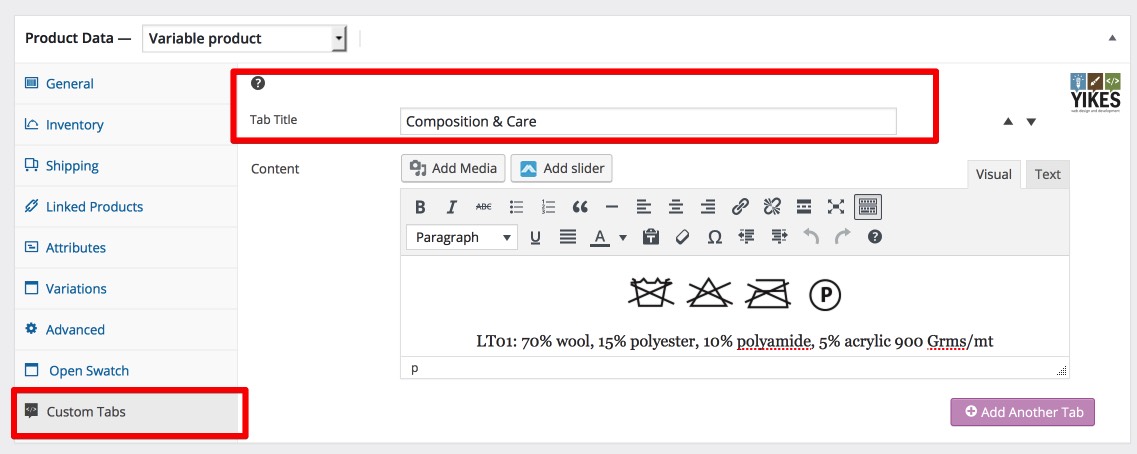
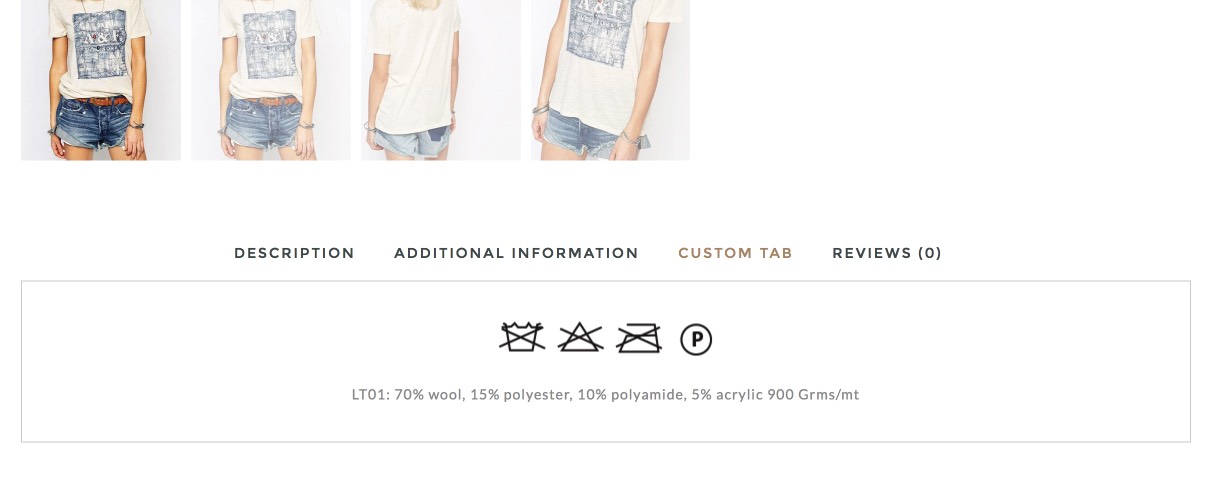
Product Custom Tab
Woocommerce default you have only 3 tabs (description, additional information, reviews) you should install YIKES Custom Product Tabs for WooCommerce plugin to add more custom tab
On the front-end display
Product Detail Layout
We have option for you can config product detail layout in theme option WooCommerce Setting and product detail section, you also can set layout for product detail when you create new product, it will override setting in theme option
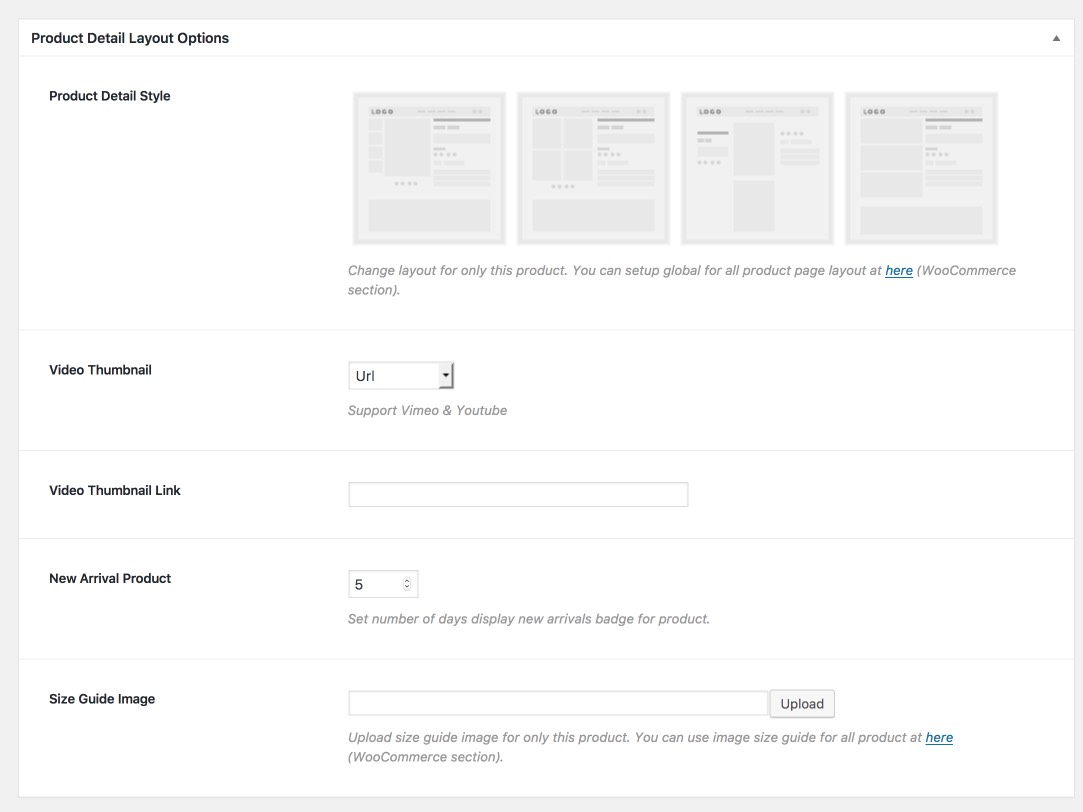
Product Video Thumbnail
We have option for you can display video as thumbnail, you can upload your video (.mp4) from local or use Youtube, Vimeo link
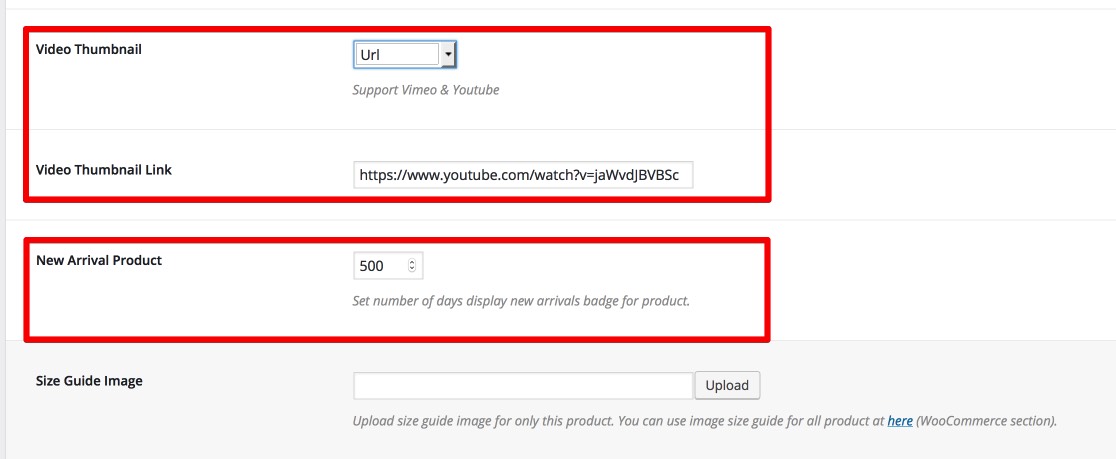
Product New Arrival Badge
You can add "New Arrival" badge for product by set number of days after product publish
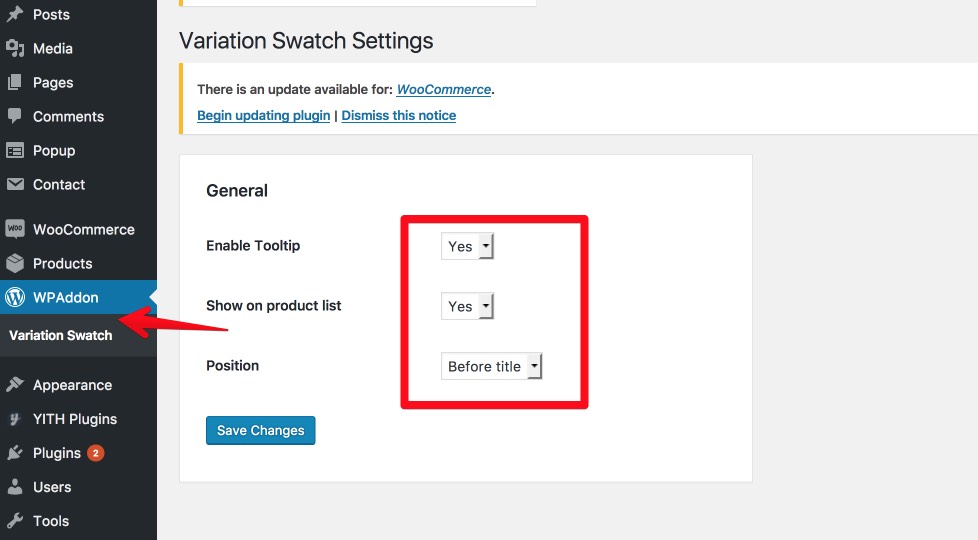
Plugin Setings
Navigate toDashboard > WPAddon > Variation Swatch
You have option to show variation swatch on product listing and show tooltip
Create Product Attributes
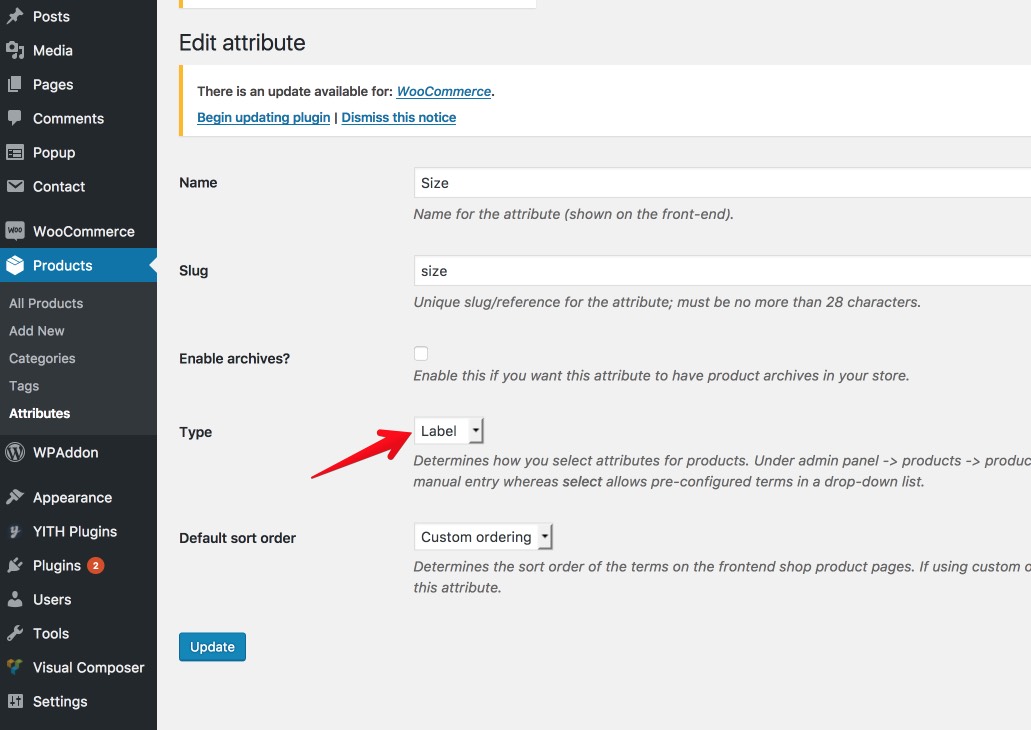
Navigate toDashboard > Products > Attributes
Create color attributes you follow this video
To create size attribute swatch
Create attribute type as label
Create new product with color and image swatches
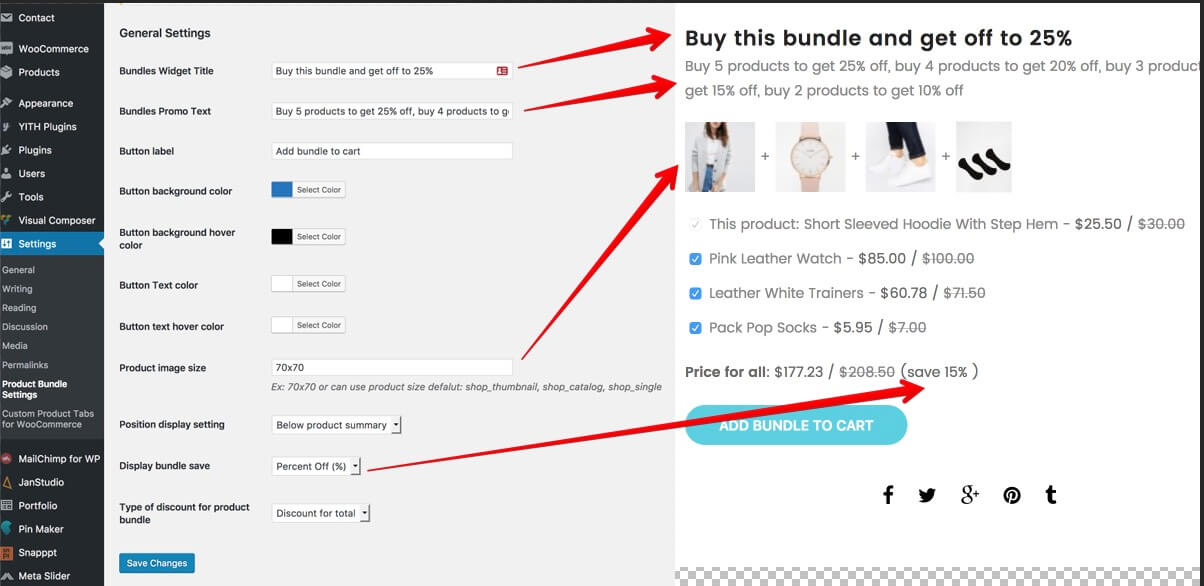
Product Bundle Plugin Setting
Open settings of plugin as Dashboard > Settings > Product Bundle Settings
You have option to change title of bundle, description of the bundle, button text and color of button. Especially you can setting discount for the bundle, display save off as amount or percent
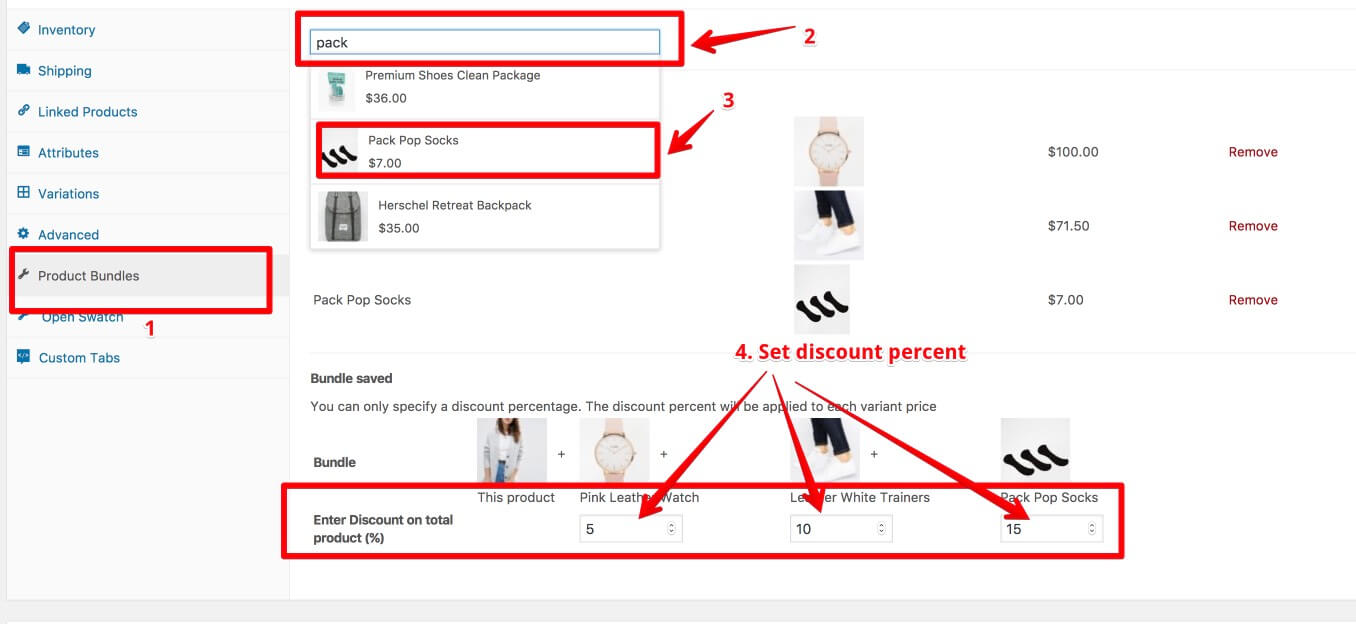
Create new product bundle
1. Create a product as normal
2. Add another product to your bundle
- Open Product Bundles Tab
- Type your product name
- Click to product to add this to bundle
- You can easy to add or remove a product to your bundle
3. Add discount percent for total products (if user buy 4 products they save 15%, buy 3 products they save 10%, etc...). This percent you easy control
You can view our video at https://youtu.be/JSKfWGjXo68
Create Lookbook Collection
Go to 'Pin Maker > Category > Add New' to create new collection. You can follow our video at https://www.youtube.com/watch?v=e_fvUxA19vU
There're 3 option to display your lookbook collections:
- Default - Grid
- Slider
- Masonry
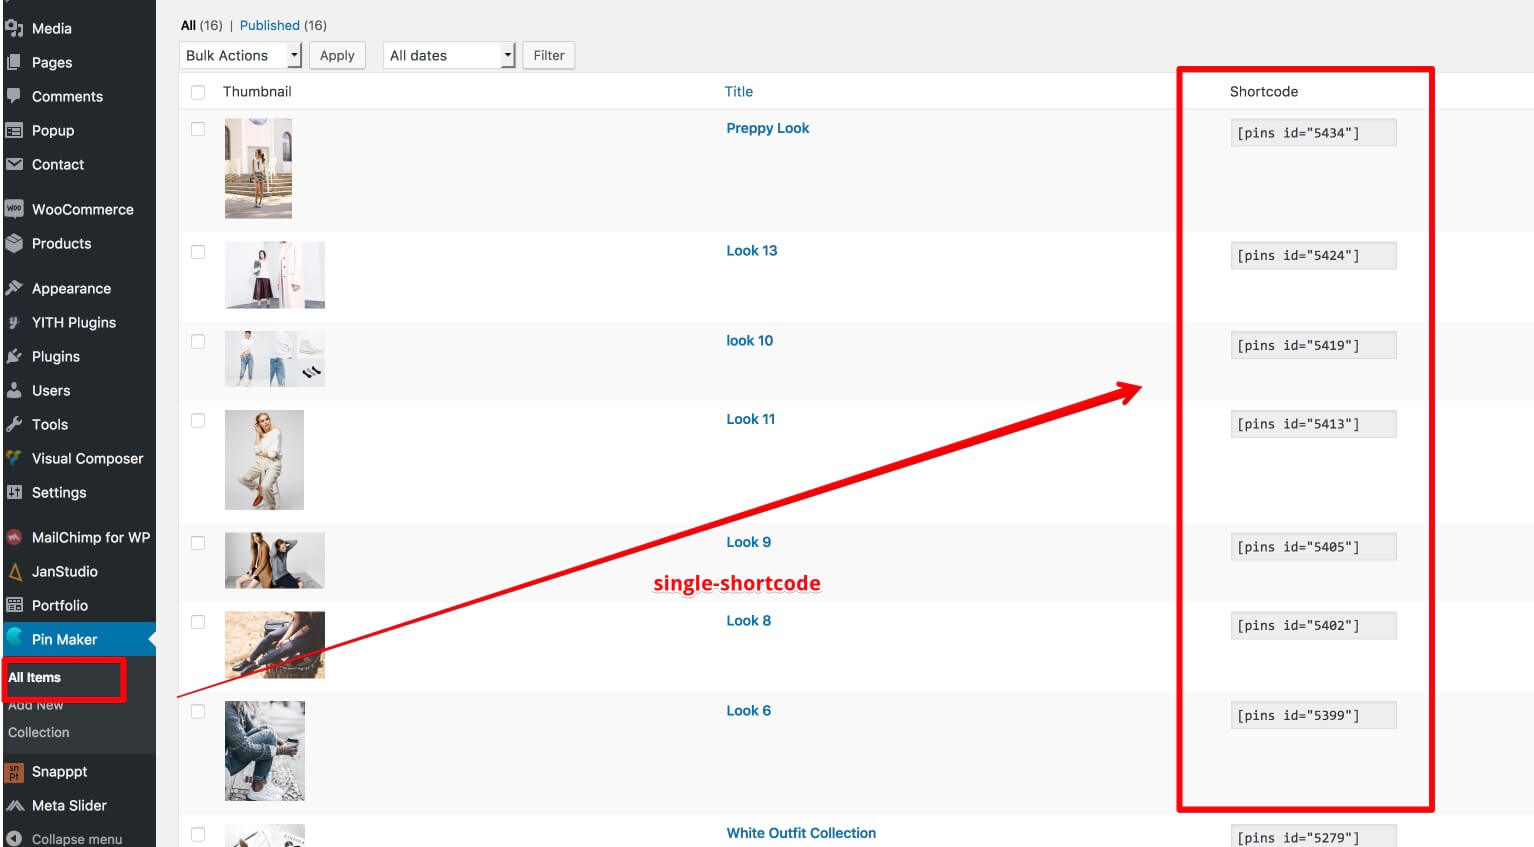
Create New Look
Go to 'Pin Maker > Add New' to create new look. You need upload image, and assign for categories
Follow our video at https://www.youtube.com/watch?v=PDvbrxVvL00
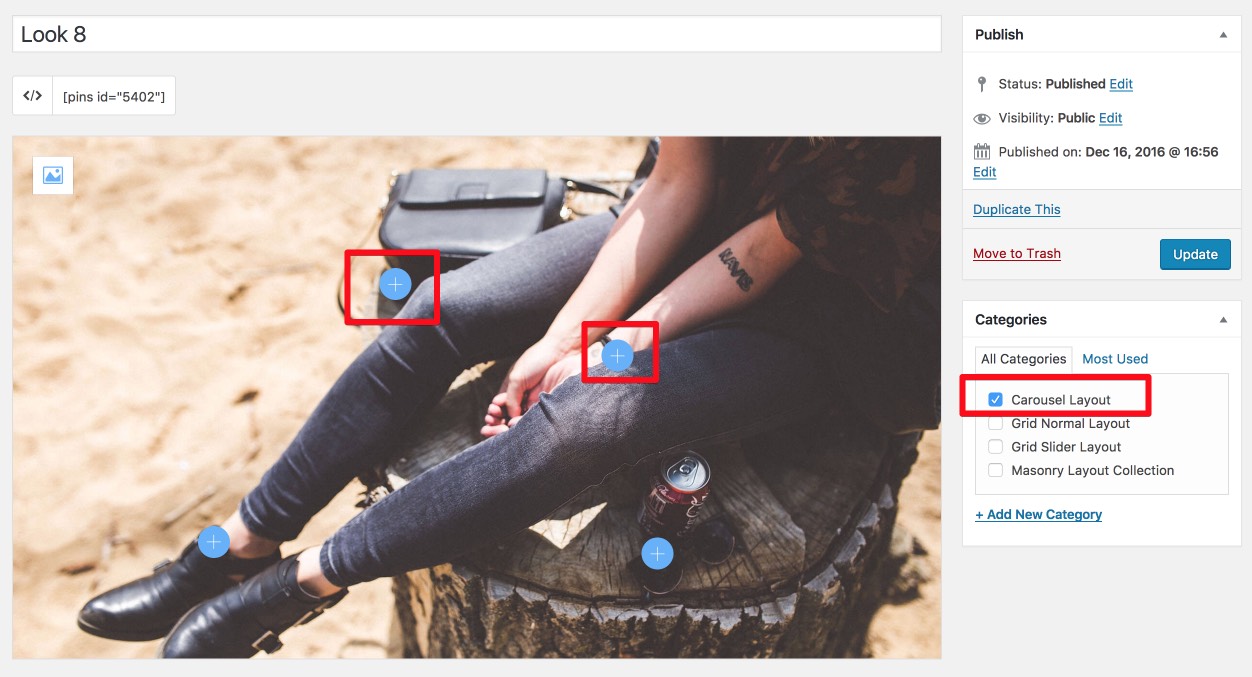
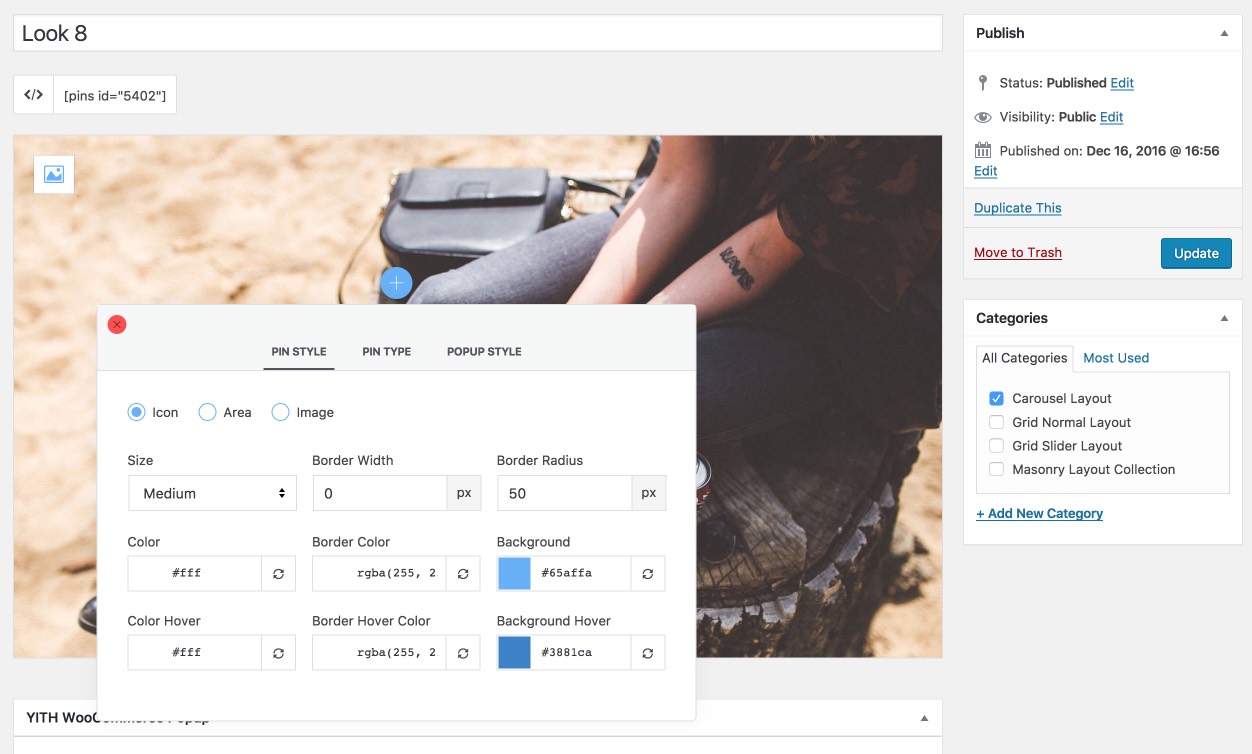
Add a pin on look
- Click on the main image to add a pin
- You can add one and more note on image and link your note to product
1. Pin Style:
Display pin as icon, area, image
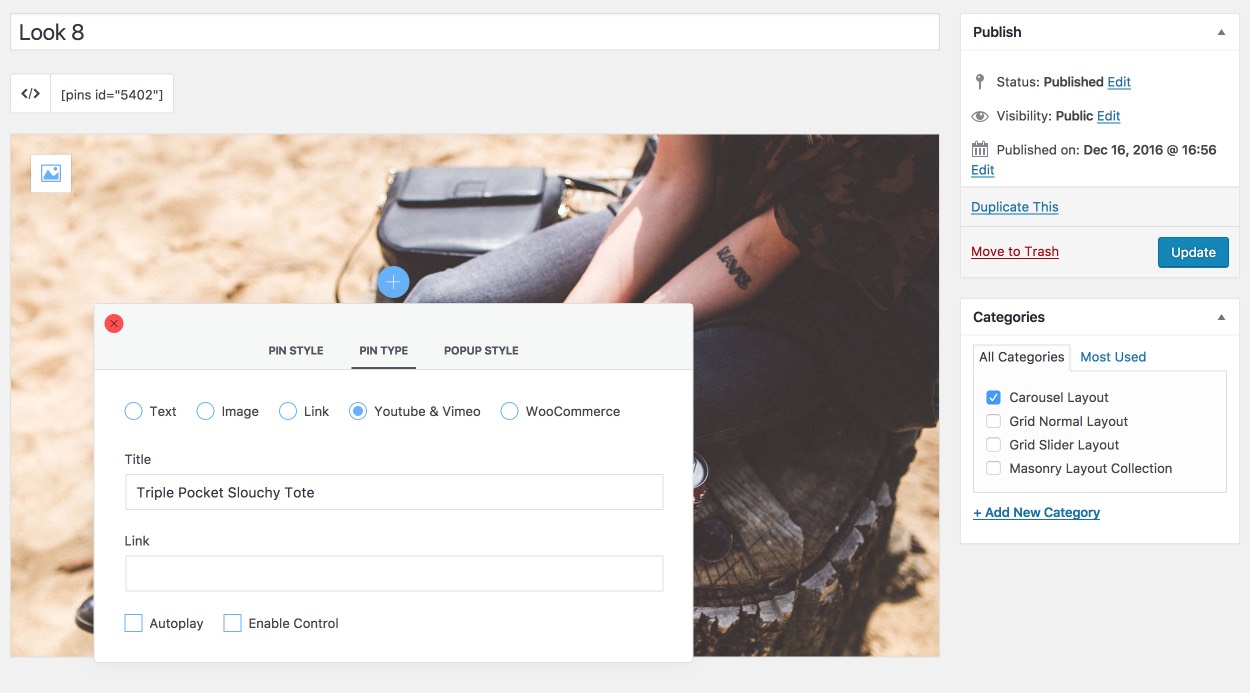
2. Pin Type:
- Text: this option help you can add text to introduct about a product,...
- Image: content of pin is image
- Link: content of pin is link, you can use this option to link to another page, affiliate
- YouTube & Vimeo: add content of pin can display a video
- WooCommerce: display content of pin as a WooCommerce's product
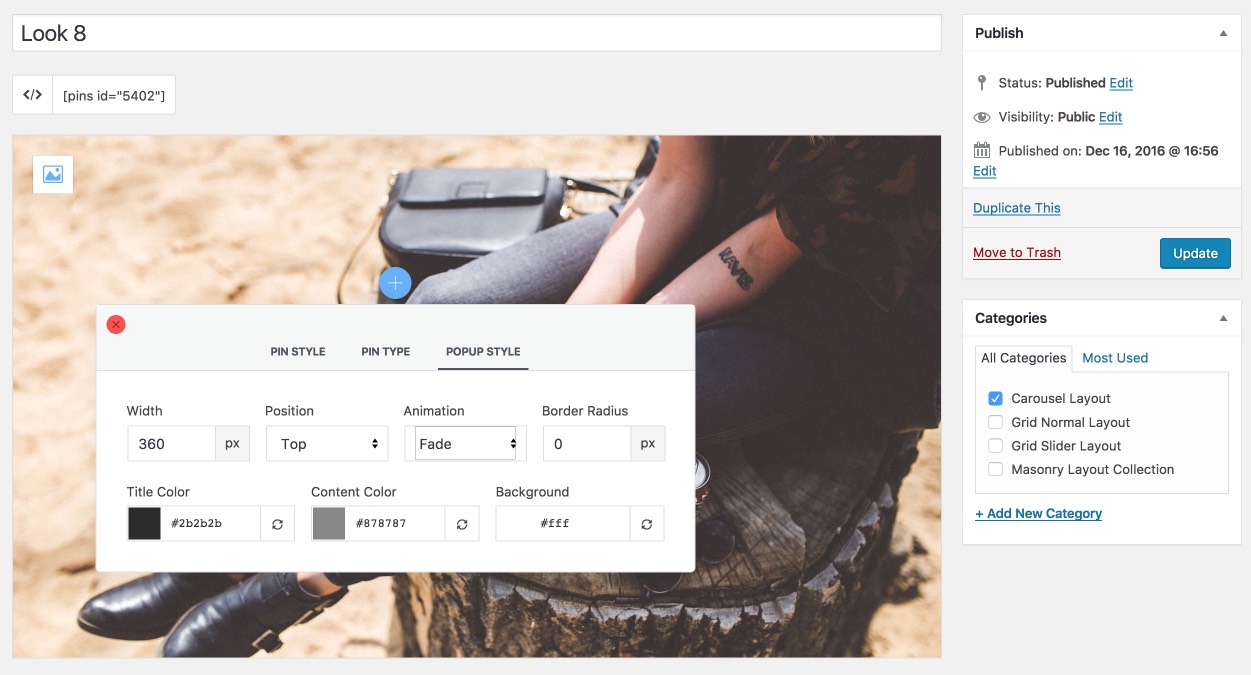
3. Popup Style: Config position, effect, style of popup display
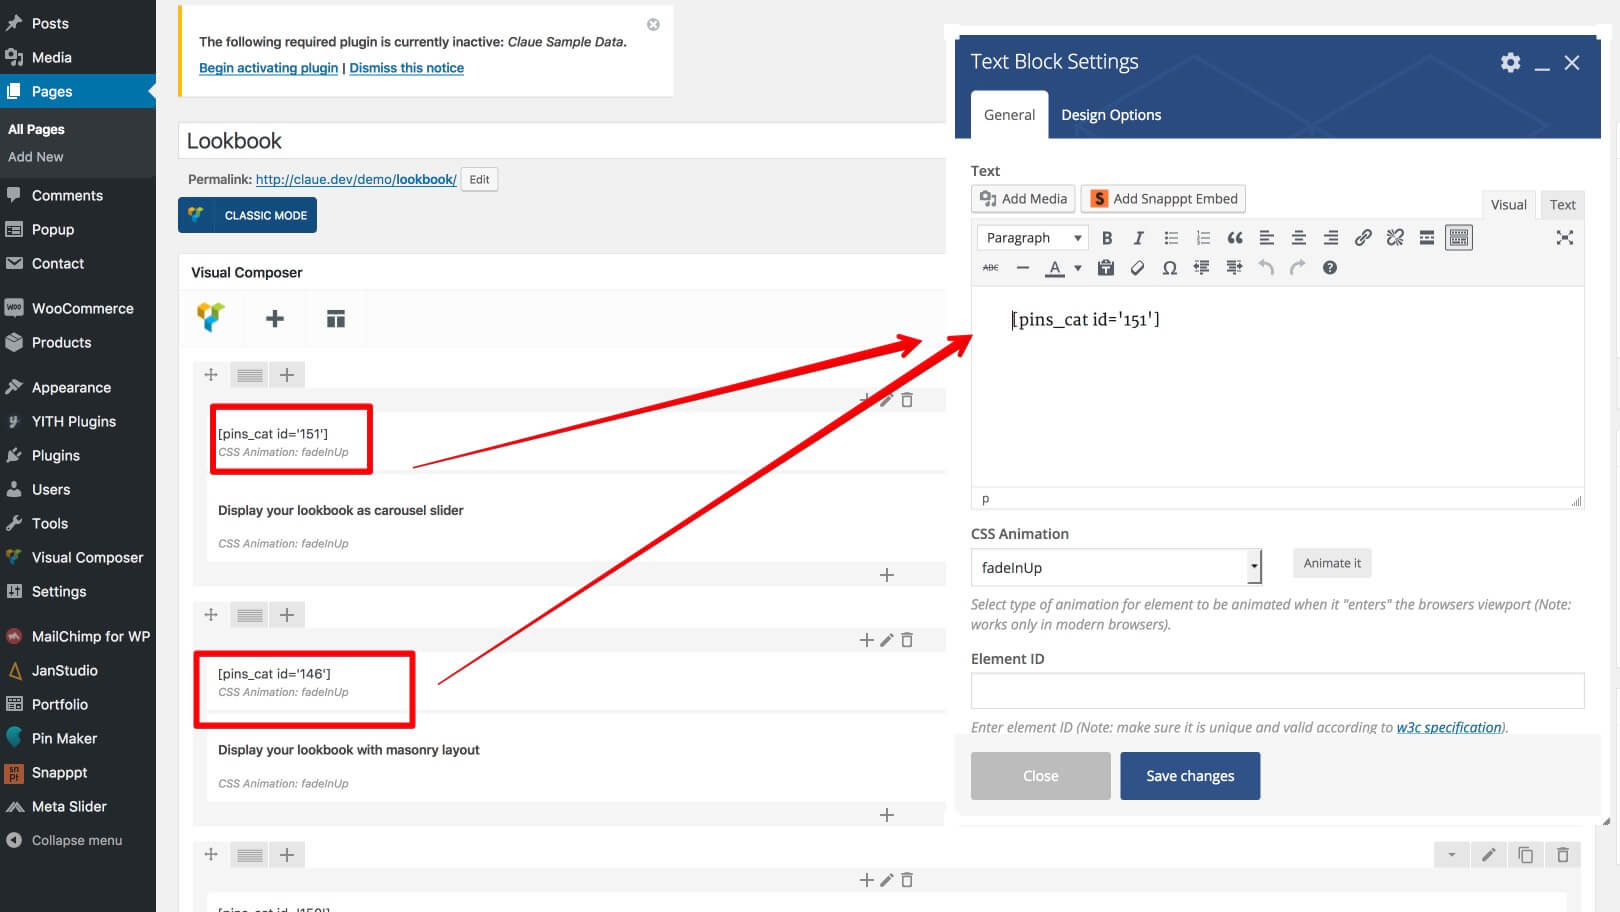
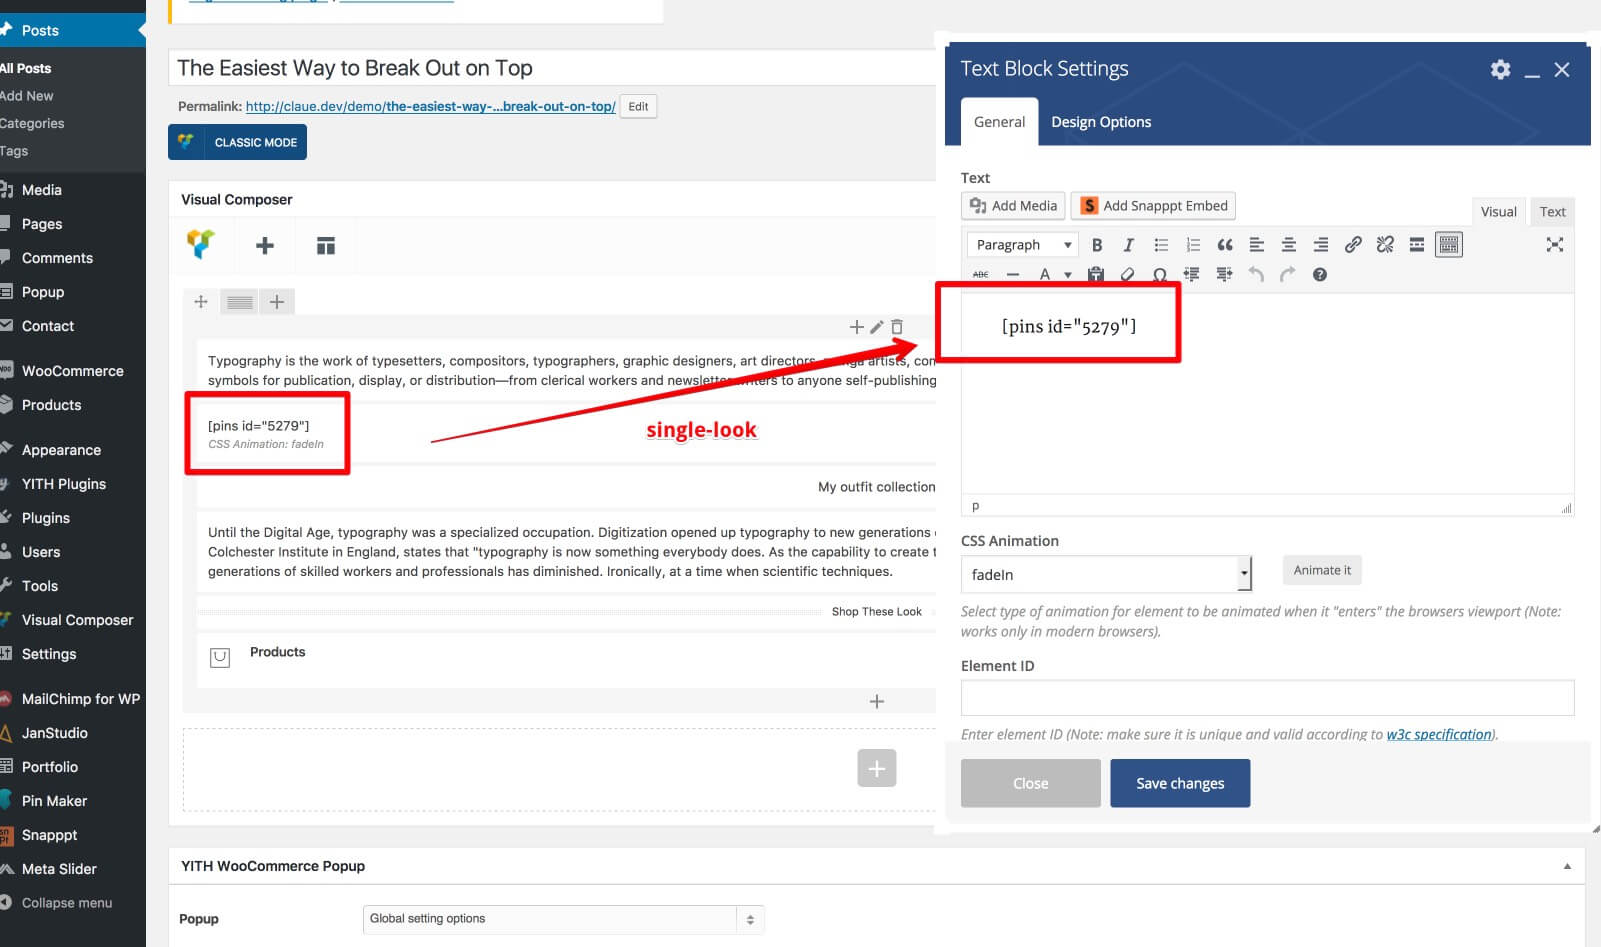
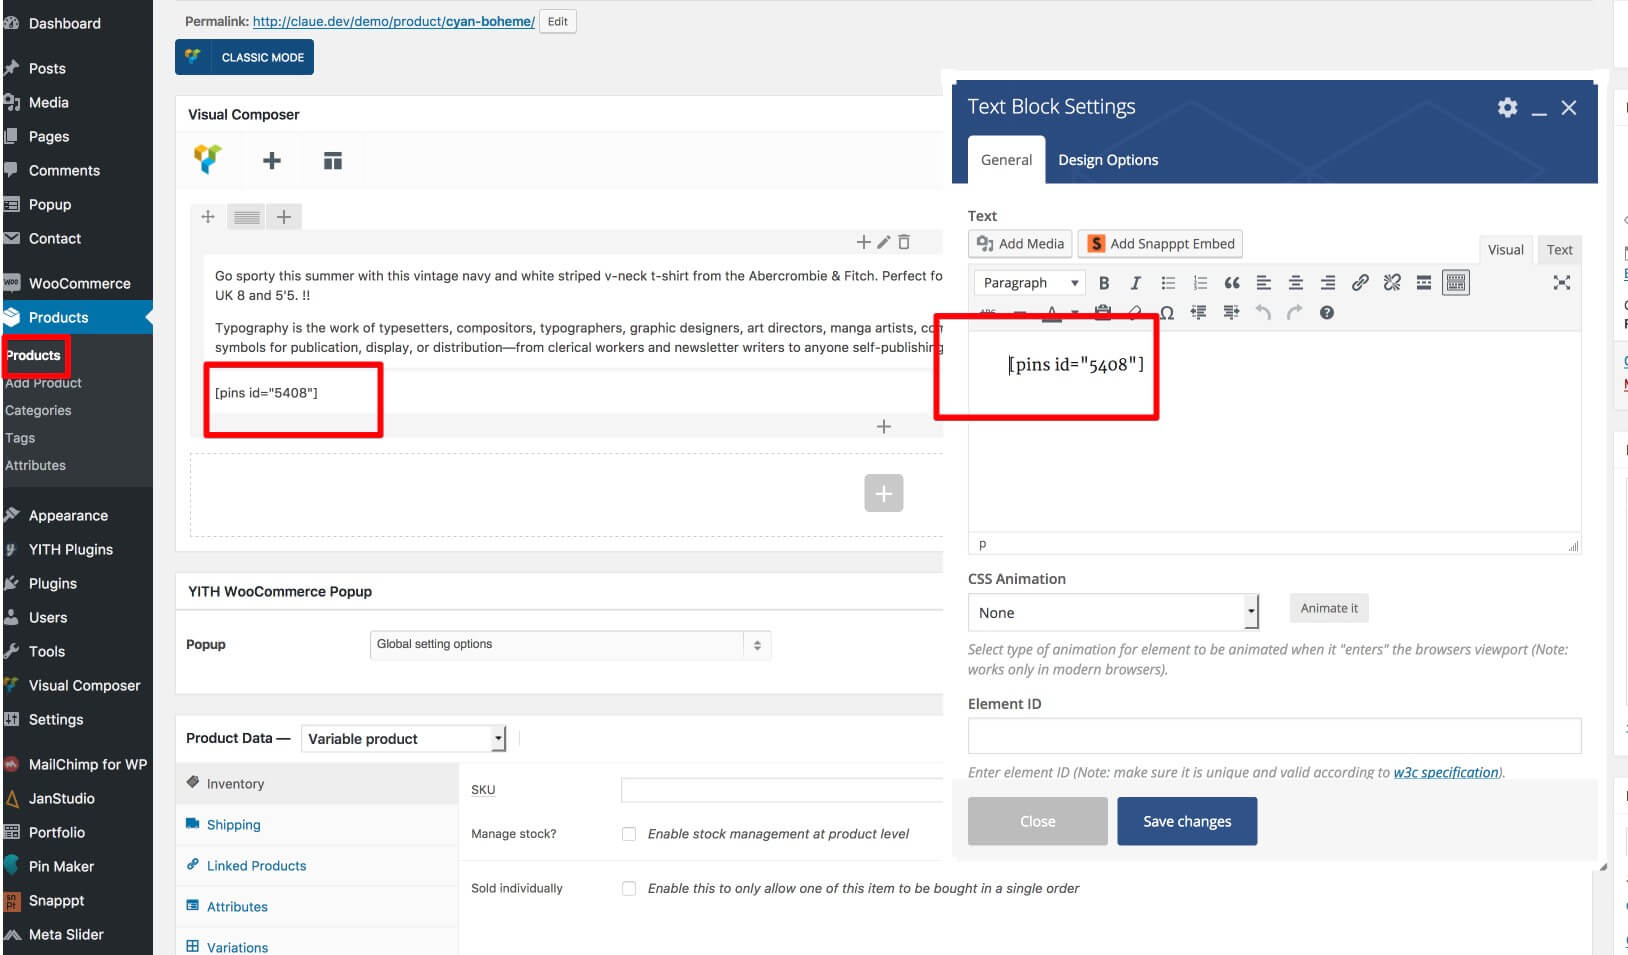
1. Lookbook Shortcode
You can add single lookbook or collection of lookbook on you blog post, page, product using single shortcode: [pins id="5279"] or collection short code:[pins_cat id='151']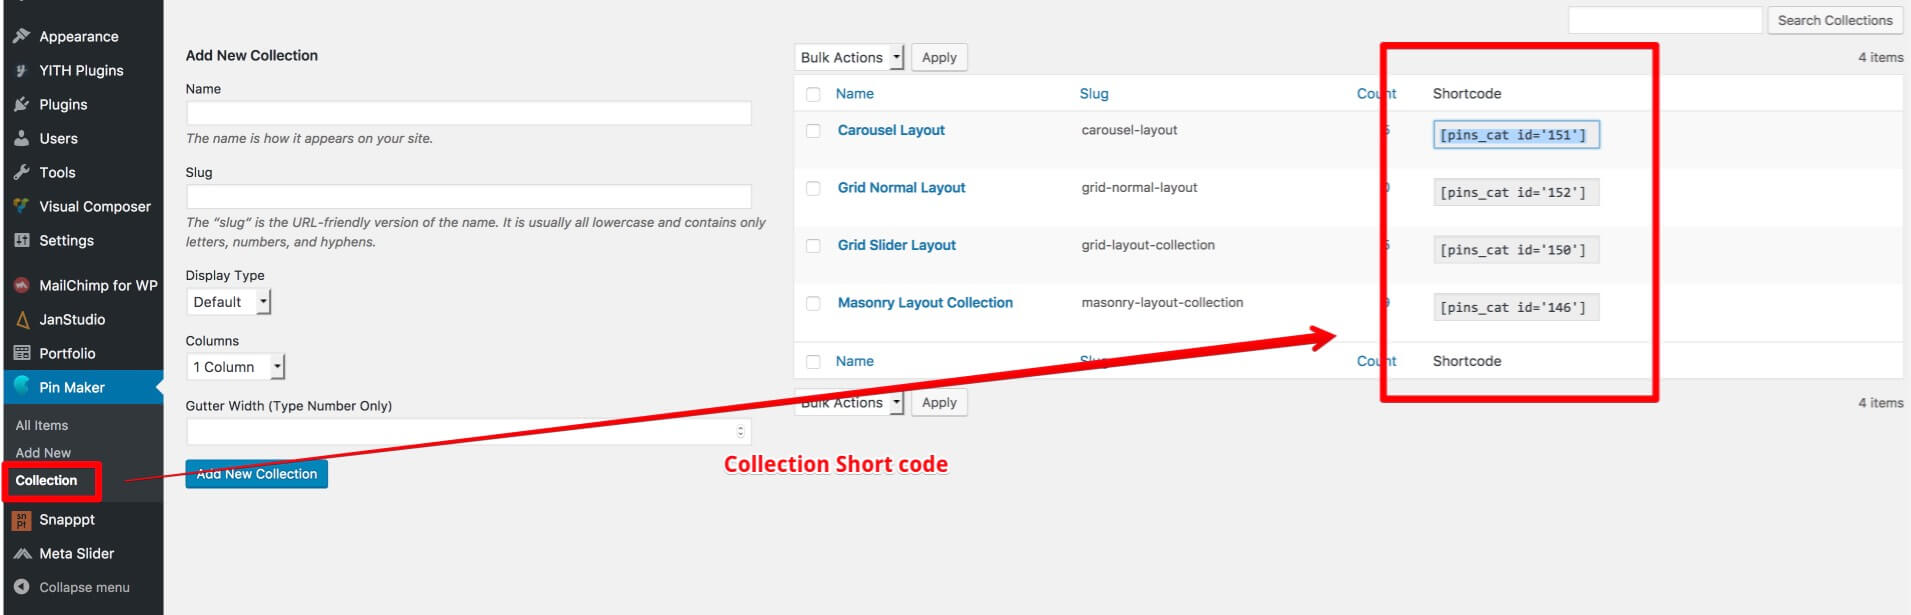
2. Lookbook Page
You can insert your lookbook to your blog post, product description, page use shortcode [pins_cat id='151']
2.1 Page with Lookbook
http://janstudio.net/claue/demo/lookbook/
2.2 Post with Lookbook
http://janstudio.net/claue/demo/the-easiest-way-to-break-out-on-top/
2.3 Product with Lookbook
http://janstudio.net/claue/demo/product/pink-leather-watch/
1. Install Plugin
Download plugin at https://wordpress.org/plugins/shop-feed-for-instagram-by-snapppt/ or in your Dashboard > Plugin > Add New > Search "Instagram Shop"
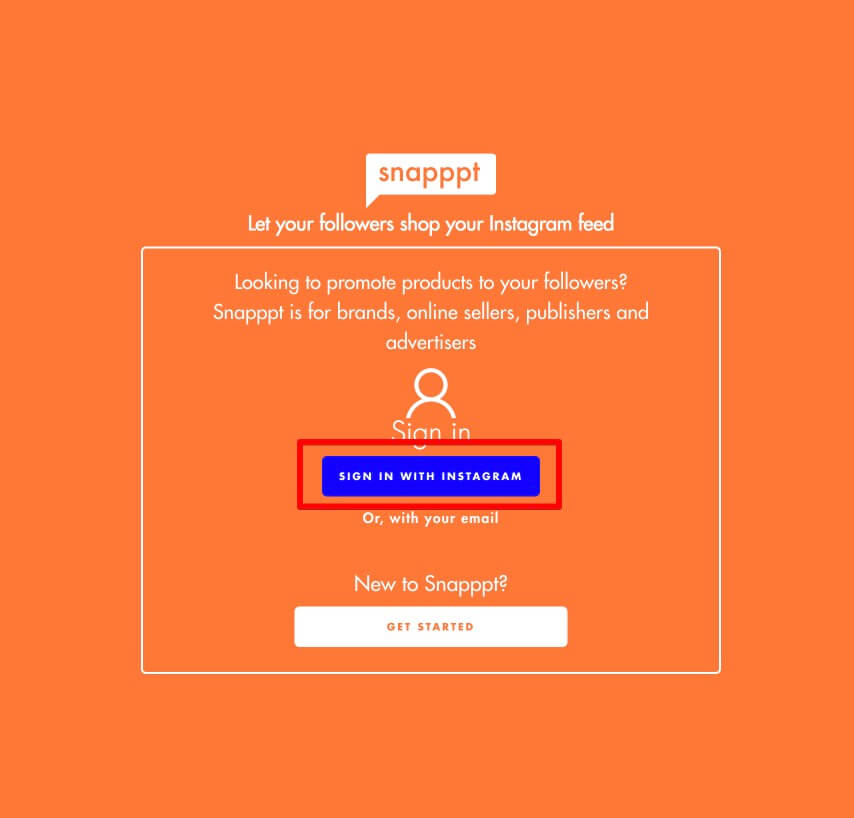
2. Sign In your Instagram and sync your products
- Sign in at https://snapppt.com/ your Instagram Feed will auto load
- Open Apps Menu, select WooCommerce app, insert your store link and press connect
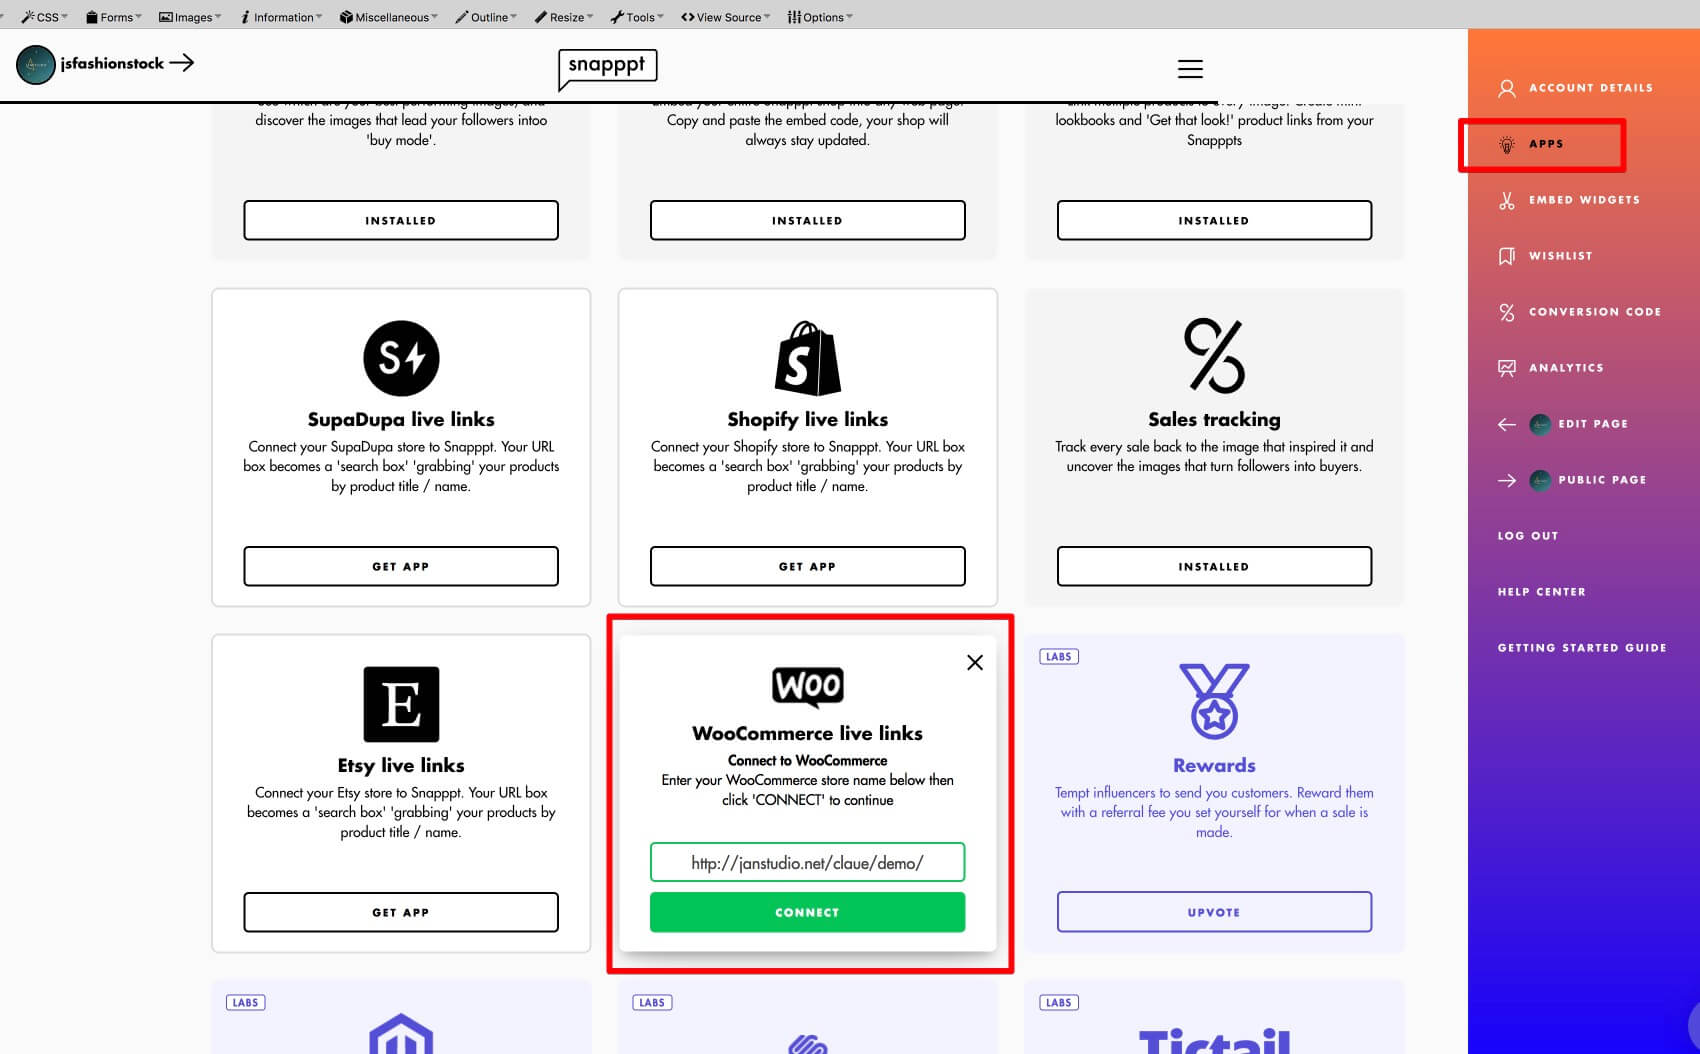
- Login your website with admin account
- Approve Snapppt read your WooCommerce product

3. Add your Snapppt account ID to your website
- Open Menu > Account Details > Copy your Snapppt ID
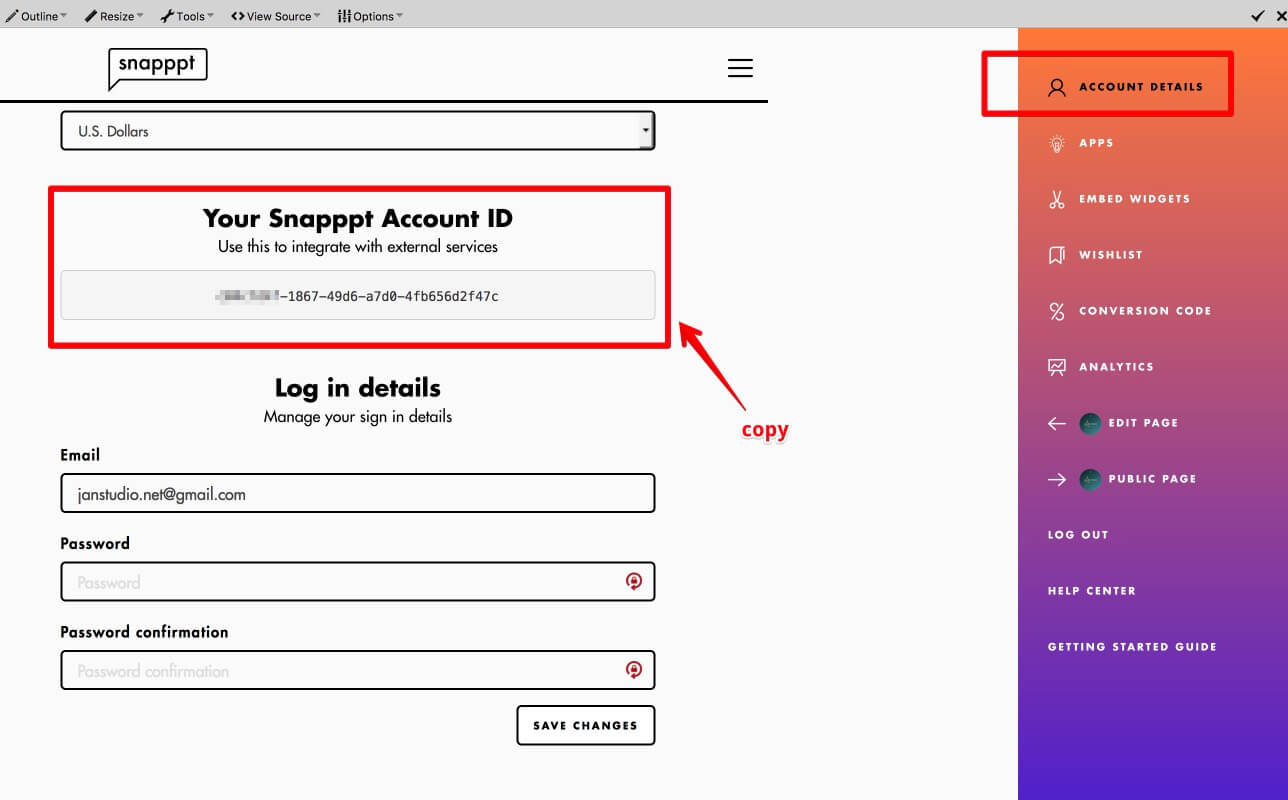
- Go to your site Dashboard > Snappt > Paste Your Snapppt Account ID. Now your store links with your Snapppt and Instagram
Create Instagram Shop Pin
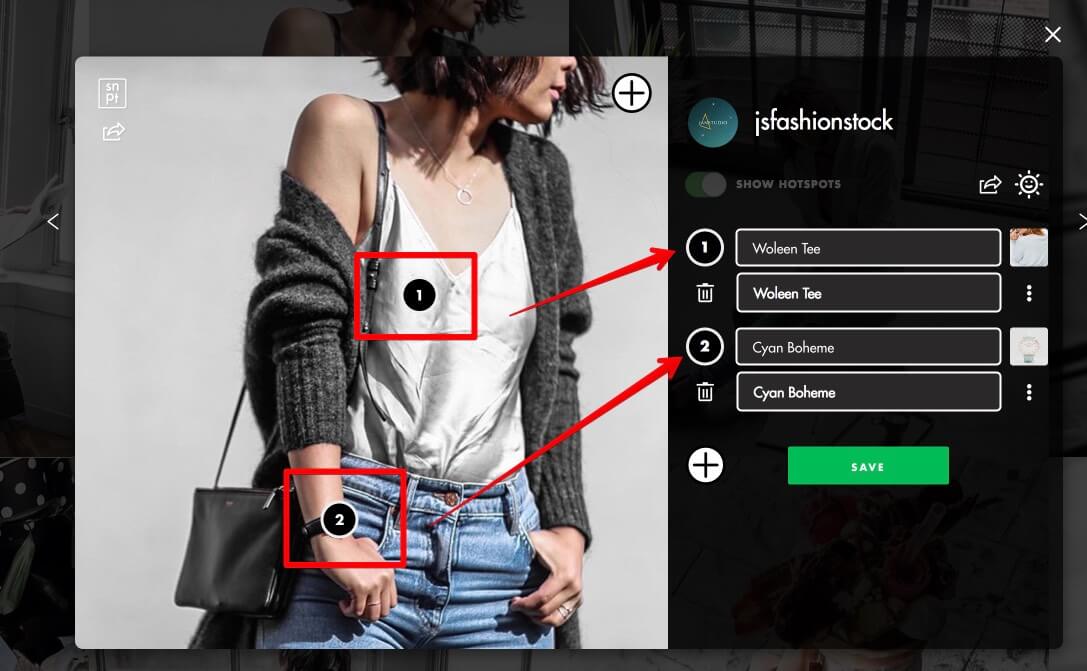
1- Open your Snapppt homepage > Click one image on your Instagram Feed > Edit Product Links
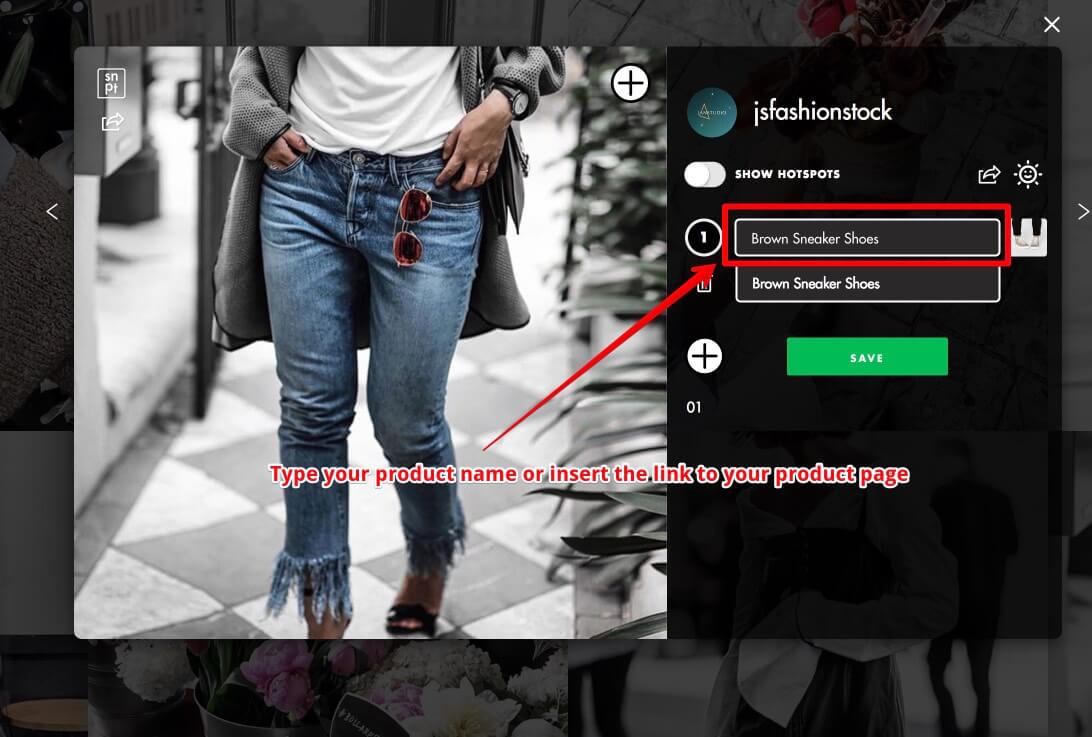
2- Edit share option or enable hotpots feature.
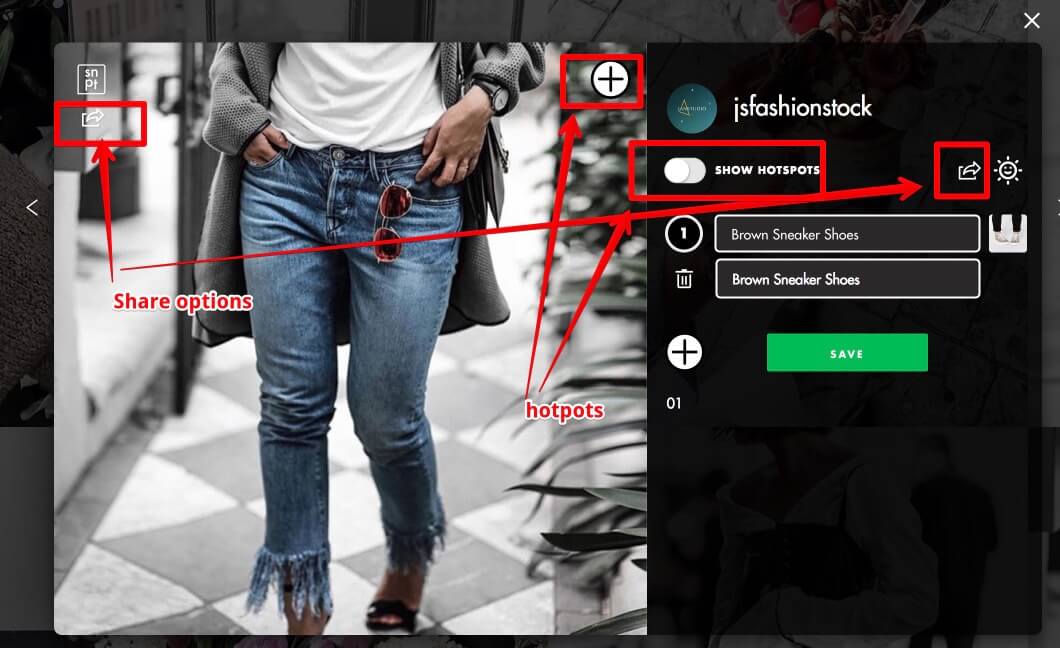
With hotpots feature enable you can add more pin to your images and link to more product
Create Instagram Shop Page
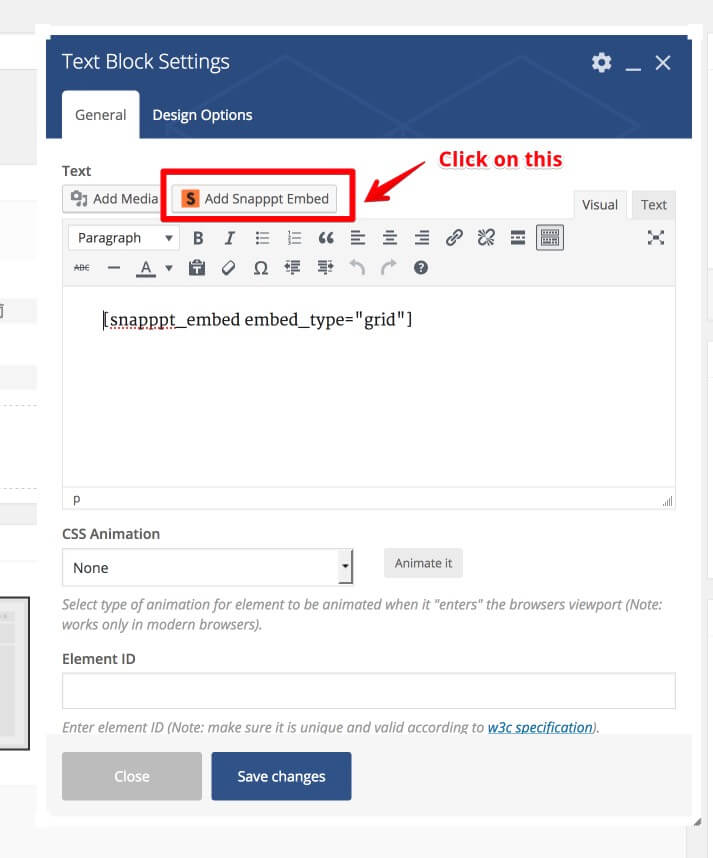
You can insert your Instagram Shop in Custom Page, Blog Post, Product Detail Description by insert shotcode [snapppt_embed embed_type="grid"] or click on button
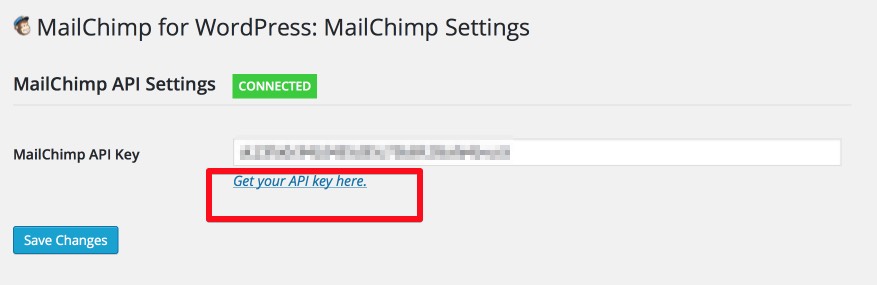
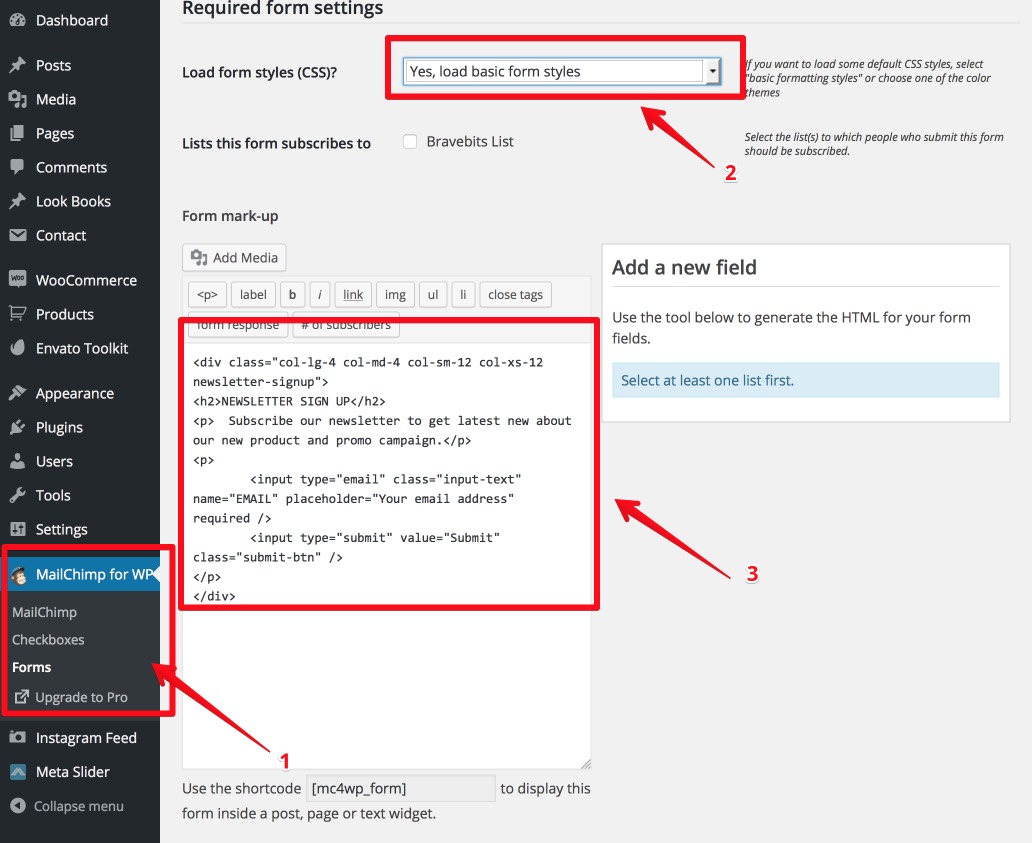
MailChimp Newsletter
1. You need to download install MailChimp Newsletter plugin
2. Get MailChimp API key
3. Edit form
4. Display Subscribes Form
- Create a widget and display this widget at Footer Sidebar: Go 'Appearance > Widgets > Text Widget' and add to 'Footer Sidebar'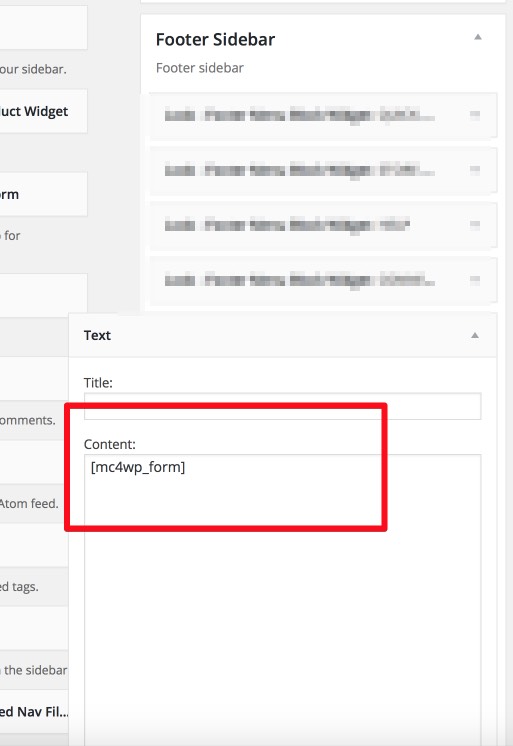
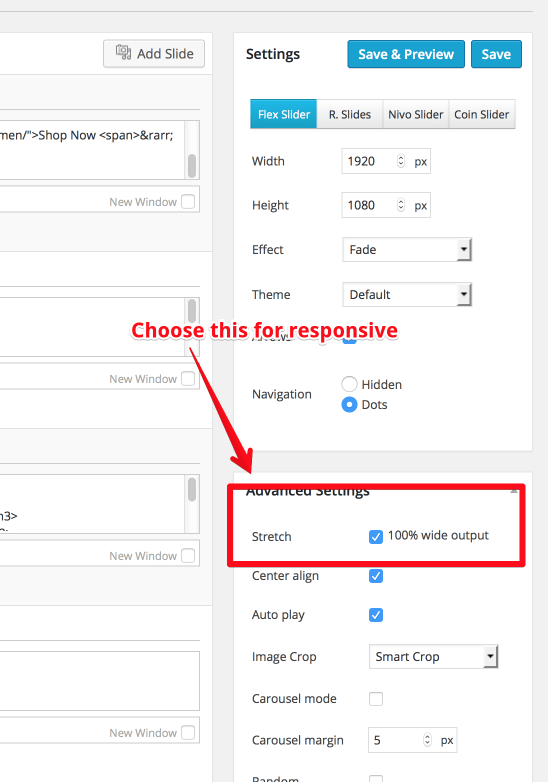
Meta Slider
1. You need to download install Meta Slider plugin
To create your first slider go 'Meta Slider > Meta Slider'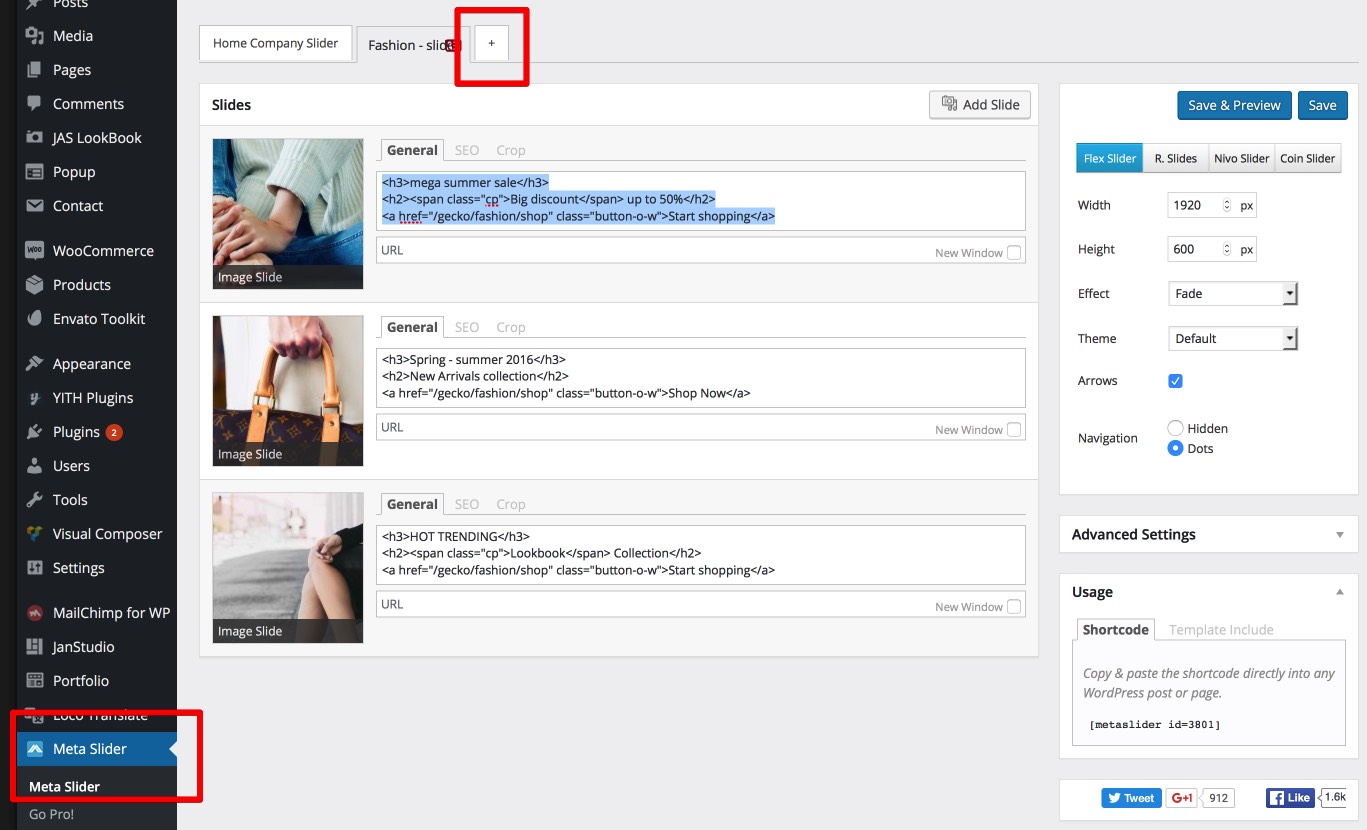
2. We're using free edition of Meta Slider so you want style text on slider you only have method: put custom HTML into caption box
					mega summer sale
					Big discount up to 50%
					Start shopping
3. Choose kind of slider to display
- Flex Slider
- R.Slider
- Nivo Slider
- Coin Slider
4. Make slider responsive and fit width all resolution screen
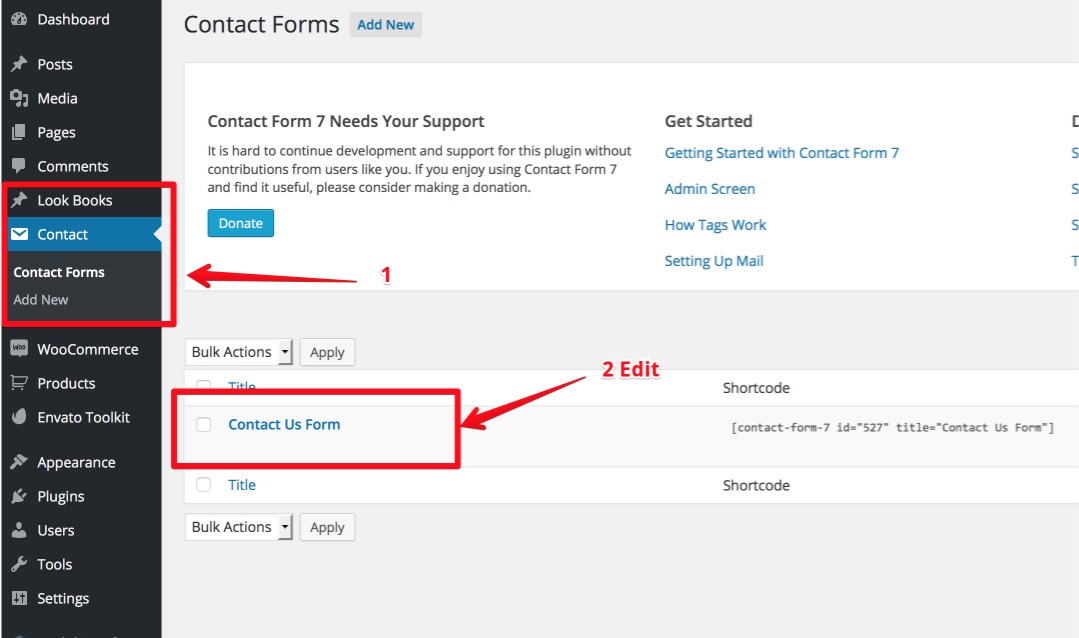
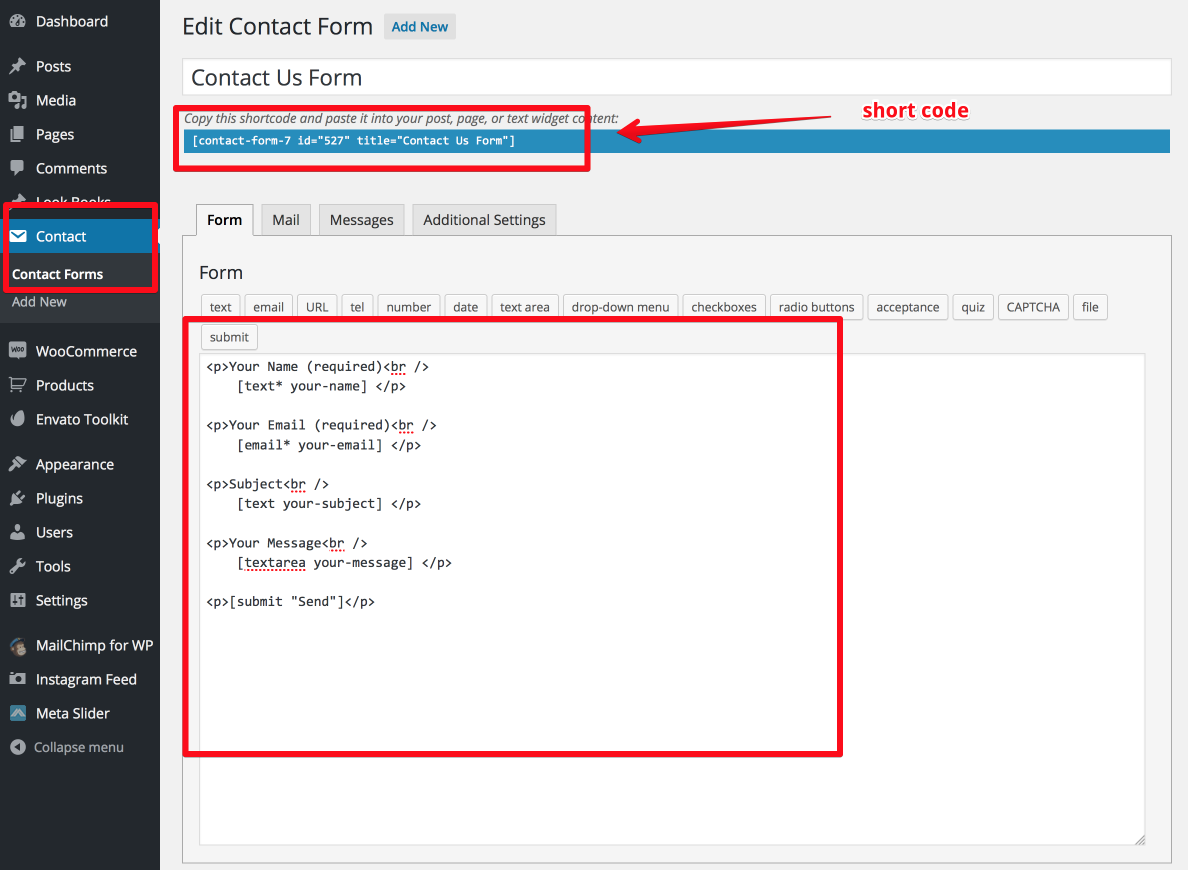
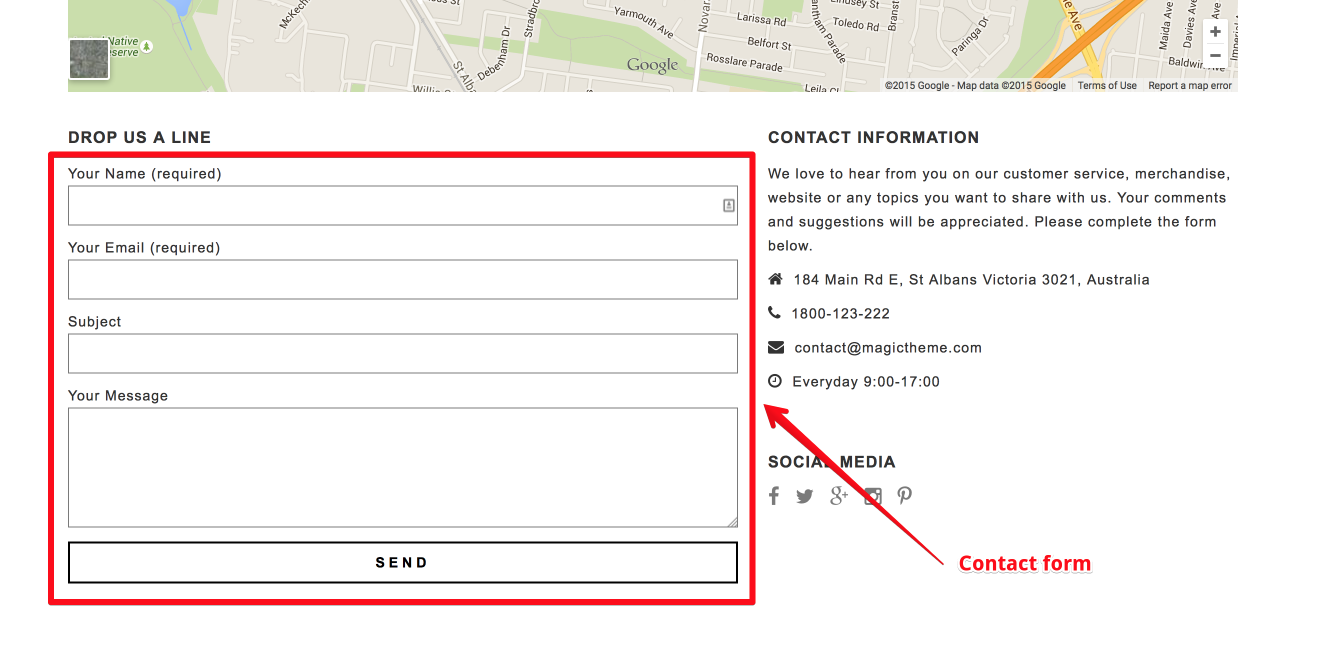
Contact Form 7
1. You need to download install Contact Form 7 plugin
2. Edit default form
3. Edit content of form
4. Display Contact Form 7 in contact page
- Create new page and insert contact form widget'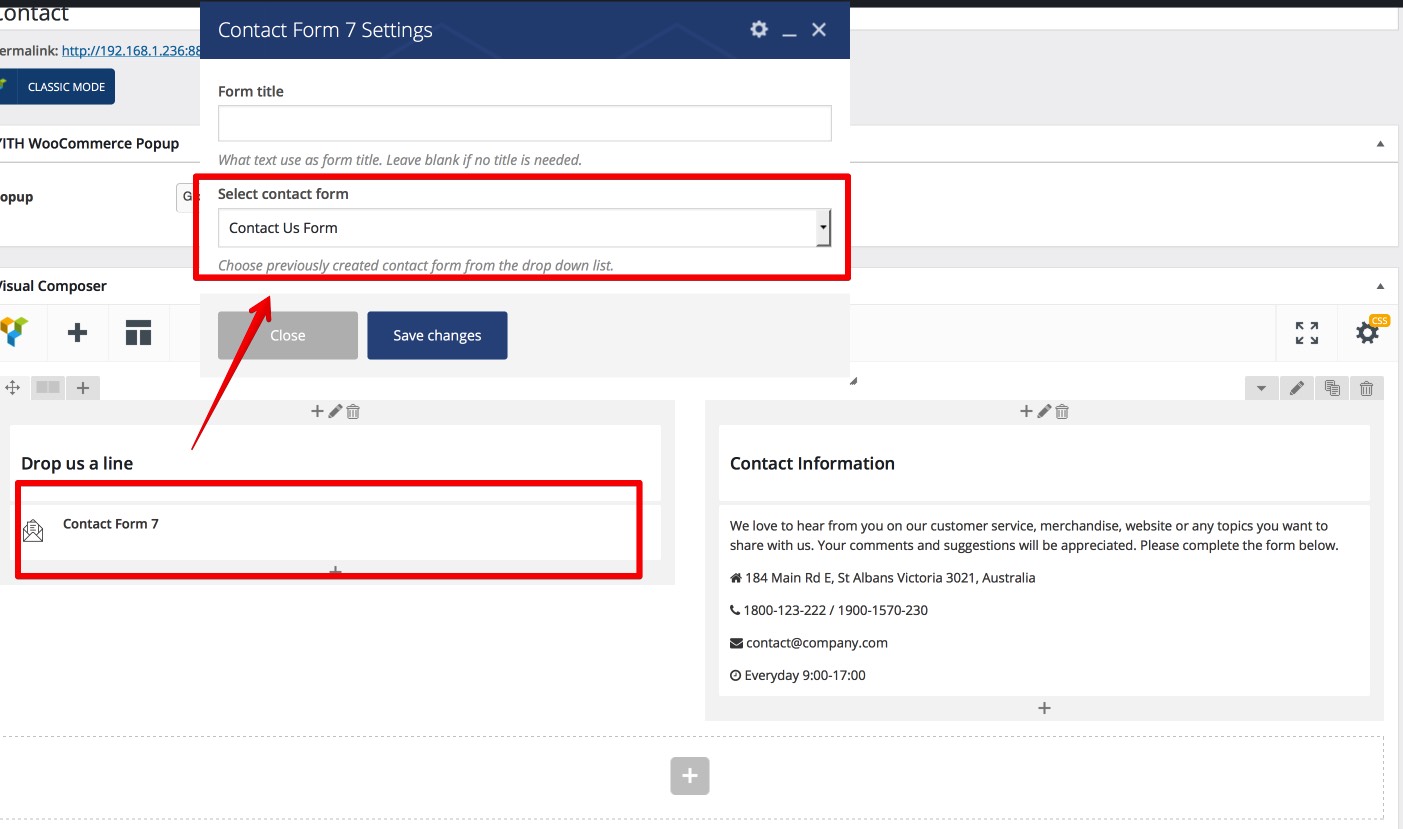
5. Result
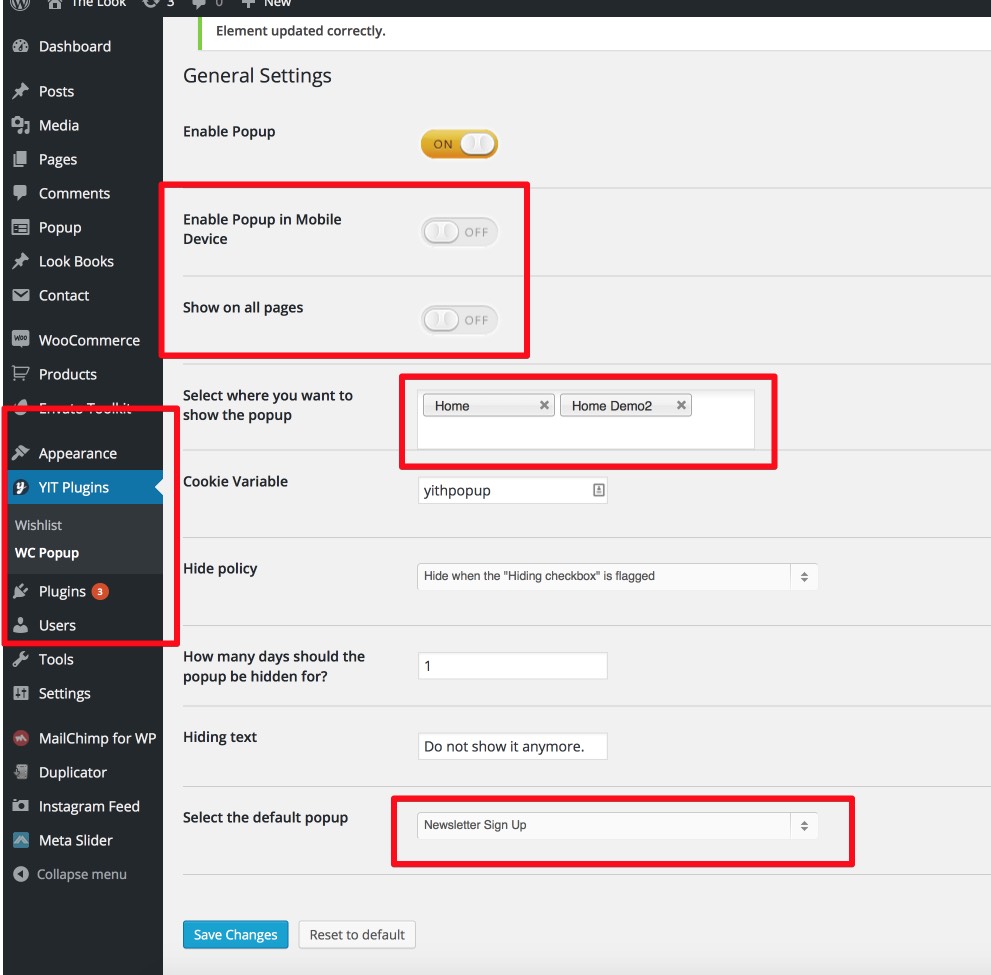
YITH WooCommerce Popup
1. You need to download install YITH WooCommerce Newsletter Popupplugin
2. Create Popup

3. Setup Popup display on pages:
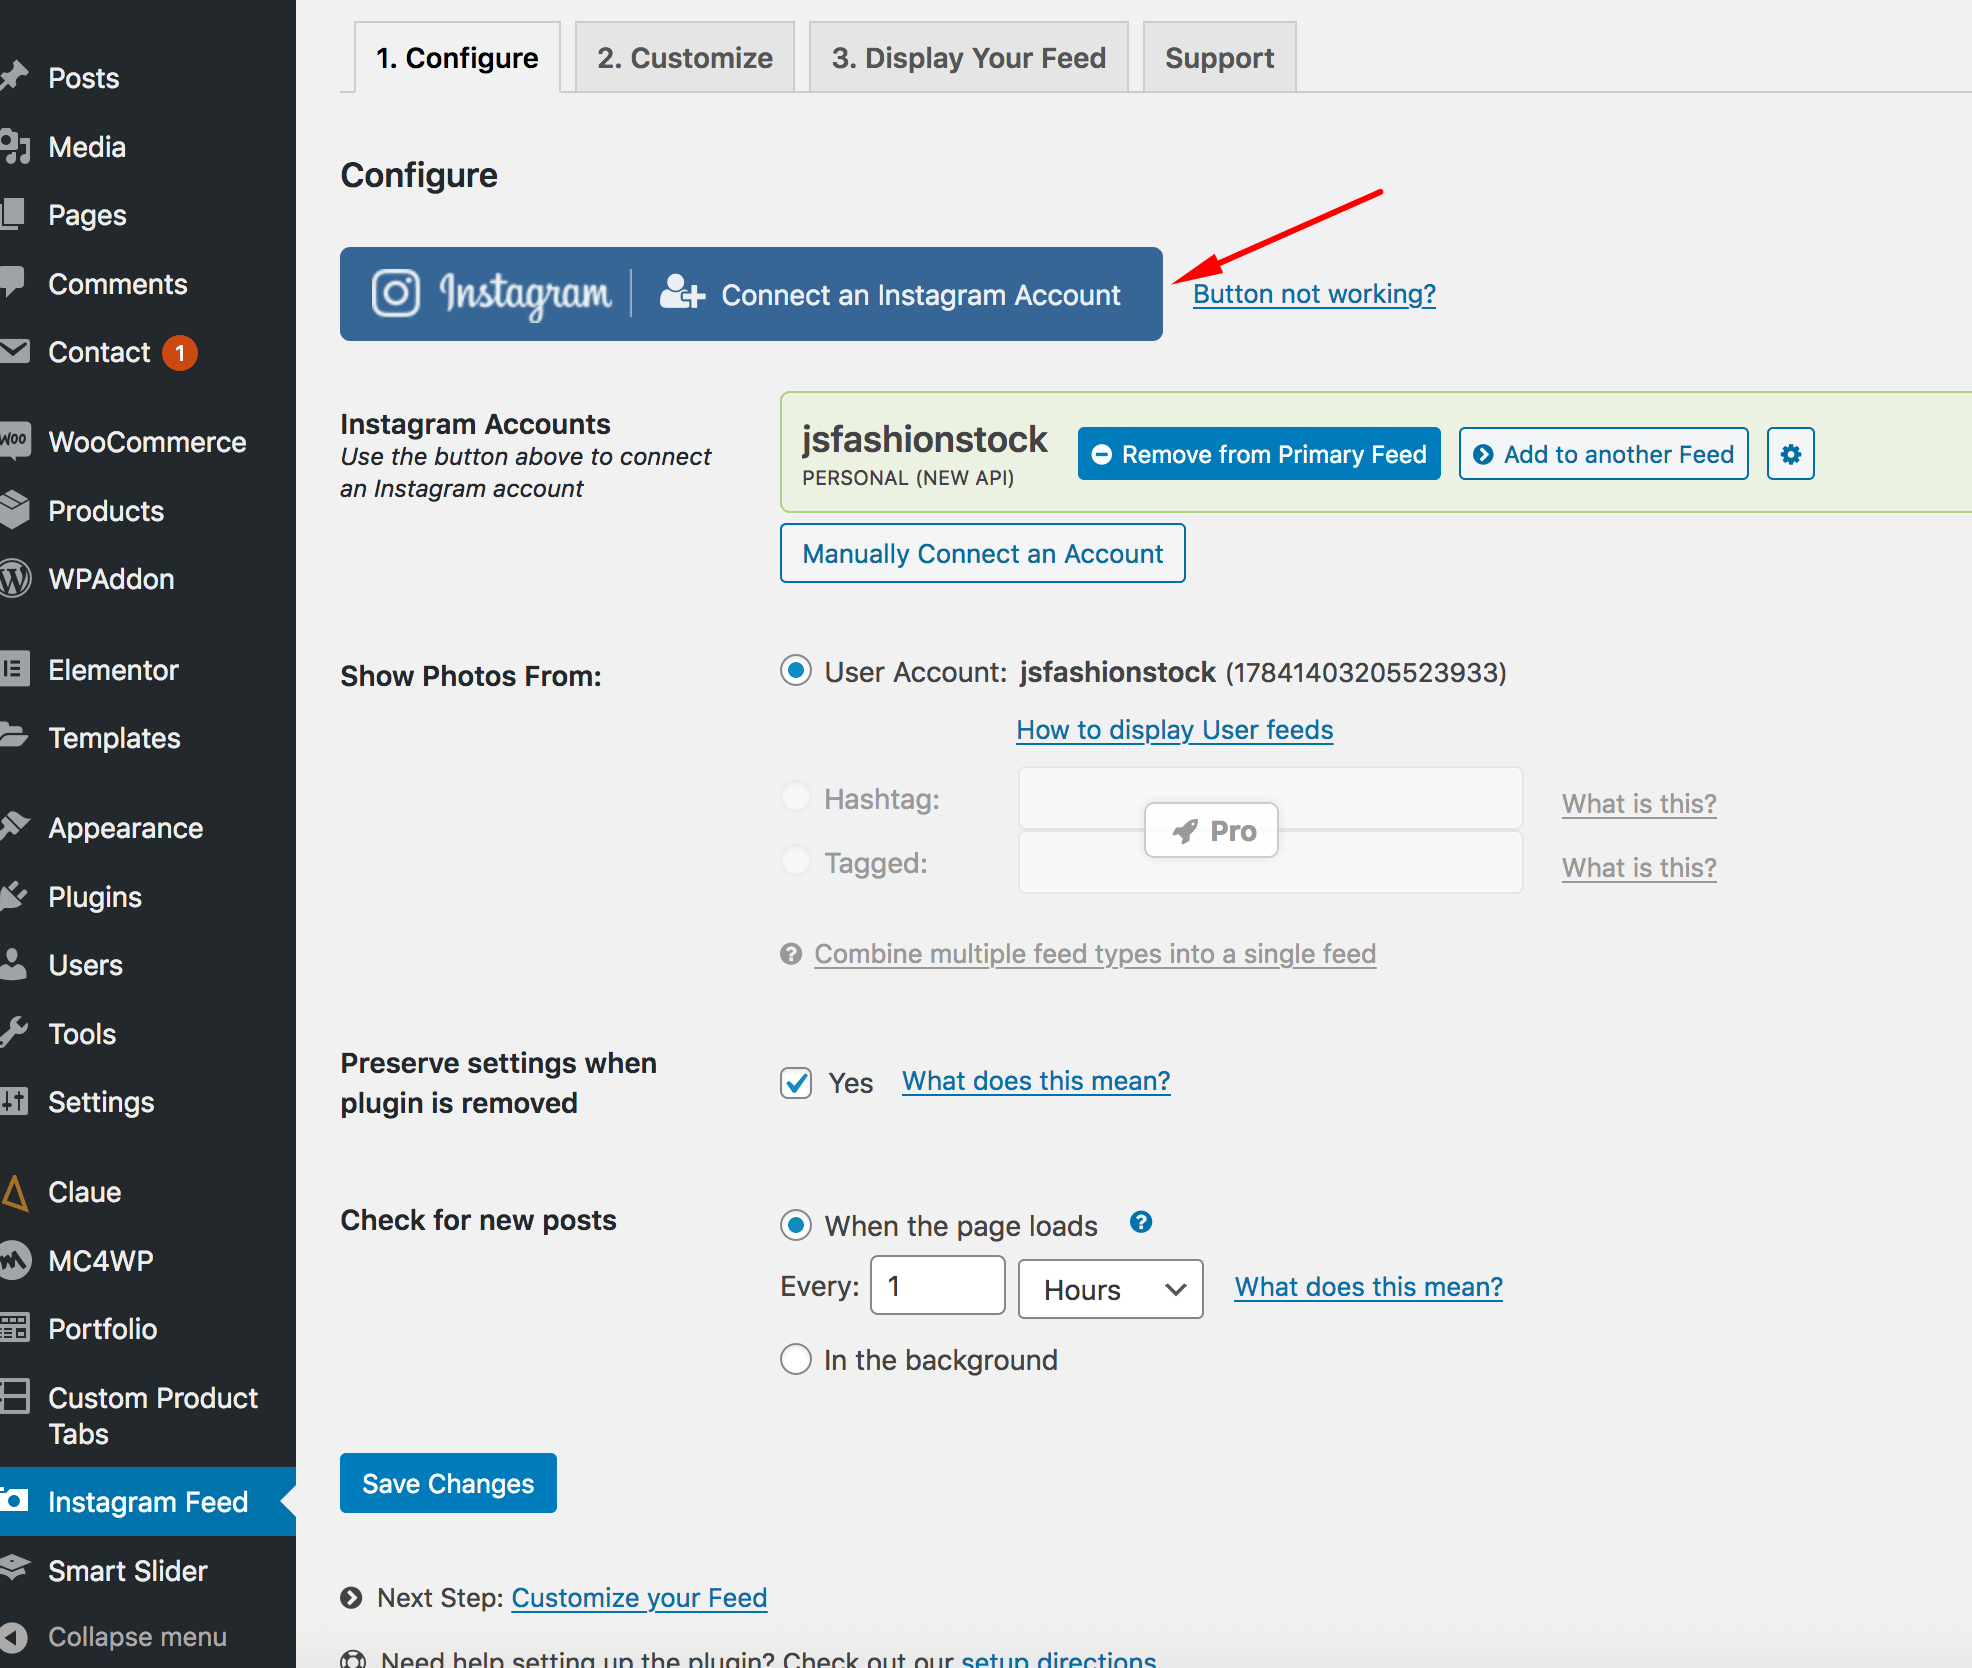
Instagram Feed
1. You need to download install Smash Balloon Social Photo Feedplugin
2. Connect to your Instagram Account
Login your Instagram account first at https://www.instagram.com/
Go to WordPress Dashboard and navigate to Instagram Feed menu
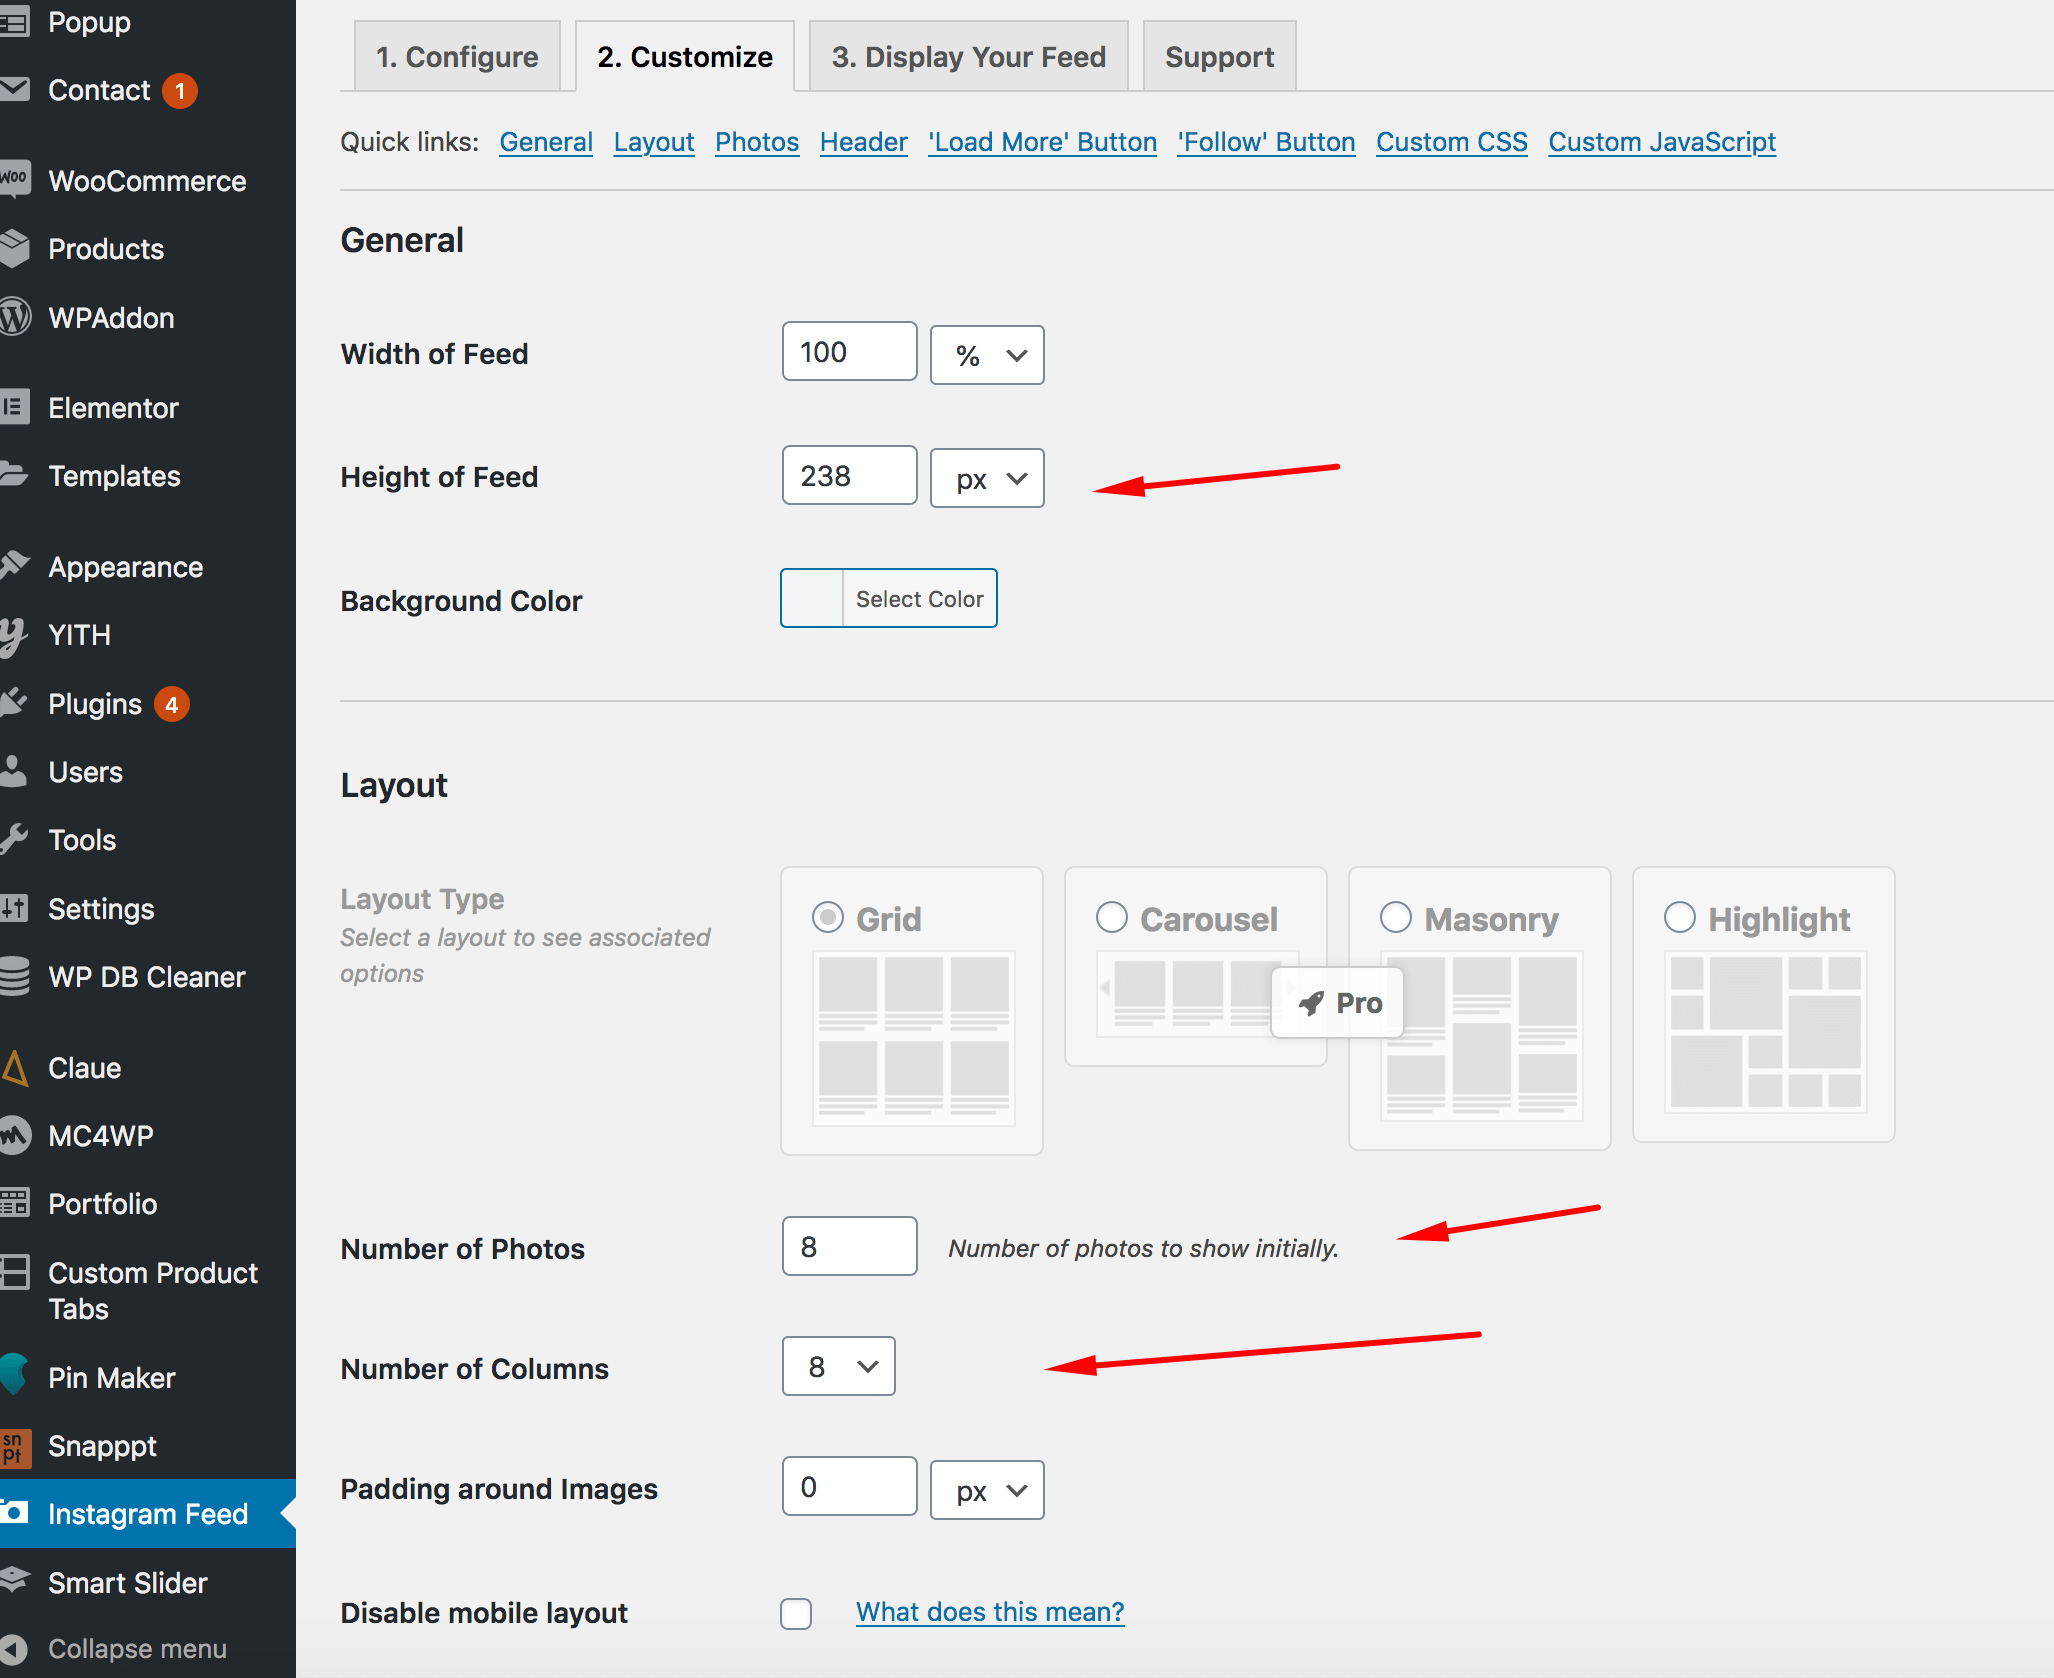
3. Customize Instagram Feed:
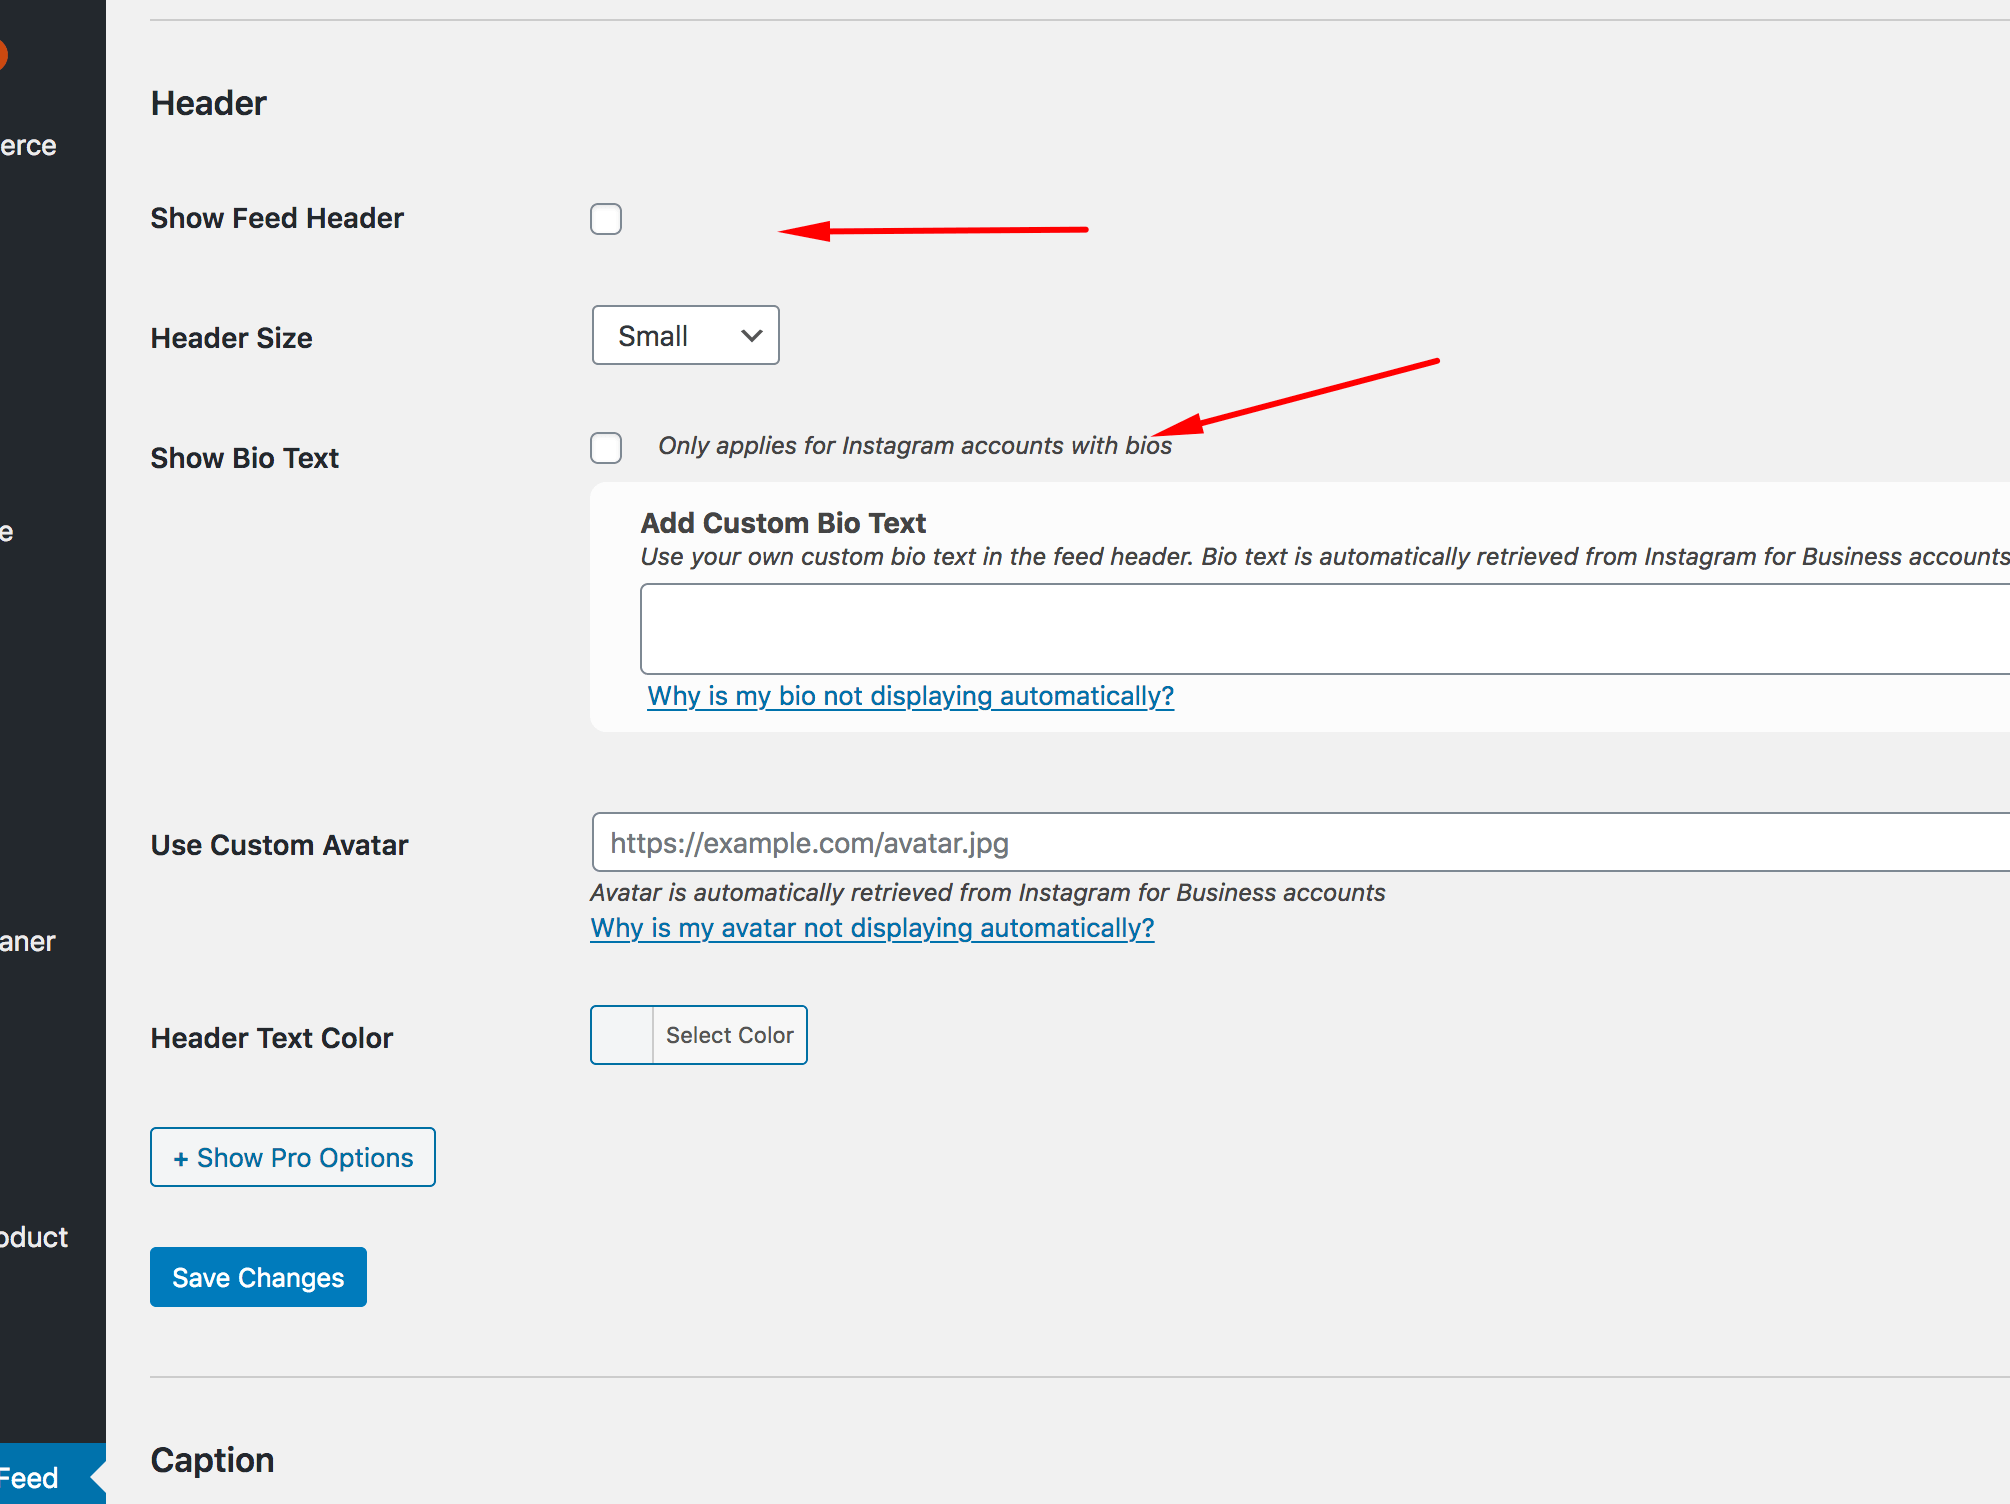
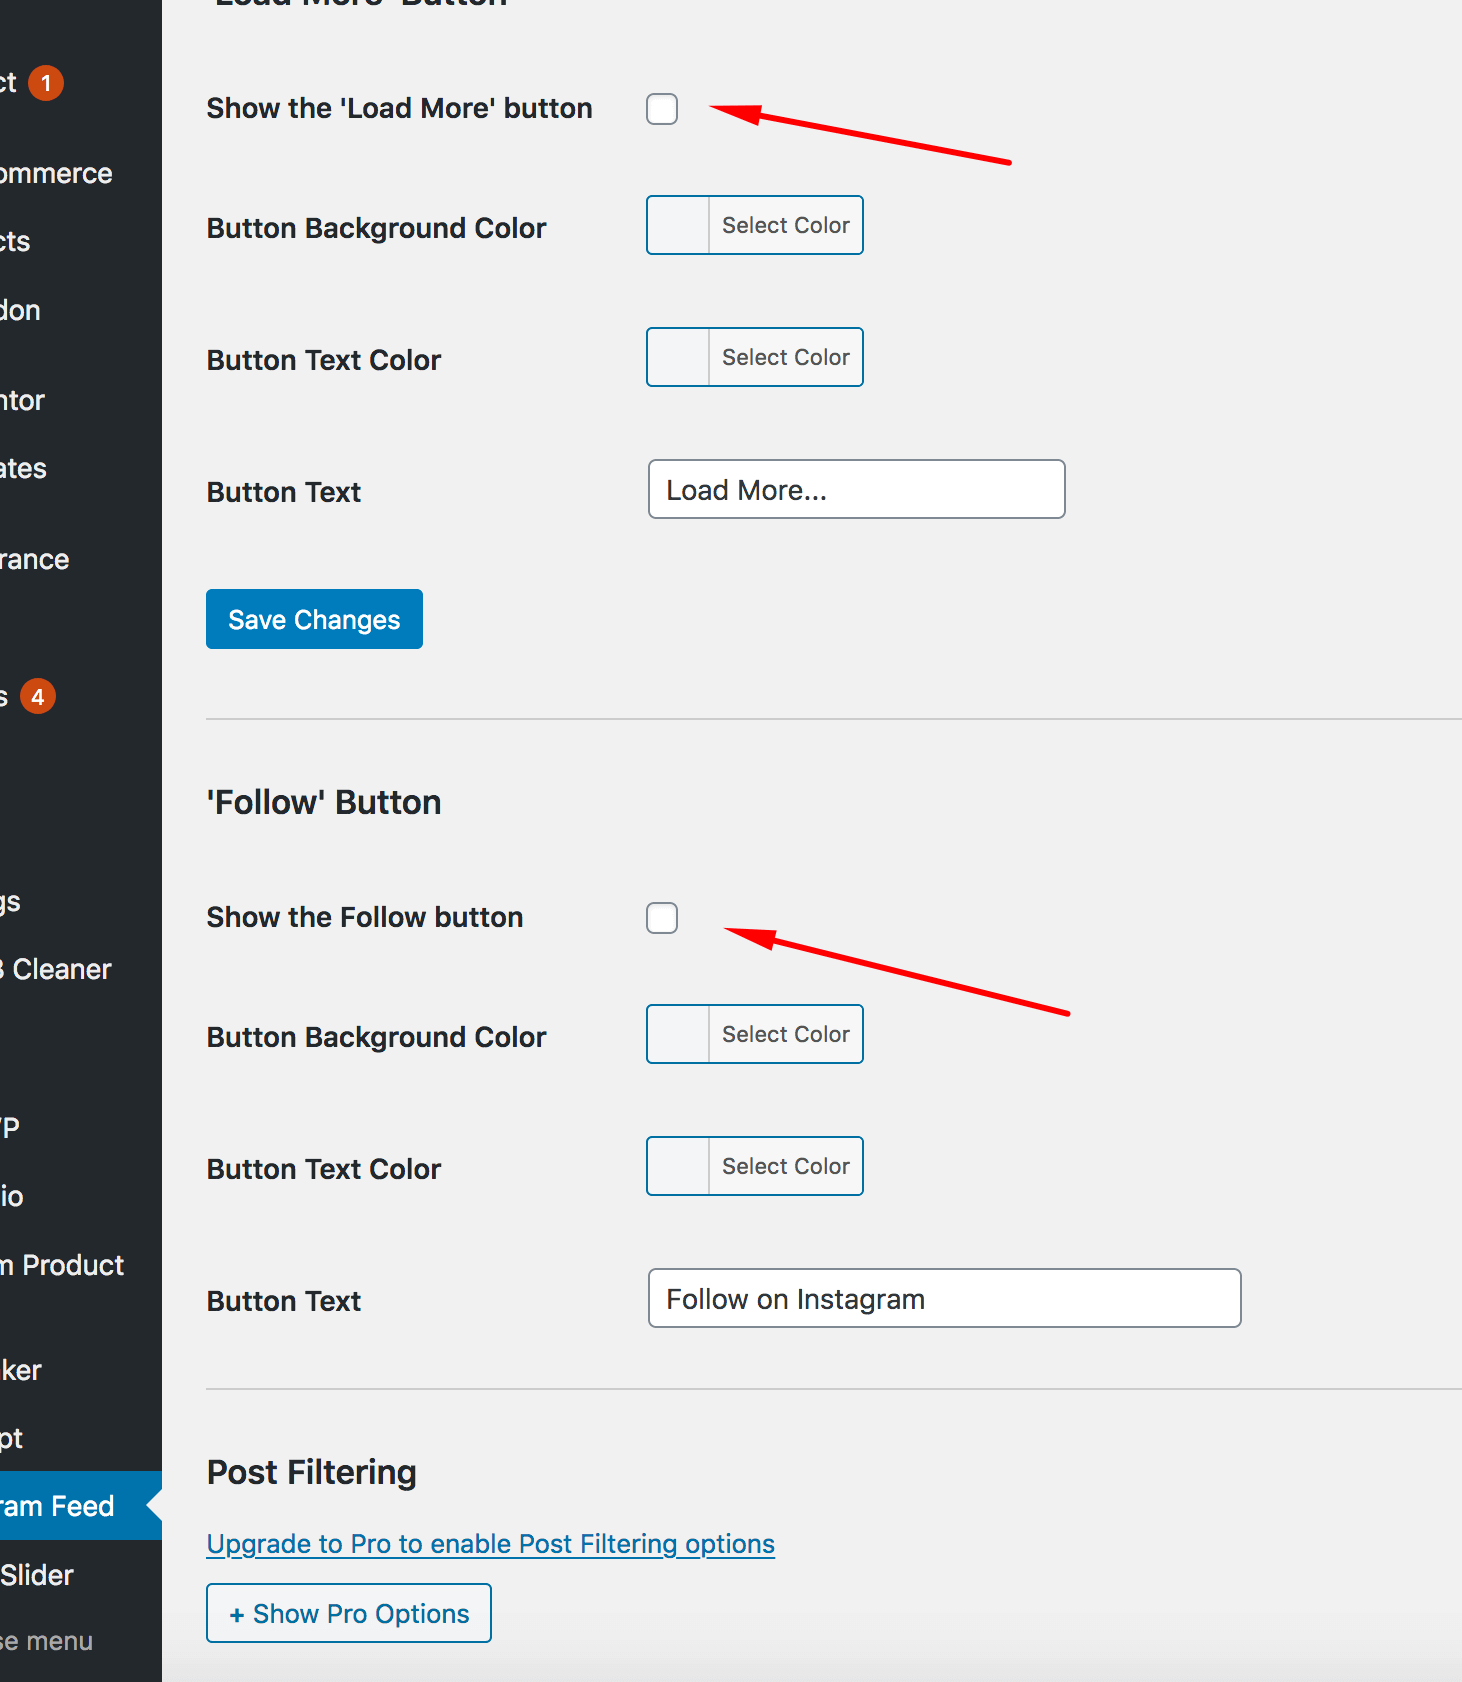
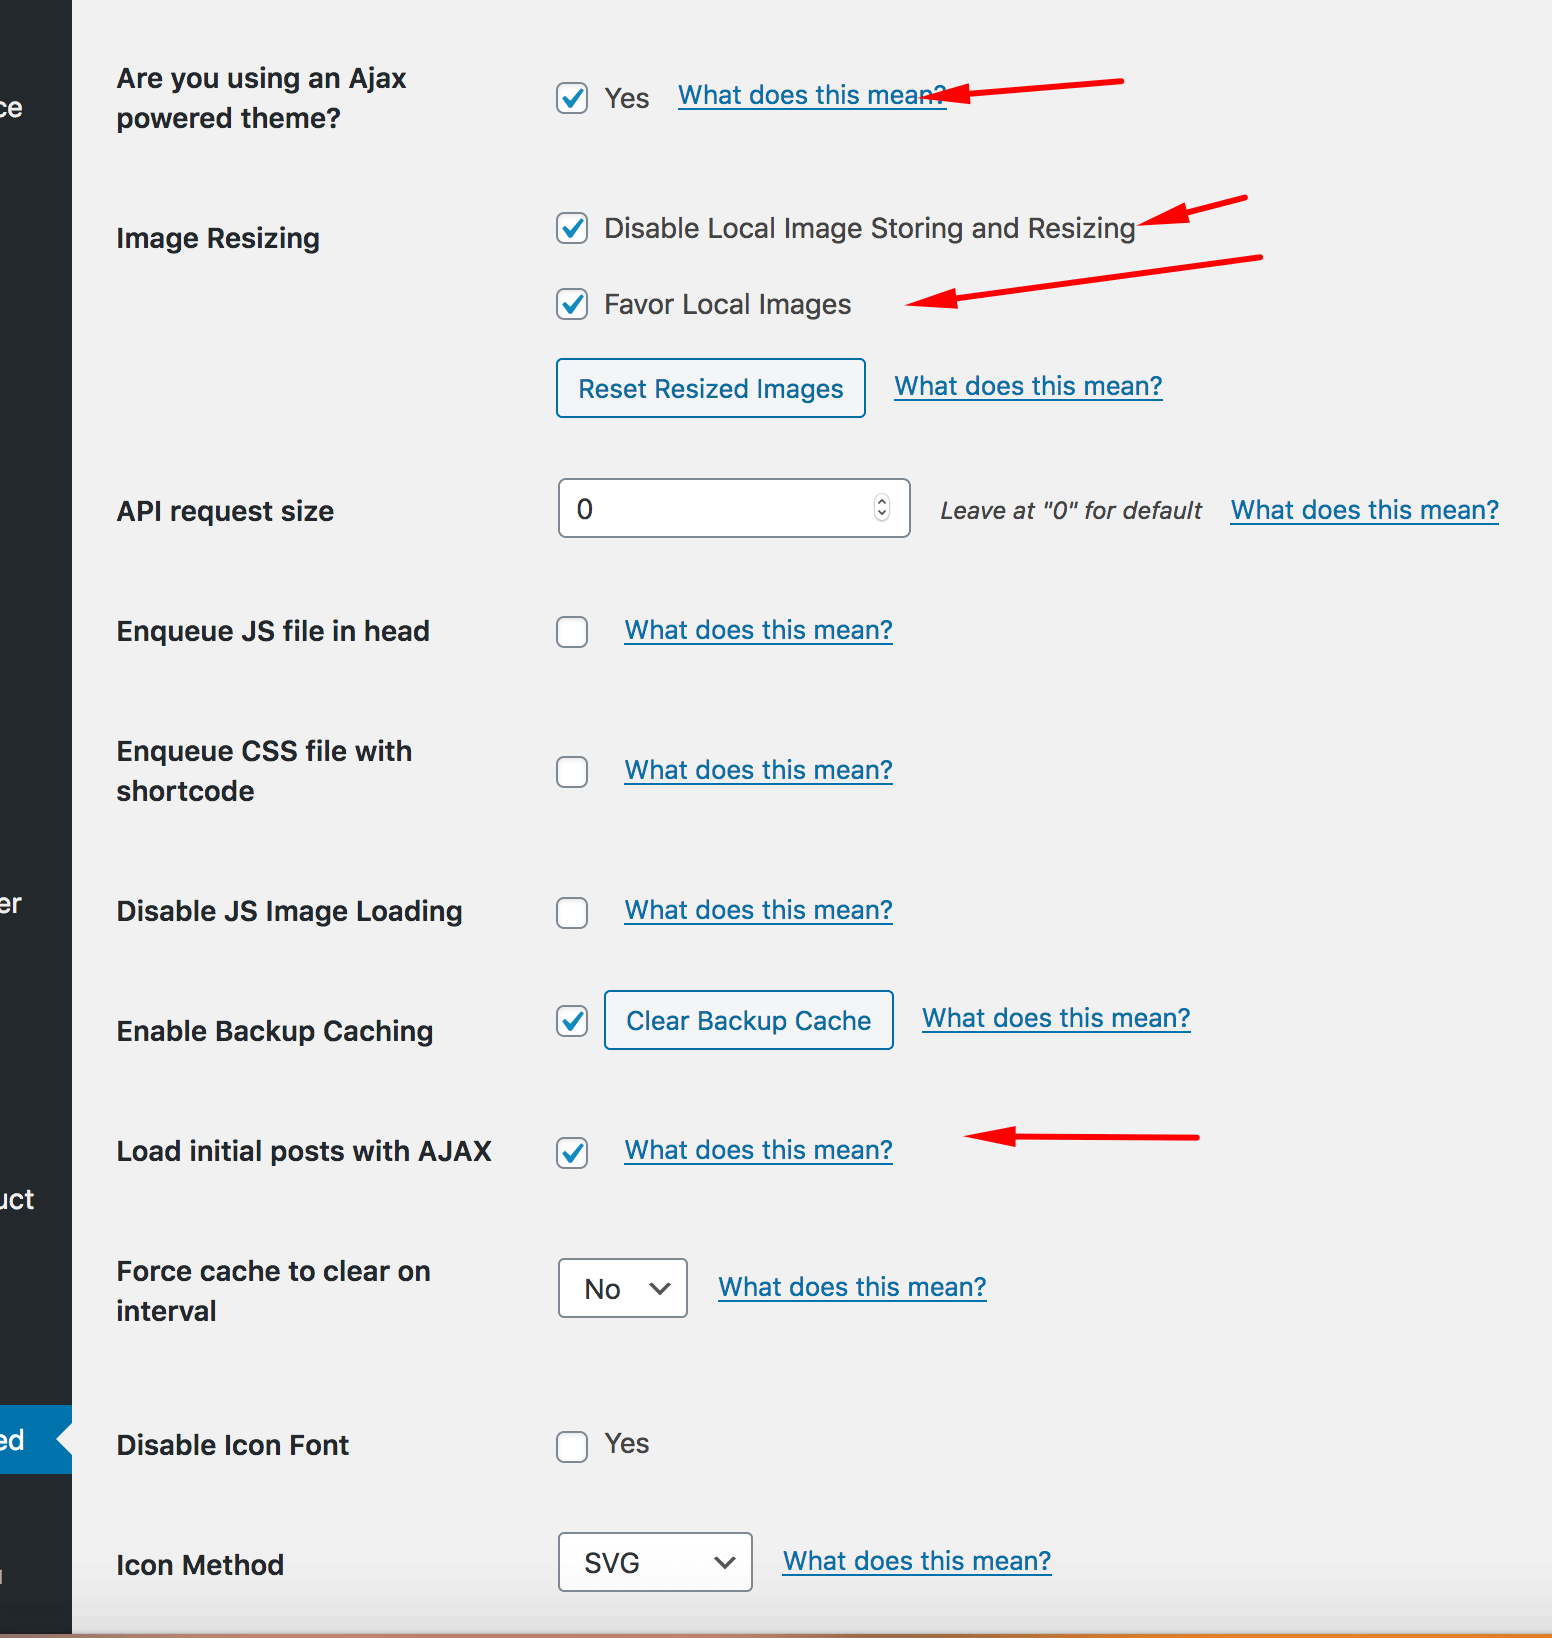
4. Show Instagram Feed:
Add below shortcode to text editor(WPBakery PageBuilder) or add shortcode element (Elementor) or Text Widget of Widget to show your Instagram Feed
[instagram-feed]
Socials Settings
You can setting up your social channel at 'JanStudio > Theme Options > Social Networks.